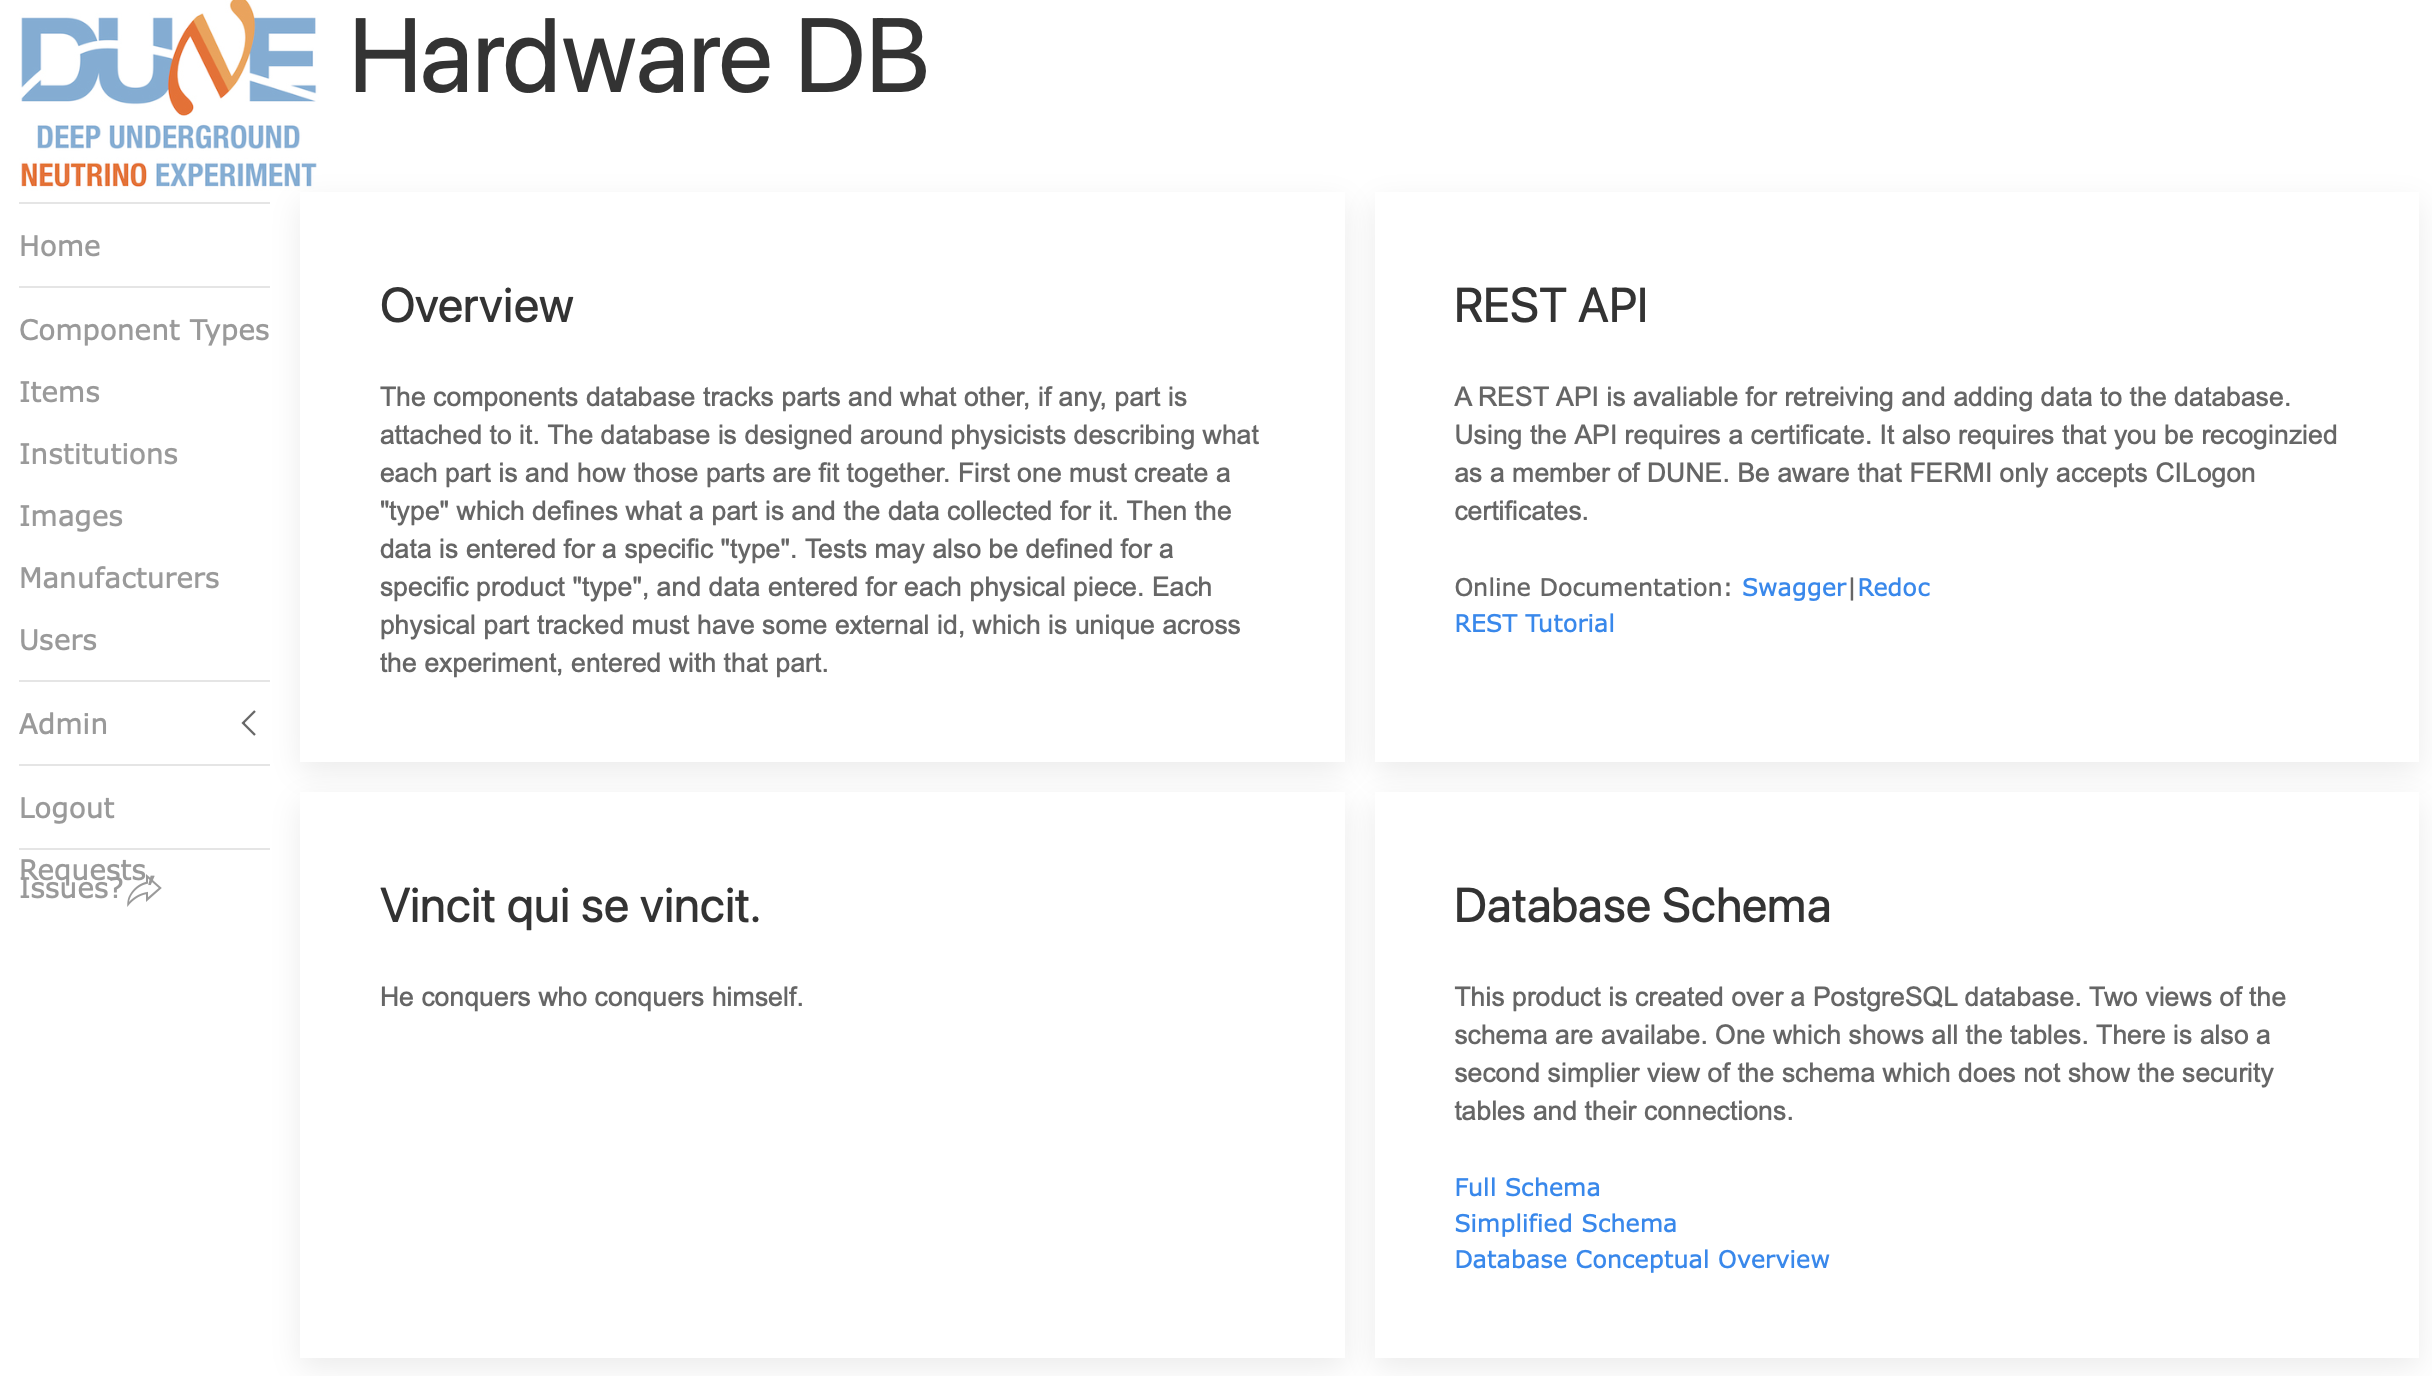
Introduction to DUNE HWDB Training site
Overview
Teaching: 0 min
Exercises: 0 minQuestions
No privilage is required.
What is this website?
Objectives
Introduce instructors and mentors.
Provide overview of this training site.
What is this website for?
The DUNE Hardware Database (HWDB) stores all the information related to a piece of DUNE hardware. It is foreseen as the primary archive of hardware related data. This web site trains you so that you can communicate (read & write) with the HWDB with ease. Towards the end of the trainings (the 6th and the 7th sessions) we also introduce two apps that would help users in communicating with the HWDB as well.
Structure of the training site
It composes of 8 main sessions.
| Session | Description |
|---|---|
| 1. Intro. to DUNE HWDB Training site | This page. |
| 2. HWDB Conceptual Overview and the DUNE PID | It goes over briefly a history of Hardware Database, conceptual overview, and introduce the definiton of the DUNE Parts Identifier (PID), a concept of PID hierarchy, and the three privileges of user account |
| 3. Setting up Component Types and Test Types | Goes through the PID hierarchy with the WEB UI. Then teaches you how to define Component and Test Types, which must be done before inserting actual data to the database. User Roles are also introduced, which restrict which users could edit/create what Types. It goes through these how-tos with both the WEB-UI and the REST API. |
| 4. Data Management using WEB UI | Teaches you how to POST/PATCH/GET Items, sub-components, Locations of Items, Tests, as well as images, including bar/QR-codes, through the WEB-UI method. Also provides some examples of how one could perform searches for Items and Tests. |
| 5. Data Management using REST API | Teaches the identical materials to the 4th session above, but through the REST API method. |
| 6. Using the iPad App | Introduces the iPad app, its requirements, how to obtain it. Shows how easily one could go through the PID hierarchy, scan/generate/print QR-codes, while dealing with information of individual Item Locations. |
| 7. Using the Python HWDB Upload Tool | Introduces the Python-based app, its requirements, how to obtain it. Shows how easily one could upload massive data to the database, even with some complicated DB schema. |
| 8. Inserting Component Types | This page is only for users with the Architect privilege. Describes how to newly create Component Types in the database. |
The 2nd DUNE HWDB Tutorials
The 2nd HWDB tutorials will be held in June XX and YY. For more details, see HWDB Tutorials. The tutorials are based on what this training site describes.
Key Points
This training site is brought to you by the DUNE Computing Consortium.
The goals are to give you the computing basis to communicate with the DUNE Hardware Database.
HWDB Conceptual Overview and the DUNE PID
Overview
Teaching: 30 min
Exercises: 0 minQuestions
No privilage is required.
What is the HWDB?
What are its essential components?
The defintion of the DUNE Parts Identifier (PID)
Objectives
To go over the overview of the DUNE HWDB
To understand the syntax of the DUNE Parts Identifier
Contents
Hardware DB Conceptual Overview
Hardware DB, A Bit of History
- Hardware Database (HWDB) was originally developed and created for NOvA about 2008-ish.00
- by Dennis Box, Margherita Vittone and Steve White with guidance from Jon Paley.
- It was created to track a specific set of parts for NOvA and some tests done on them.

- About 2015 it started being adopted by other experiments including:
- Mu2e, Icarus, SBND, Proto Dune, Ash River (currently under development)
- Known Issues with HWDB
- Supporting a new experiment means creating a new schema from scratch.
- Adding a new type of part/test requires developing and adding a new, distinct table or columns to the schema.
- Good at tracking current state but little to no historical data was kept.
- Very limited API allowing uploading data only.
- Utilizes original, very early, web technology which will not last for the life of DUNE.
DUNE Expands the Requirements

- The full current state as well as past history must be available for each item.
- Requires the complete test history for every item, not just the last one done on item or a history on a few items.
- Robust html access for queries, inserts and updates.
- Ability to see what an item is connected to or what is plugged into it.
- Both current and past history of all connections.
- Support for storage of associated documentation and or photographs.
- Create a unique physical identifier (PID) for every item as well as provide for the generation of their labels. i.e. bar codes.
- For a complete list of requirements: https://docs.dunescience.org/cgi-bin/sso/ShowDocument?docid=23333
DUNE requires a very large set of discrete types of items to be tracked making creating individual tables for each item extremely difficult. Well, impossible.
Hardware Database for DUNE
Hardware Database supports the complete life cycle of each item in the DB for the experiment as a whole.
The figure shows a simplified view of the DUNE HWDB schema (sorry for the fuzziness).
For more details, please refer to: https://cdcvs.fnal.gov/redmine/projects/components-db/wiki.

- Manufacturing / Procurement
- Manufacturer created a component
- Where it was created
- You describe what items is to be stored in the DB, the data to be stored for it. As well as what items are allowed to be attached to it.
- No longer need a developer to add a table for each new type of item.
- You create a definition of what that item is, a pattern if you will.
- Item data is entered according to the pattern.
- Versioning is fully supported with a history of all changes.
- Displays the item according to the version in effect at the item’s creation or last update.
- The entire history of “patterns” and each item is available.
- Testing and Quality Control
- Create any number of tests for each type of item
- Run any test and store its data multiple times. There is no limit.
- View the entire test history.
- Support for Documentation, Photographs, URLS.
- Can be tied to the Patterns, Items and Tests.
- A complete, secure, REST API is available for most of what the forms do.
Accessing the System
- The page the production link is on: https://dbweb0.fnal.gov/cdb/login/sso
- You can also access the development system : https://dbweb0.fnal.gov/cdbdev/login/sso
- All DUNE analysis experimenters have read only access.
- Requires a FNAL services account.
- If you do not do analysis, you may need to be manually added.
- Login using your Fermilab Services account/password.
- We support the lab’s Single Sign On (SSO).
- Non-FNAL accounts are not allowed.
- Security is provided by
- Creating a role for one or more component types
- Adding users to roles.
- Data can be entered through web forms or a REST API.
- The API requires a CILogin certificate for security.
Dealing with HWDB data via Parts Identifiers
Every entry in the DUNE HWDB is associated with a Parts Identifier (PID), which is uniquely defined and assigned by the HWDB, according to DUNE specifications (LBNF/DUNE Parts Identifier: EDMS 2505353). Thus PID allows a user to retrieve and sort the all entries there.
Each entry can be also linked to other entries through PIDs. This provides a concept of PID hierarchy, such as a relation between a parent hardware component and daughter components. E.g., for a given shipping crate PID, one could retrieve its contents as PIDs of the components insides are linked to the shipping crate PID. Or one could have a PID that corresponds to the entire HVS, which is linked to PIDs of CPA+FC+EW modules. And one of those PIDs is then linked to a CPA Plane and so on.. eventually could link down to a raw CPA part.
We’ll start to describe how the DUNE PID is defined below.
PID
The Parts Identifier (PID) is a 32-characters alphanumeric string that is used to uniquely identify all the LBNF and DUNE components that are used during the construction of the LBNF facility (including both the far site at the Sanford Underground Research Facility – SURF and the near site at Fermilab) and of all the corresponding detectors. The parts identifier forms a unique identifier for that part in the hardware database. Each part which has important information associated with it must have a parts identifier assigned so the data can be archived in the hardware database. The parts identifier is used for all equipment bar codes, QR codes, tags and other systems of identification. The PID is composed of 10 fields, of which 7 are required. More information about PIDs can be found under LBNF/DUNE Parts Identifier: EDMS 2505353.

The following is an example of a PID.
D00502301200-00050-US125
      D     = DUNE
      005   = FD1-HD HVS
      020   = CPA
      01200 = DUNE Shipping Crate
      00050 = the 50th item (crate)
      US    = United States
      125   = Argonne National Laboratory
Project Identifier (required)
The project identifier is a single character in the range A-Z representing the major divisions in the DUNE/LBNF enterprise. The designations are as follows:
- D: DUNE (includes approved far detector modules and near detectors)
- I: Integration (includes cryostats, cryogenic plants, system engineering, installation …..)
- L: LBNF (includes Conventional facilities, cavern services, …..)
- P: Future project.
System Identifier (required)
The system identifier is a three-digit (001-999) number representing the major subdivisions in responsibility for LBNF/DUNE. In general, each detector consortium is assigned a separate system identifier and the consortium is then assigned the responsibility of defining the sub-systems and components under their authority.
Click to expand table
| System ID | Description |
|---|---|
| 0 | Invalid |
| 1 | FD1-HD Complete Detector |
| 2 | FD1-HD Instrumented Anode Plane (with Elec and photon Det.) |
| 3 | FD1-HD Anode Plane Assemblies (bare wire planes) |
| 4 | FD1-HD Photon Detection System |
| 5 | FD1-HV HY |
| 6 | FD1-HD Calibration |
| 51 | FD2-VD Complete Detector |
| 52 | FD2-VD Instrumented Top Charge Readout Planes (CRP) (inc. Elect) |
| 53 | FD2-VD Instrumented Bottom Charge Readout Planes (CRP) (inc, Elect) |
| 54 | FD2-VD Instrumented Cathode Plane (inc. PD) |
| 55 | FD2-VD Top Charge Readout Planes (CRP) |
| 56 | FD2-VD Bottom Charge Readout Planes (CRP) |
| 57 | FD2-VD Top Vertical Drift CRP Electronics |
| 58 | FD2-VD Photon Detector |
| 59 | FD2-VD Calibration |
| 80 | FD-2-VD HV |
| 81 | FD1-HD TPC Elec. and FD2-VD Bottom Elec. |
| 82 | FD DAQ |
| 83 | FD Slow Control |
| 84 | FD Cryogenic Instrumentation |
| 85 | FD Integration |
| 86 | FD Installation |
| 100 | ND: Near detector complex |
| 101 | ND: Liquid Argon Near Detection |
| 102 | ND: TMS |
| 103 | ND: Beam Monitor - SAND |
| 104 | ND: DAQ |
| 105 | ND: Slow Controls |
| 106 | ND: Prism Infrastructure |
| 107 | ND: Integration |
| 108 | ND: Installation |
| 200 | FS: Safety |
| 201 | FS: BSI |
| 220 | NS: Safety |
| 221 | NS: BSI |
| 300 | FS: Cryogenics |
| 321 | NS: Cryogenics |
| 400 | FS: Networking |
| 421 | NS: Networking |
| 500 | Computing |
| 600 | FD Cryostat |
| 621 | ND Cryostat |
| 900 | ProtoDUNE-Il complete detector |
| 901 | FD2-VD Module-0 complete detector |
Subsystem Identifier (required)
The subsystem ID is a three-digit number (001-999) defined by the consortium or responsible group. Its purpose is to allow the consortia to separate the major components under their responsibility into subsystems.
Component Type Identifier (required)
The component Type ID is a 5-digit number (00001-99999) used to identify the specific parts in a subsystem. Together with the subsystem ID the component Type ID defines the part inside the consortium scope.
Item Number (required)
The item number is a five-digit number used to specify the exact part in a series and is assigned by the HWDB. It serves the typical role of the serial number in commercial fabrication. Five digits was chosen as the vast majority of components will have less than 100,000 units fabricated. In the handful of situations where this is not the case, different Component Type IDs will be needed for batches.
Country of Origin (required)
The country of origin is a two-character string representing the country responsible for fabricating the part or assembling the sub-components into the assembly (AA-ZZ). The country codes are specified according to the ISO3166 standard (ISO 3166-1 alpha-2). The list of active countries in the DUNE collaboration are as follows:
| Country | Code | Country | Code | Country | Code | Country | Code |
|---|---|---|---|---|---|---|---|
| Armenia | AM | Madagascar | MG | Brazil | BR | Mexico | MX |
| Canada | CA | Netherlands | NL | CERN | CH | Paraguay | PY |
| Chile | CL | Peru | PE | China | CN | Poland | PL |
| Colombia | CO | Portugal | PT | Czech Republic | CZ | Romania | RO |
| Finland | FI | Russia | RU | France | FR | Spain | ES |
| Georgia | GE | Sweden | SE | Germany | DE | Switzerland | CH |
| Greece | GR | Turkey | TR | India | IN | Ukraine | UA |
| Iran | IR | United Kingdom | GB | Italy | IT | USA | US |
| Japan | JP | Korea, South | KR |
Responsible Institution ID (required)
The responsible institution ID is a three-digit number (001-999) representing the institution inside LBNF/DUNE responsible for the part or assembly. The responsible institution is the last of the immutable fields making both the country and institution required information before a part number can be assigned to a given part. The range 001-500 are reserved for the DUNE collaboration institutions. 000 is an illegal value.
Important Reminder
When a PID is assigned, then the corresponding drawing should be associated (stored) with it. This will allow workers in the field to verify that the correct parts were used in the assemblies and installation. If/when a part is to be handled, transported, or assembled into other systems by other group, it must be marked with the PID.This will allow the workers to look up the relevant procedures, drawings, QC steps, and safety info at the installation location. Every shipment (box, crate) must be assigned with a PID. This is crucial in to be able to track the latest locations of parts and the number of parts at certain locations.
PID hierarchy
As you will see in the next session, there is a list of Projects in the HWDB. For a given Project, there is a list of System IDs. And then for a given System ID, there is a list of Subsystem IDs. For a given Subsystem ID, there is a list of Component Type IDs. Finally for a given Component Type ID, there is a list of Items. These form the PID hierarchy and you will learn how to go up and down through these lists in the next session.
Obviously, if a Component Type doesn’t exist, you can’t have the corresponding Items. Similarly, if a Subsystem is not there, there is no way to create the corresponding Component Type. All of these, except Items, need to be created and well defined before a user starts to enter data.
User Privileges
The list of Projects and the list of System IDs have been already created in the HWDB by default. However one needs to define the rest, depending on needs of individual consortium. And not all users are allowed to do such tasks.
There are 3 types of privileges in the HWDB: active, administrator, and architect.
- In general, all users of the HWDB should be active. They are allowed to read and input data.
- Users with administrator privileges can update Component Types, but not allowed to create them.
- Architects can create Subsystems and Component Types.
Among these privileges, administrator and Architects should be assigned to the liaisons from each consortia who are listed here. These liaisons should determine and create necessary Subsystem IDs and Component Types for their own consortia and then provide proper definitions to each of the created Component Types. Please refer to the 8th session on how to create Component Types. In the next session, we will go through how to define Component Types in detail.
Key Points
Component Types, Items, and PartIDs.
Every item must have a PartID attached via a bar/QR-coded label.
A PartID is a unique identifier defined according to the DUNE specifications.
Setting up Component Types and Test Types
Overview
Teaching: 60 min
Exercises: 0 minQuestions
Administrator privilage is required.
How do I define a Component Type and a Test Type with the WEB UI?
How about through the REST API?
Objectives
Users should be able to setup both Component Types and Test Types so that they would be ready to enter actual data.
In setting up a Component Type, users should be also able to define lists of Roles, Manufacturers, and Connectors (Type IDs of sub-components).
Contents
Description Tasks for Administrators and very simplified DB schema Sub-components Tests Very simplified DB schema WEB UI Going through the hierarchy of IDs List of Projects, Systems, Subsystems, and Component Types Defining a Component Type Definition of a Component Type Managed by Permissions of editing a Component Type definition Manufacturers List of Manufacturers, creating and editing Specifications DB schema for a Component Type Connectors where sub-Component Types are defined SPEC LOG History of Specifications Defining a Test Type Definition of a Test Type REST API Going through the hierarchy of IDs with the REST API List of Projects, Systems, Subsystems, and Component Types GET a list of Projects GET /projects GET lists of Systems, Subsystems, and Component Types GET /systems, /subsystems, and /component-types Defining a Component Type with the REST API PATCH & GET /component-types/<type_id> Defining a Test Type with the REST API POST & GET /component-types/<type_id>/test-types Some other useful endpoints List of some useful REST API endpoints
Tasks for Administrators and very simplified DB schema
We now know how a PID is formed and there are three types of user privileges. One of the privileges, Administrator, allows to edit Component Types. In this session, we will go through what Administrators need to do before active users can start to enter data.
Sub-components
While editing a Component Type, Administrator can also define sub-component Types. A sub-component is a component (Item) that is linked to another component (Item). This is a very powerful functionality, allowing user to trace various related Items for a given single PID. We will show how this is done later in this session.
Tests
For a given Item, there is a place to store Test results. Actually it doesn’t have to be a Test result.One could store there anything that is associated with that Item. It is Administrator’s job to create/define Test Types for each of your Component Types. And for a given Component Type, one could create multiple Test Types. Again we will go over how this is done later in this session.
Very simplified DB schema
The picture below shows a very simplified DB schema, in which one can see that Administrators define Component Types, Sub-component Types, and Test Types, while ordinary (active) users enter data and Test data.
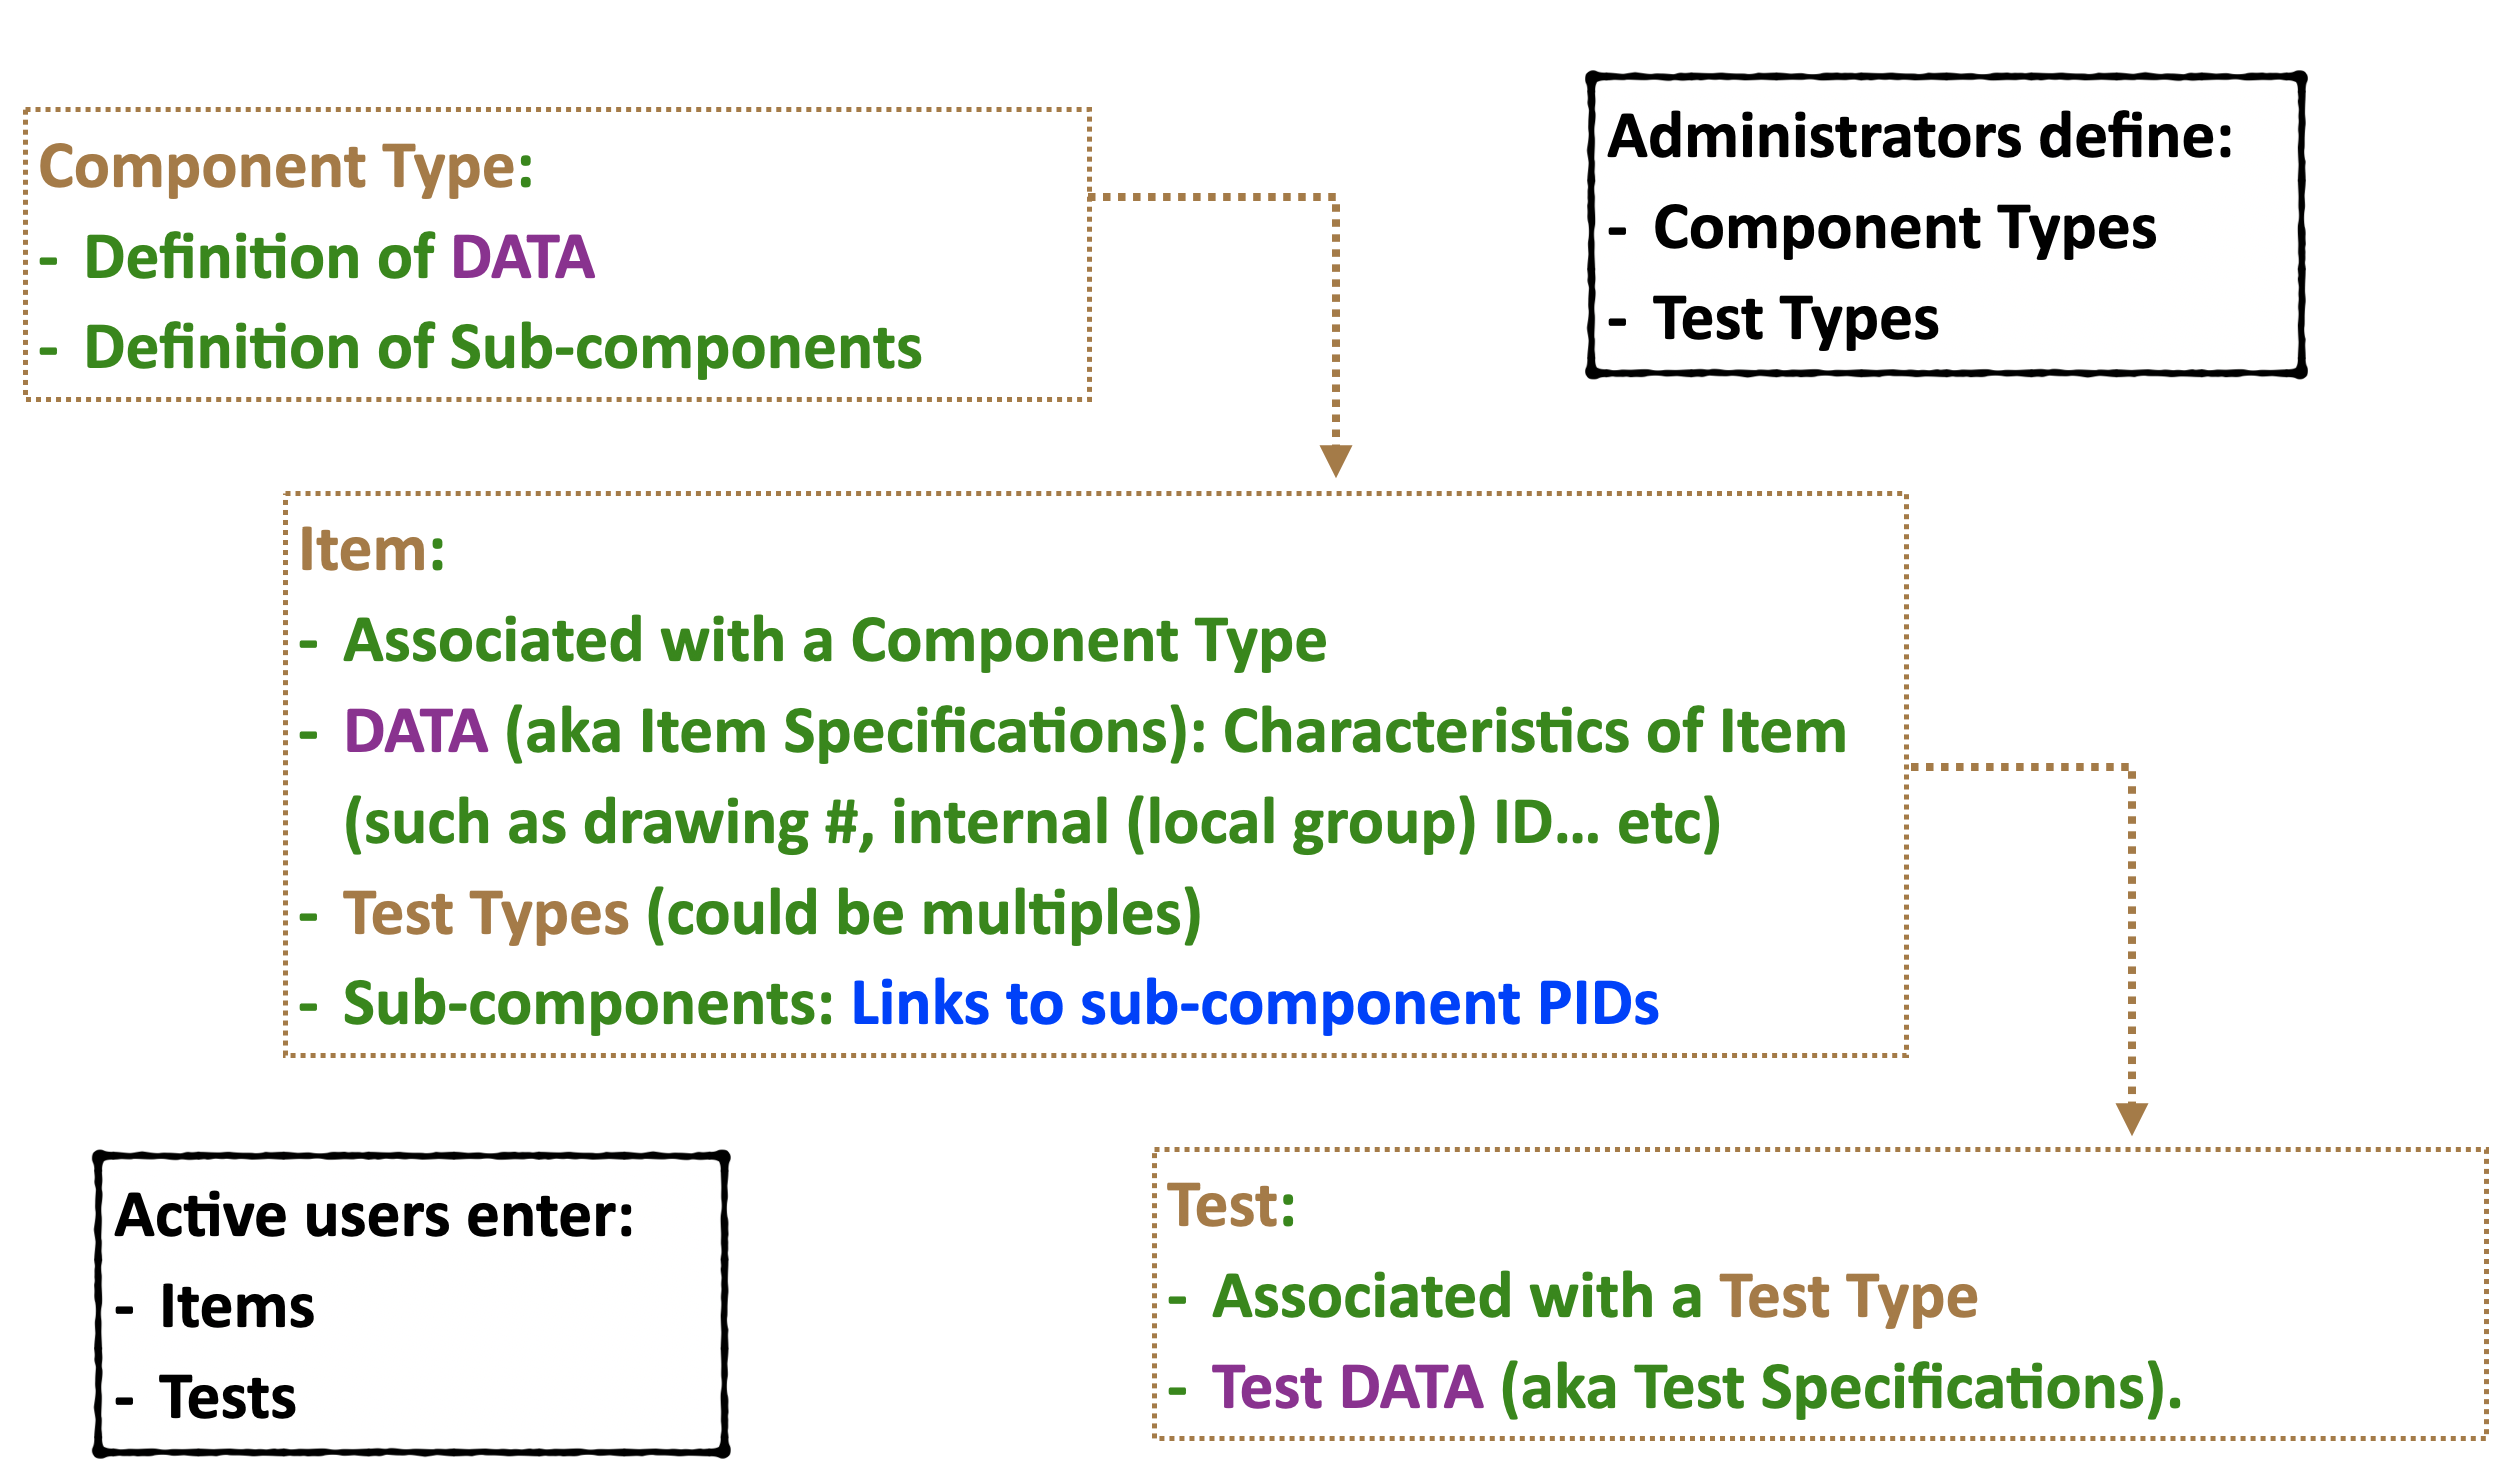
For the remaining of this session, we will go through how Administrators achieve these tasks in two different ways:
- WEB UI: user-friendly, intuitive, probably one wouldn’t want touse this method for repetitive tasks.
- REST API: executed from command-line or communicated directly from your preferred programs.
WEB UI
One can access to the two versions of the HWDB from these addresses.We will use the development version in this session.
Production version : https://dbweb0.fnal.gov/cdb/login/sso
Development version: https://dbweb0.fnal.gov/cdbdev/login/sso
Go ahead to log into the development version. Once logged in, you should be seeing the opening page like below:
Going through the hierarchy of IDs
In the previous session, we introduced a several different types of IDs:
Project, System ID, Subsystem ID, and Component Type ID.
With the WEB UI, one can go down (and up) such hierarchy of IDs easily.
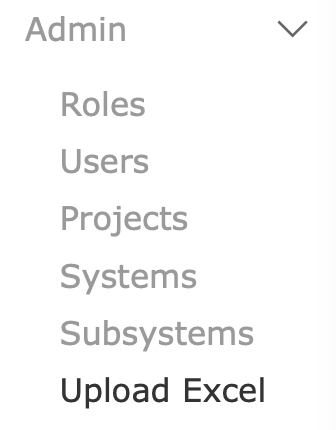
Click Admin in the side-menu. It will show a sub-menu as shown here. One can select any of the three, Projects, Systems, or Subsystems to get into each of these lists.
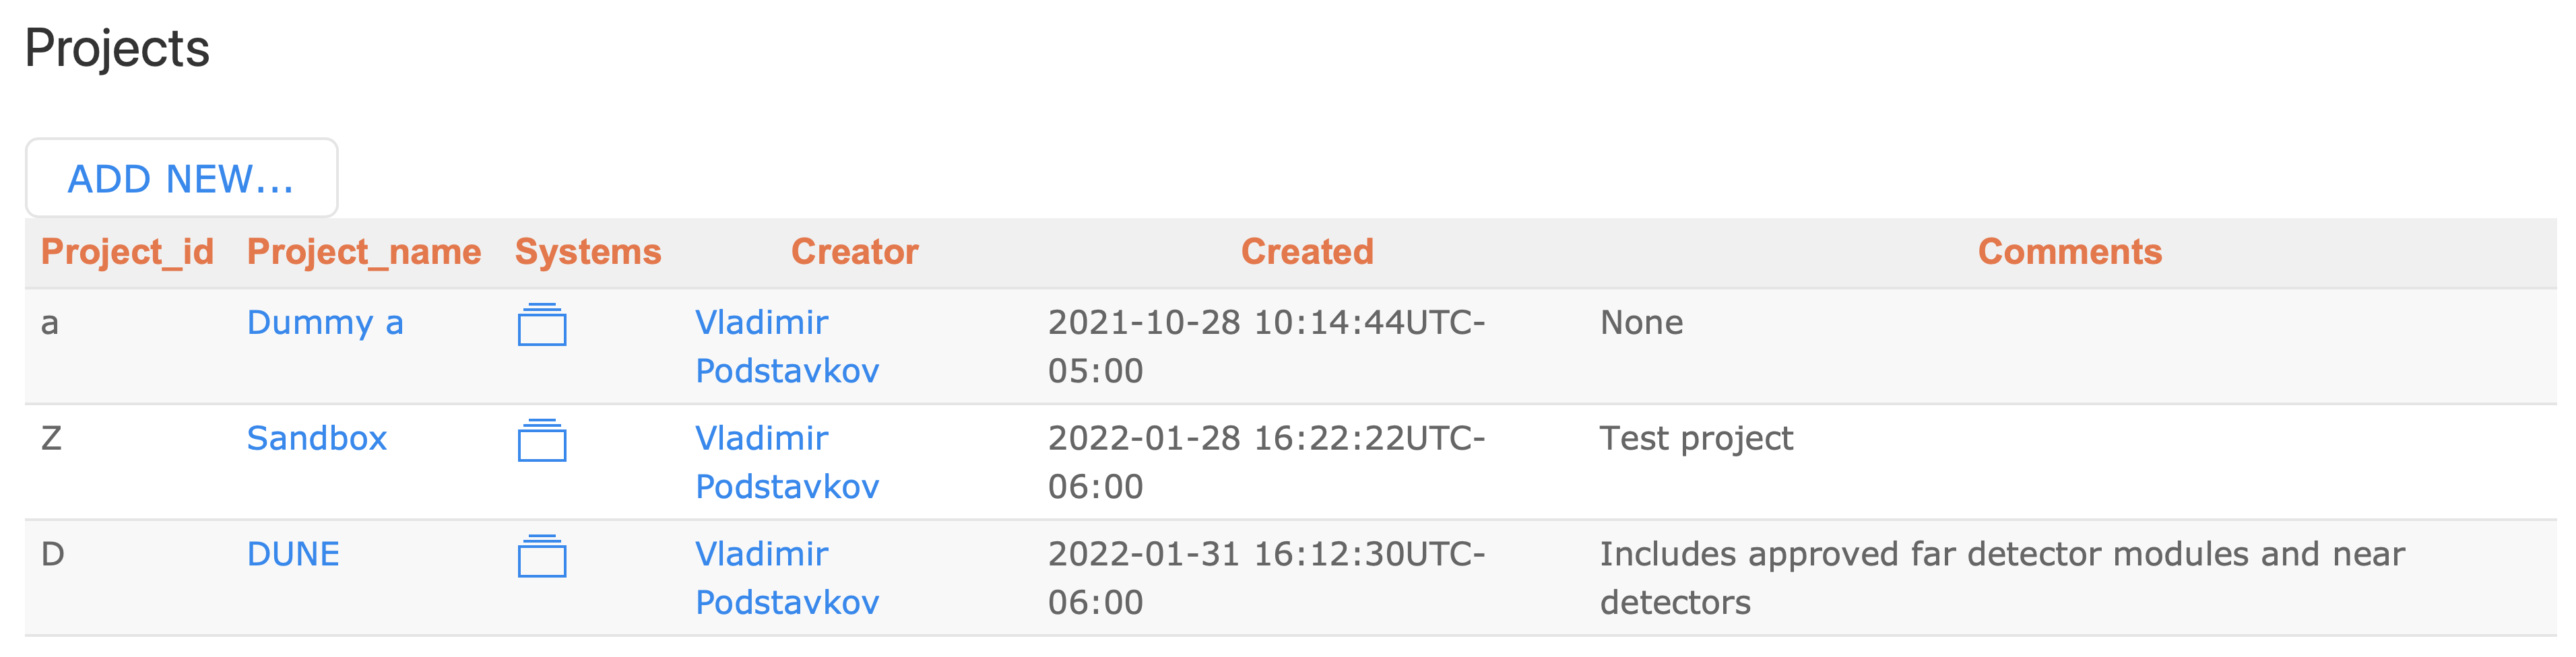
Let’s start with the root by clicking Projects in the above sub-menu. You should be seeing a list of currently available Projects in the HWDB like this:
Now let’s click the folder in the DUNE row & Systems column. This will show a list of Systems (individual System names along with System IDs) that correspond to the DUNE project as shown below:

Similarly let’s display a list of Subsystems of the System, FD2-VD HVS by clicking its folder icon. You should be seeing a Subsystem list like shown below:

By the way, in these lists we have seen so far (currently Subsystems), one can also click individual name (i.e., Subsystem name) to see the corresponding definition. We’ll come back to this shortly.
Now let’s pick a Subsystem, Field Cage Spacer Bar and see a list of its Component Types by clicking its folder. You should be seeing a list of Component Types shown below:
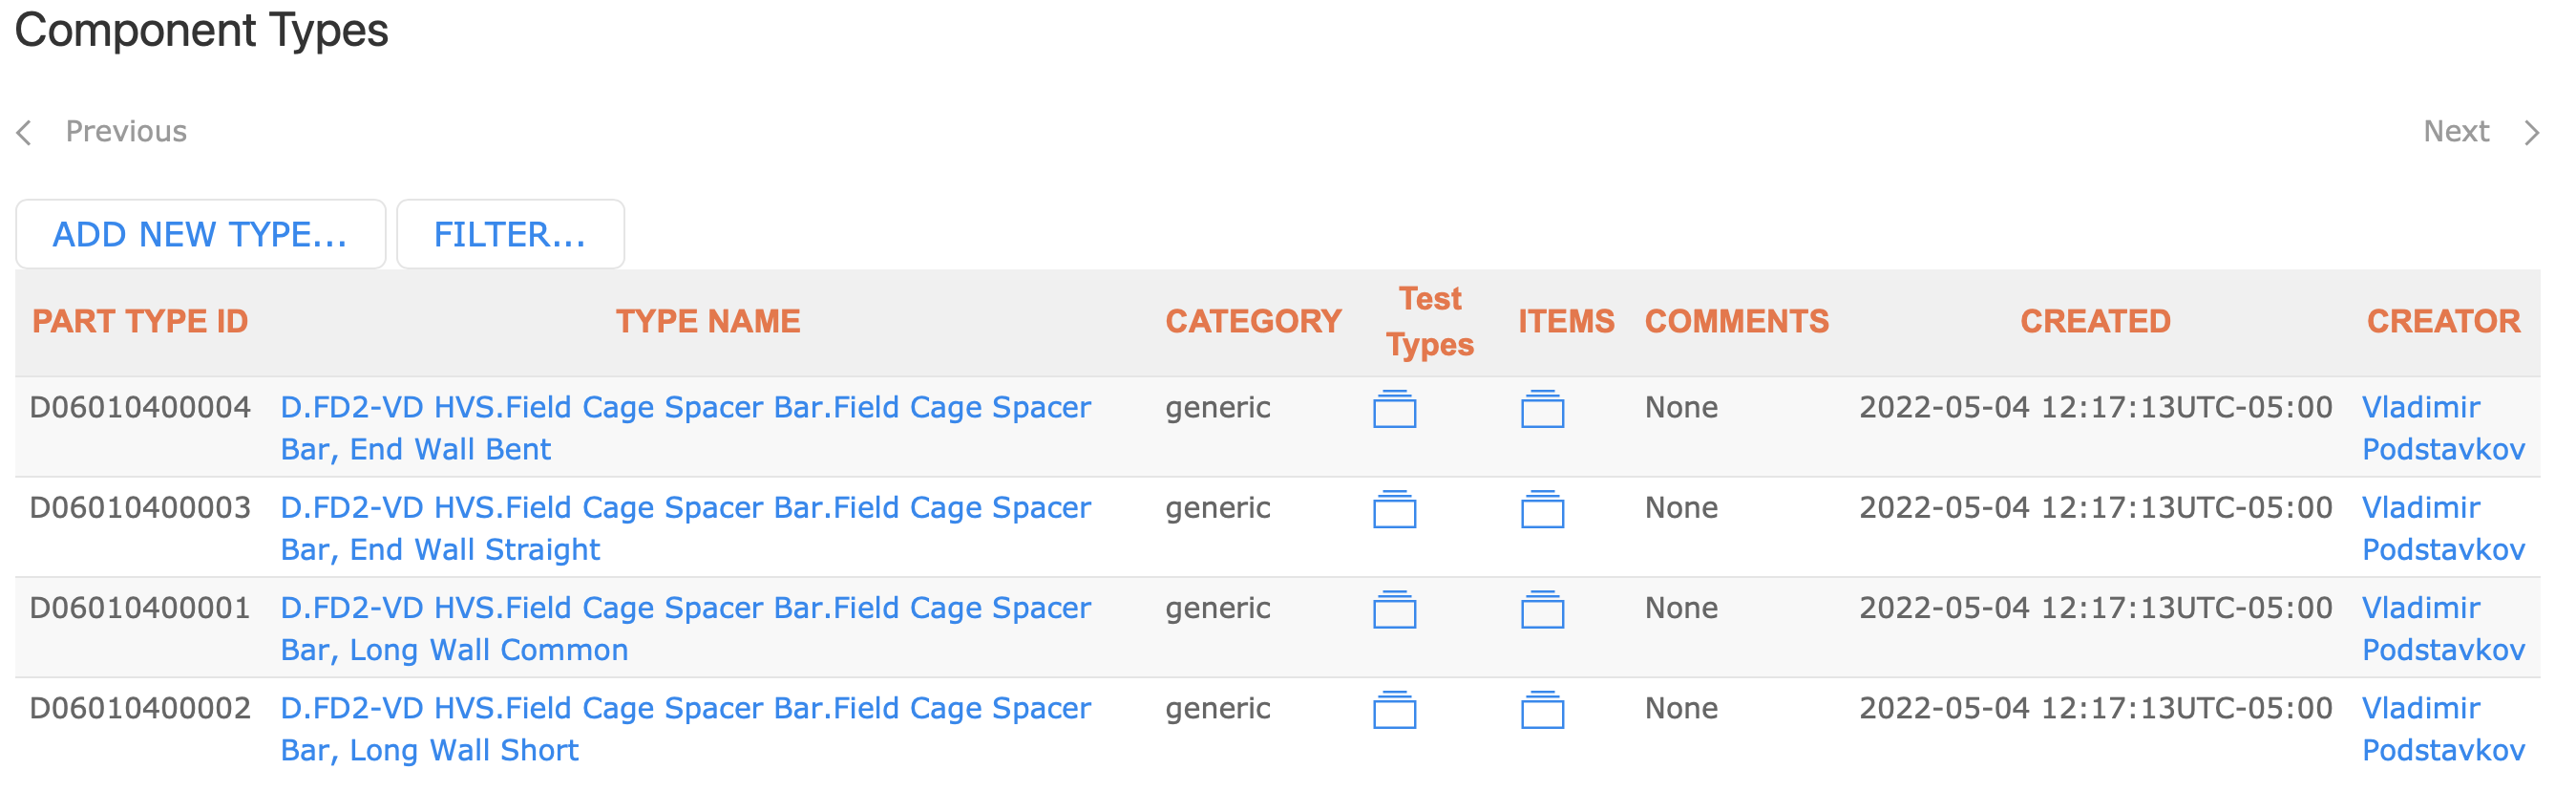
Four Component Types for Field Cage Spacer Bar are seen. In this list one can click the ITEMS or Test Types columns to see a list of the corresponding Items or Test Types, if it exists, respectively.
Defining a Component Type
Now that we can go through the hierarchy of existing IDs, let’s edit one of the existing Component Types.Pick one that you like to modify. As an example, we’ll modify the Component Type, CPA Parts FR4 bottom frame (type id = Z00100100017) here.
First, let’s find the Component Type.
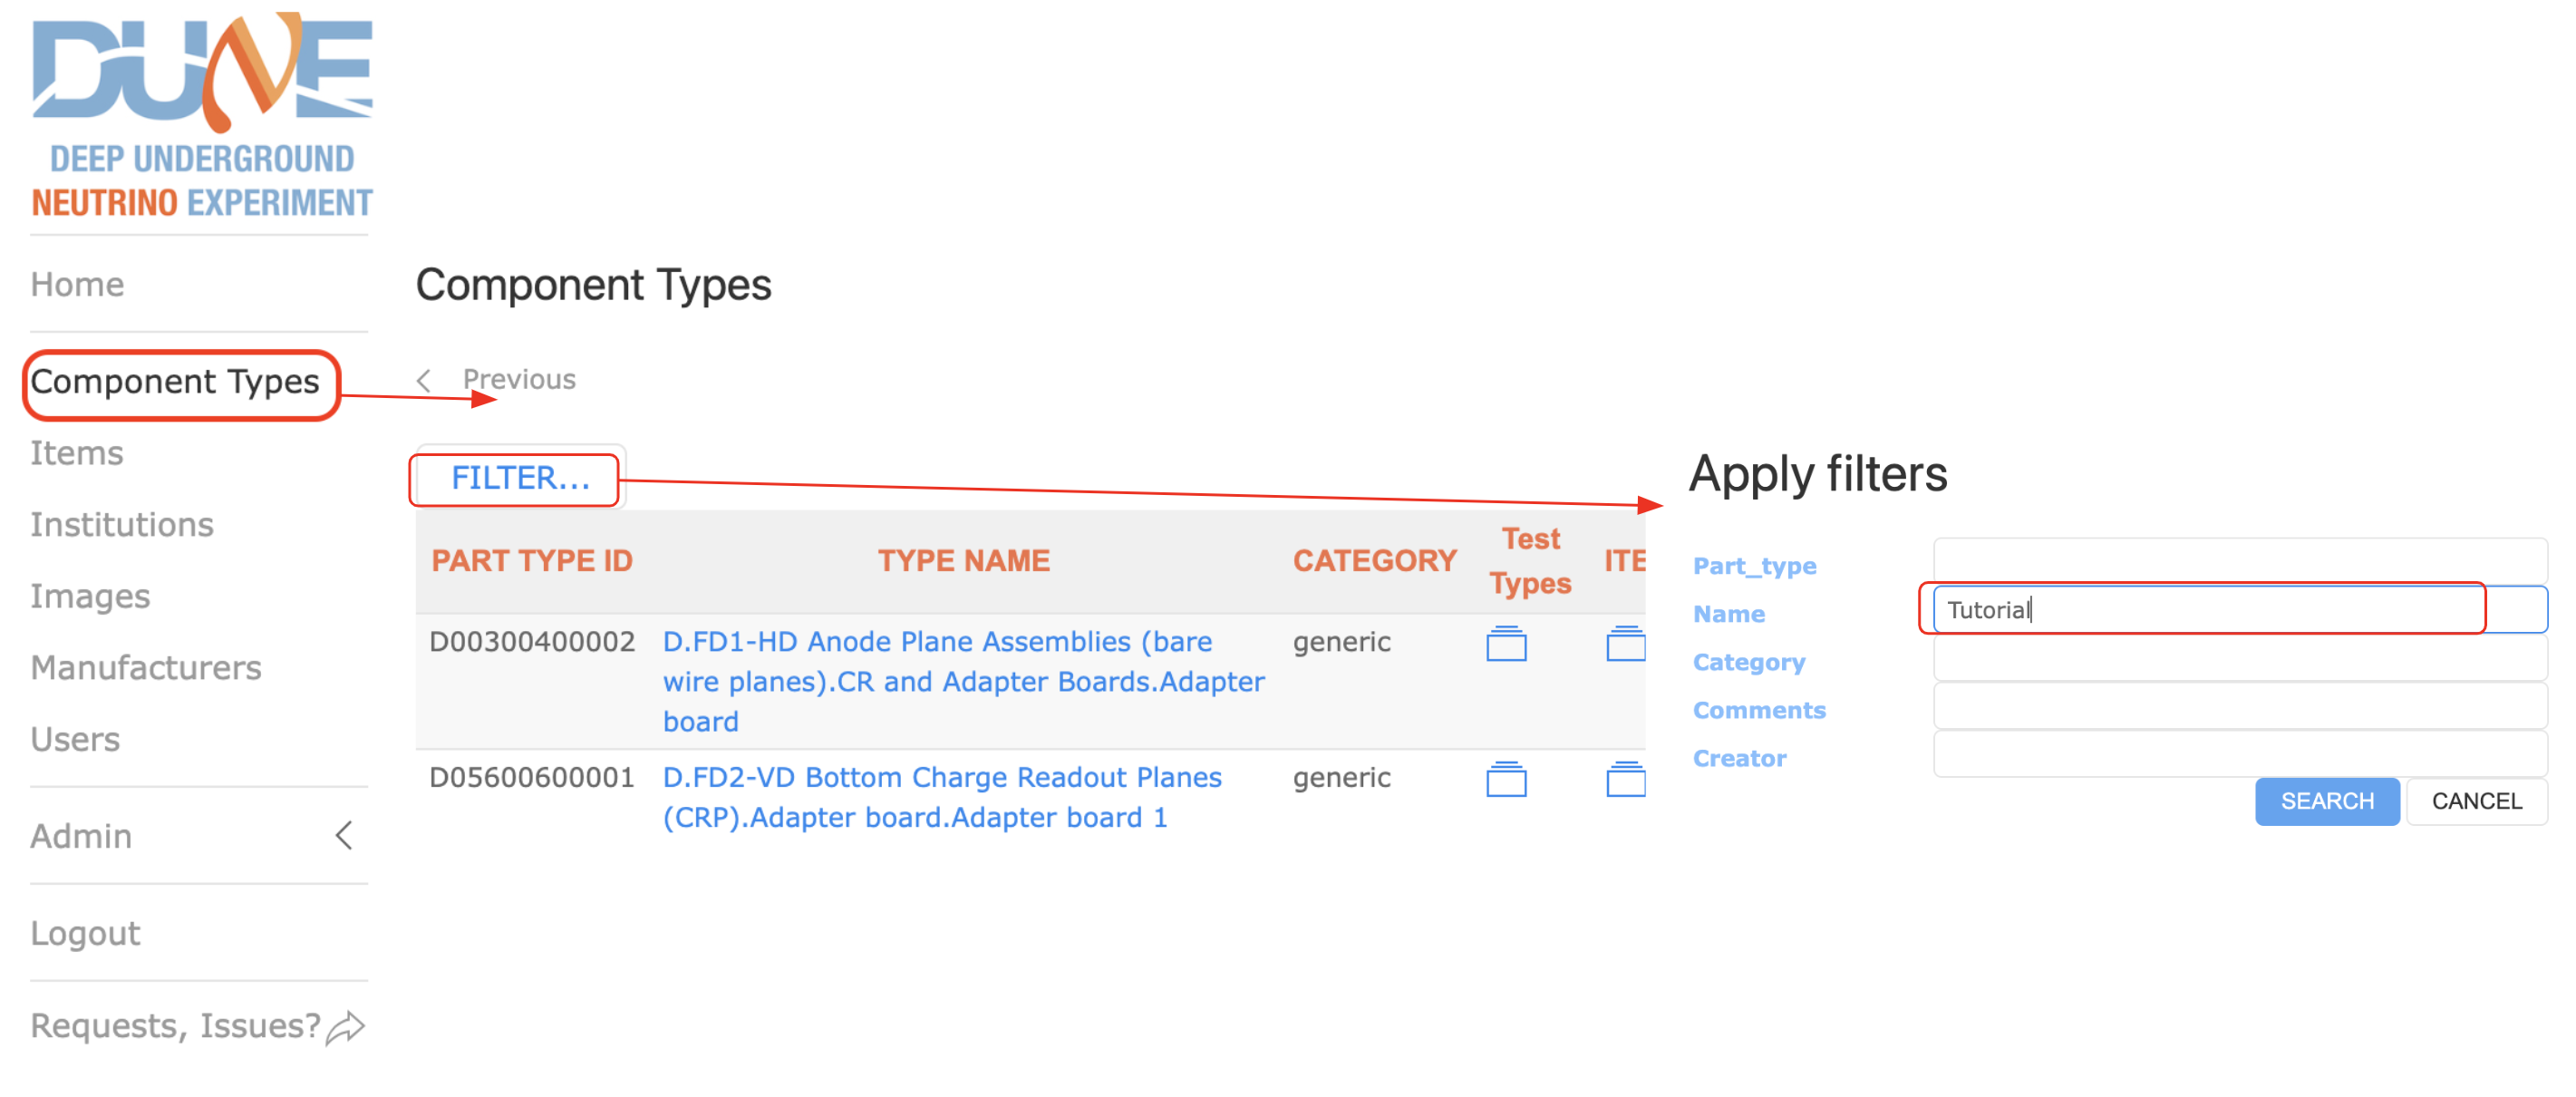
From the side menu, click Component Types and then click FILTER….
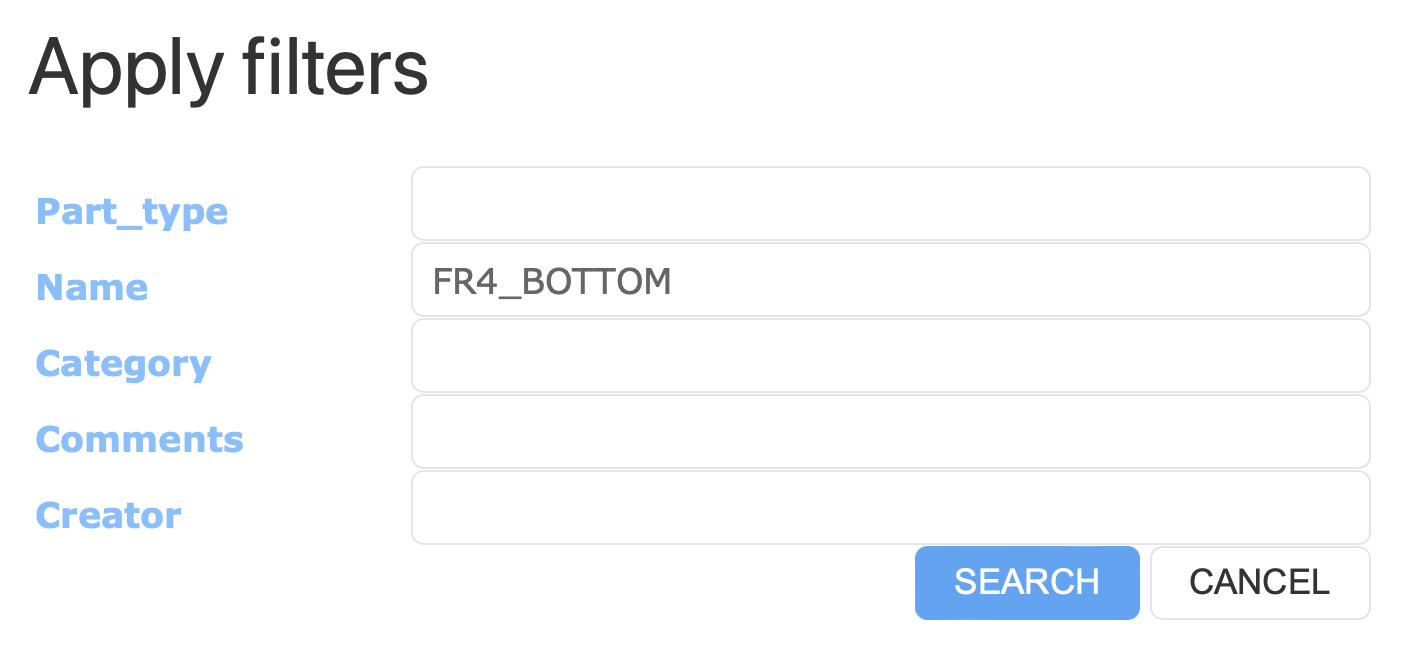
In the Apply filters window, you can provide the corresponding type id to the Part_type field, if you already know the type id you are looking for.
You could also provide a part of the Component Type name, like FR4_BOTTOM to Name field as shown below. It is case-insensitive here. Now hit the SEARCH button.
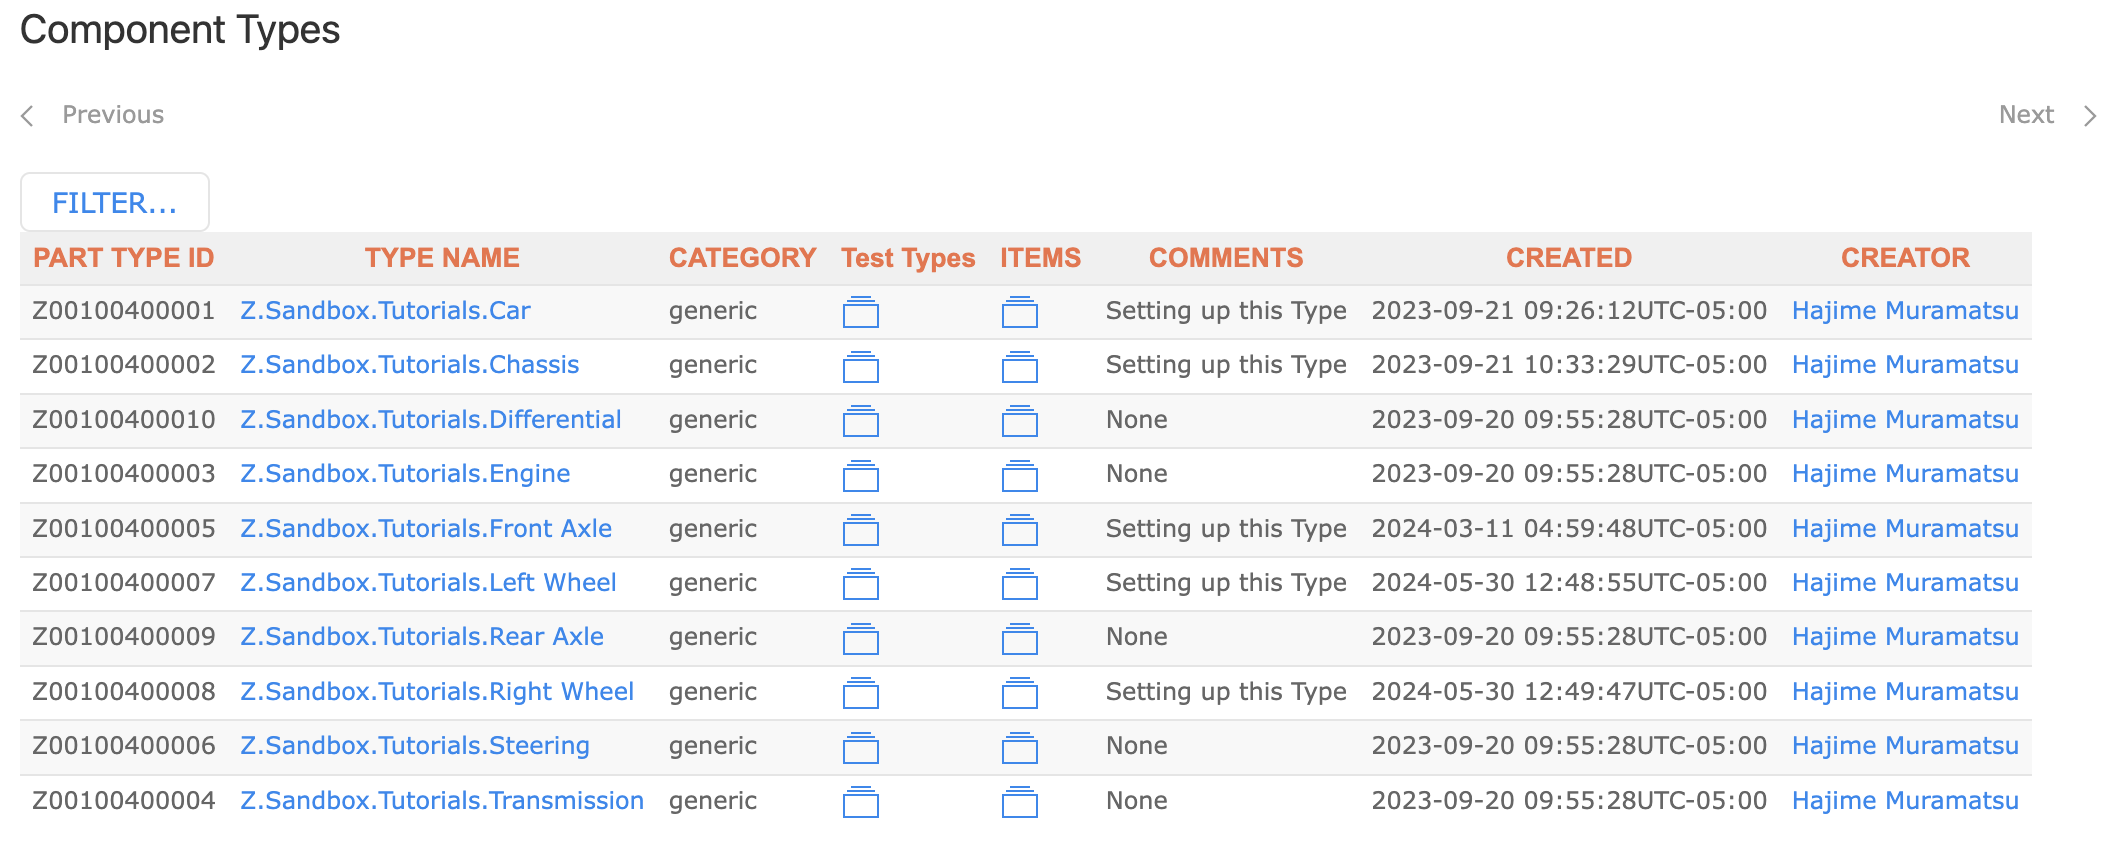
After filtering the Component Type list, you should be seeing the type you were looking for.
Clicking its TYPE NAME should display its definition as shown below:
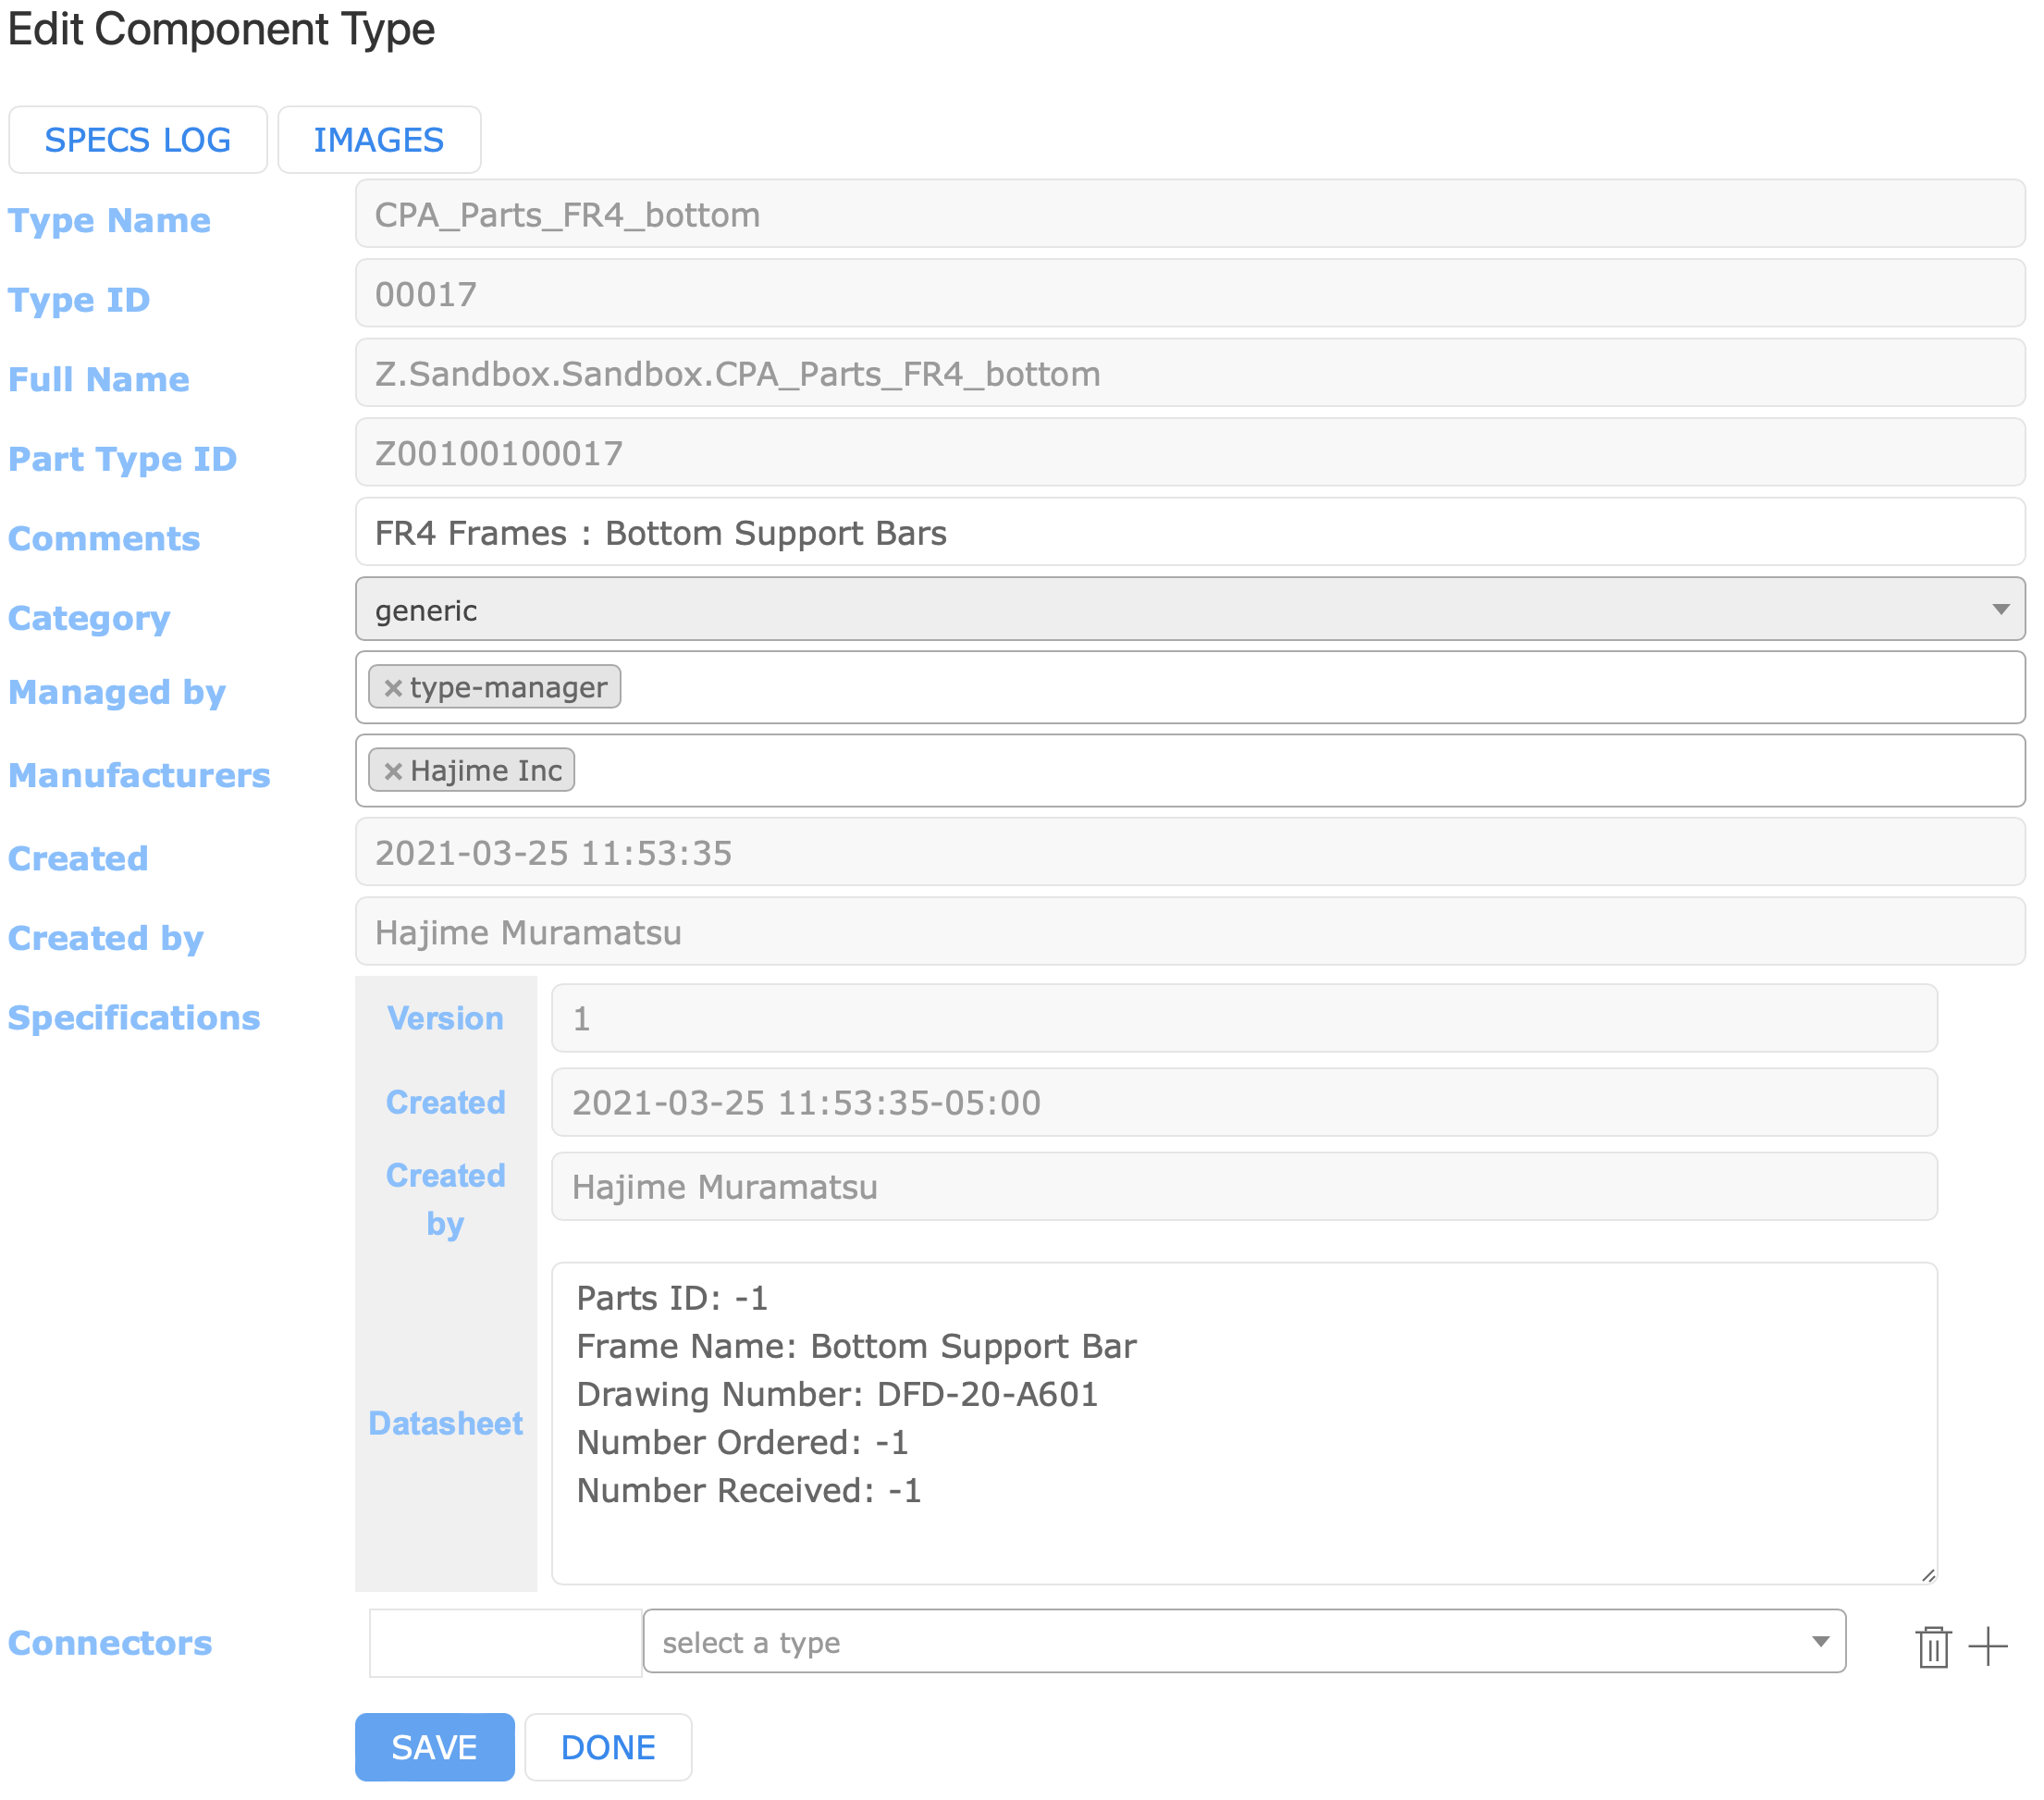
Some of the fields are in gray, indicating that you are not allowed to edit them, such asType Name, Type ID, Full Name, Part Type ID, Created, and Created by… etc. Here Full Name is a name that combines the all id names together:
- Project = Z
- System name = Sandbox
- Subsystem name = Sandbox
- Component Type name = CPA_Parts_FR4_bottom
We’ll now go through the rest of the fields/button now: Managed by, Manufacturers, Specifications, Connectors, and SPECS LOG.
Managed by (a required field)
In Managed by field, we provide a specific Role or Roles which behaves as an access restriction to this particular Component Type. That is, by providing a specific Role, only users who are assigned to that specific Role are allowed to create/edit the corresponding Items.
Where can we see a list of available Roles and how can we create a new one?
Again, from the side-menu, click Admin and then Roles. You should see a list of existing Roles like shown here:
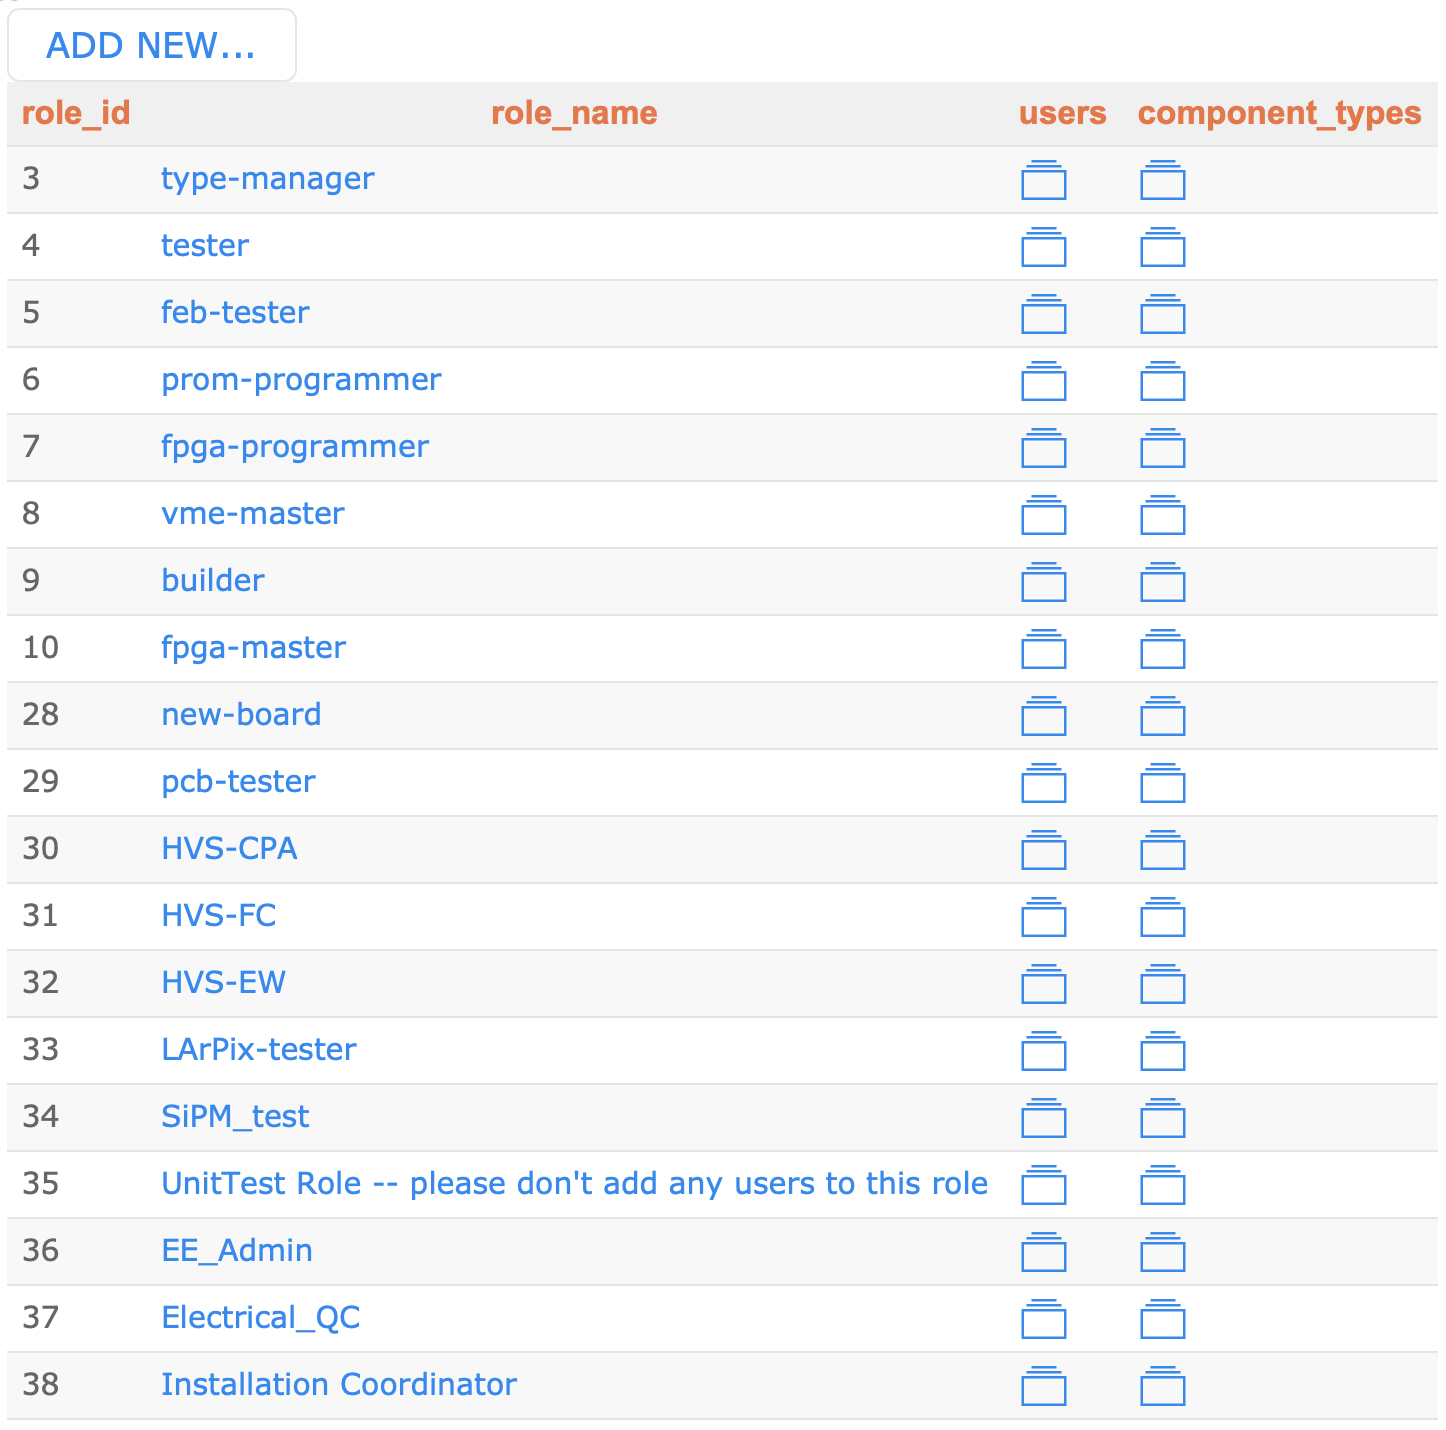
Only users with the Administrator privilege can create a new Role by clicking ADD NEW….
Similarly one can find out what Roles each user has been assigned to.
Clicking Admin from the side-menu and then go to Users. This shows a list of the all available users.
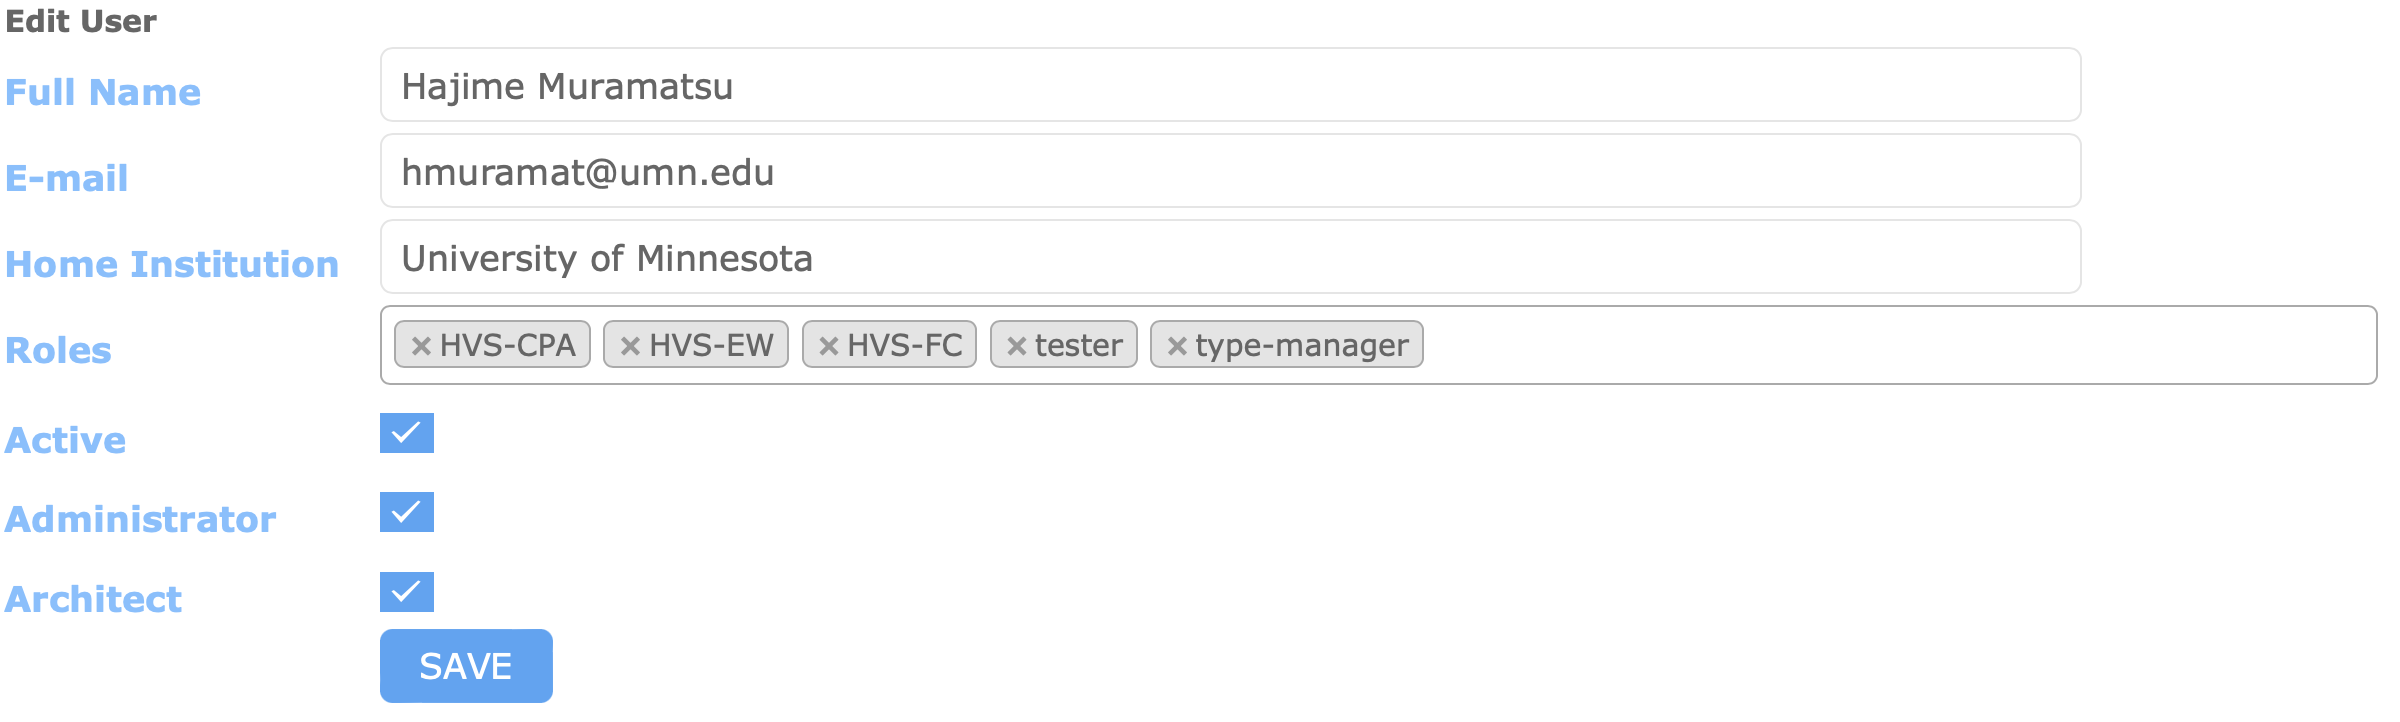
Clicking full_name shows information of the individual user like shown here in which one can see what Role(s)
the user has been assigned to:
 back to top
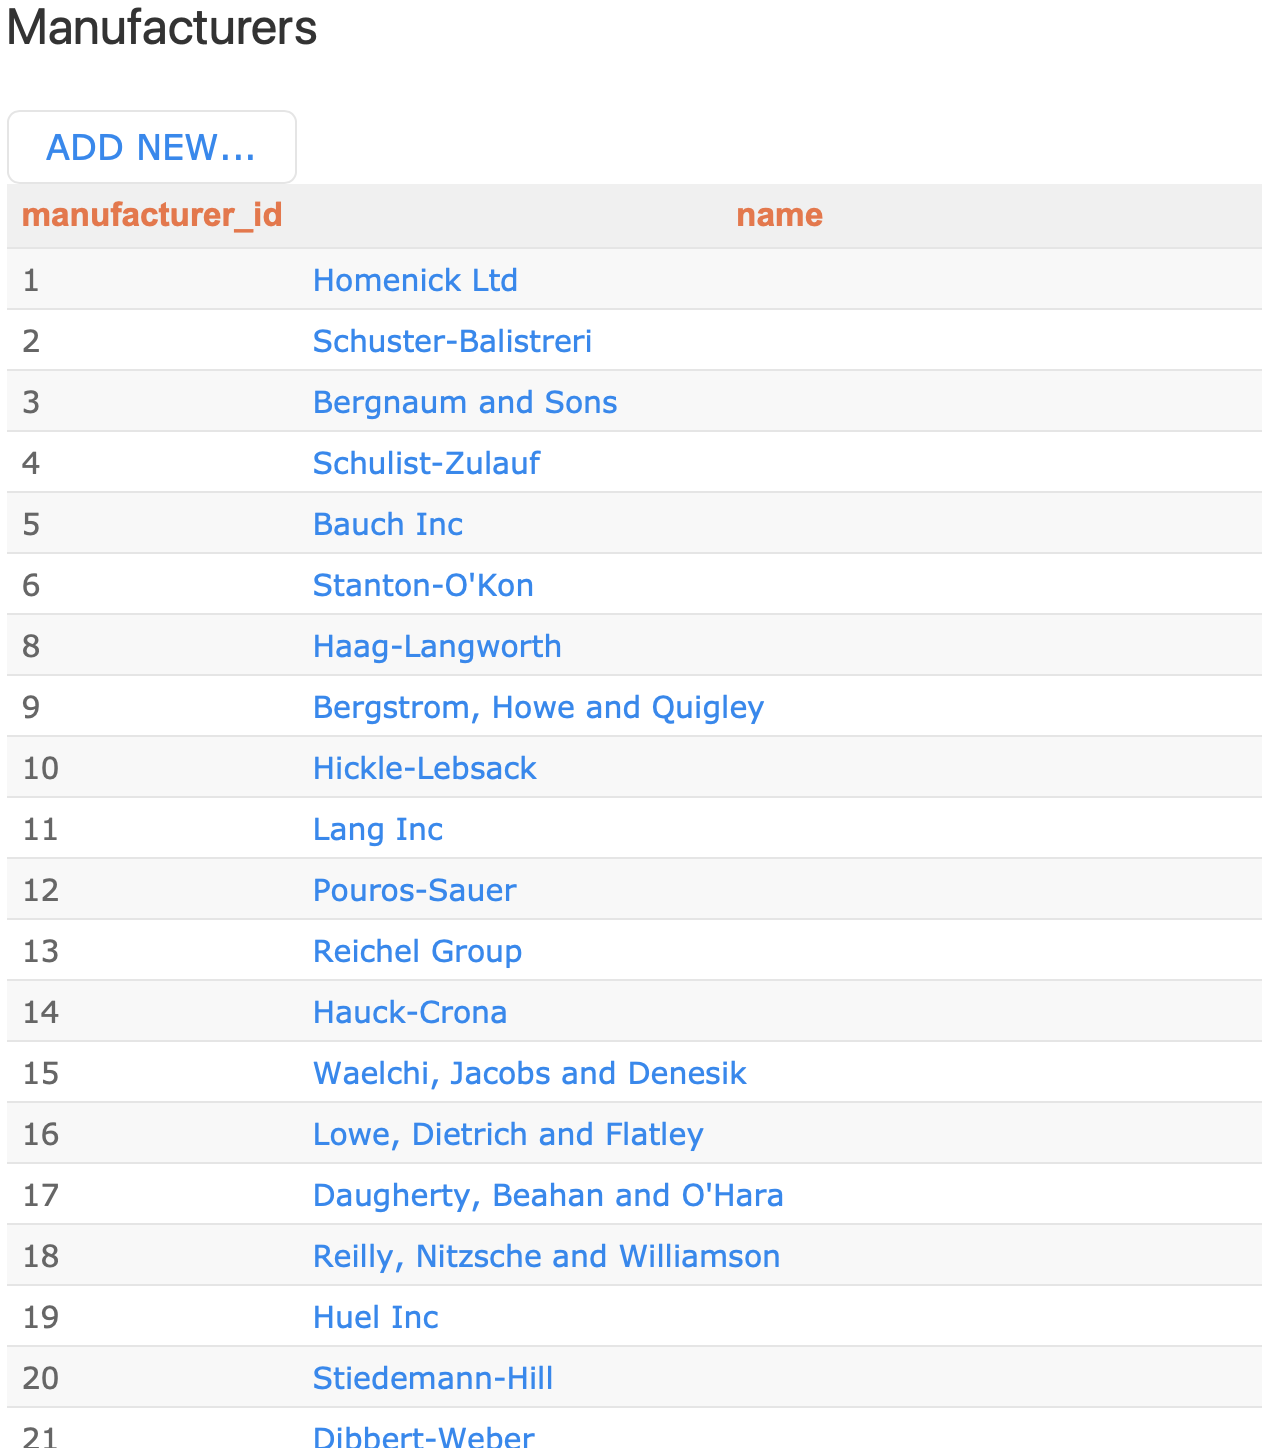
Manufacturers (an optional field)
Just like Roles, we assign Manufacture(s) from its available list.
The list can be reached by going to Manufactures from the side-menu.
Again only Administrators can edit the list.
 back to top
Specifications (a required field)
Let’s now fill the field, Datasheet under Specifications. This is probably the most important field in defining a Component Type definition.
Users may provide information in Specifications of an Item, that uniquely identifies each of the corresponding Items. Database schema for Specifications can be provided by YAML, a human-friendly data serialization language for all programming languages. It has typically a form of;
Key : Value
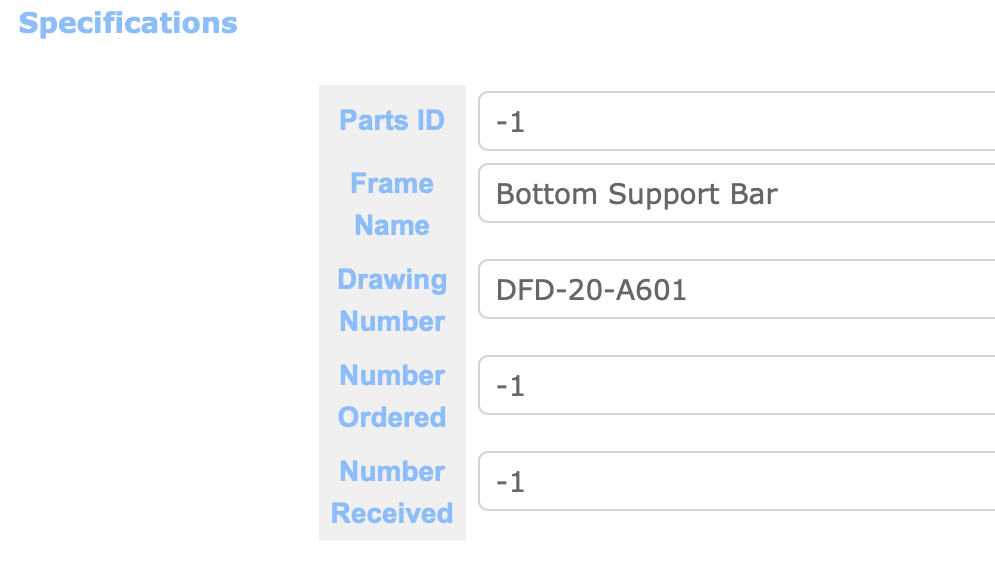
Value could be numbers, strings, null, list, array, or even an empty array. For instance, if you define a Specifications like the following;
 Parts ID: -1
 Frame Name: Bottom Support Bar
 Drawing Number: DFD-20-A601
 Number Ordered: -1
 Number Received: -1
then when you create an Item (in the next session) you will have boxes that are filled with their initial valies as shown below:
You could also provide an empty array, like [ ]. In this case, you could provide data for this array in any scheme, which might sometimes be useful.
You could also provide options like the following;
 AR: []
 Gain:
  - T1
  - T2
 Size: null
 Type: null
so that when you create a new Item, it will let you select predefined optional values as shown below:

Quiz
Can yo provide a Specifications that has nested Keys?
Connectors (an optional field)
In the Connectors section, one can provide Type IDs of sub-Components, defining relations among different Component Types. For instance,
an assembly is a Component Type that is constructed from other sub-Component Types.
E.g., A Component Type, CPA Plane, is made of a pair of sub-Component Types, CPA Panels. By the way, from the view of one of the sub0Component Types, the current Component Type you are editing would be then its parent Component Type, forming a hierarchical structure : Parent Component Type ⟷ Current Component Type ⟷ sub-Component Type(s).
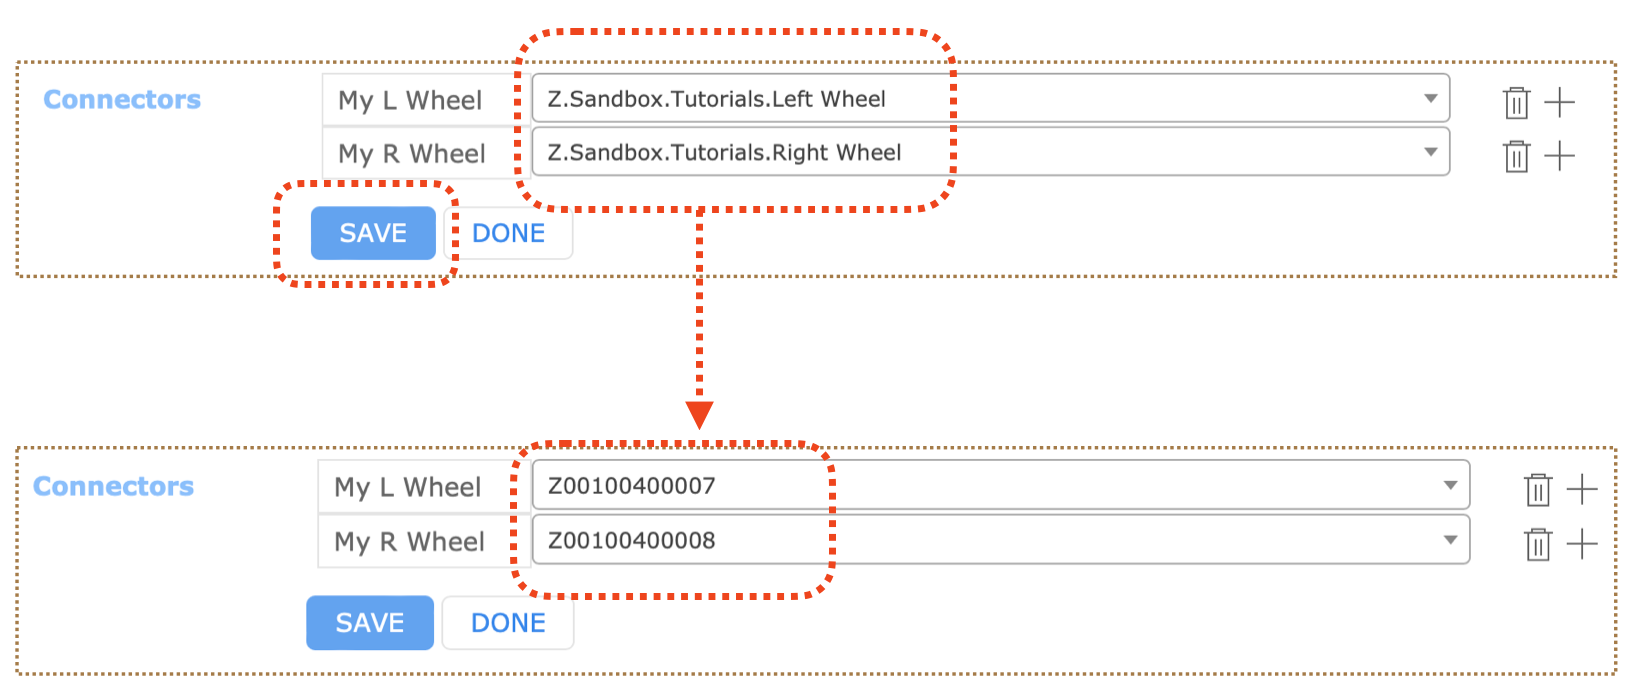
Suppose, we have 3 Component Types: Front Axle, Left Wheel, and Right Wheel. And let’s just that Front Axle is made of two sub-Component Types, Left and Right Wheels.
Furthermore, Type IDs for these 3 Types are:
- Type ID = Z00100400005 for Front Axle
- Type ID = Z00100400007 for Left Wheel
- Type ID = Z00100400008 for Right Wheel
Now let’s start to define Type IDs of these two sub-Components. Again, we want Left & Right Wheels to be sub-Components of Frot Axle. Go to the Component Type definition page of Front Axle and find the Connectors section at the bottom.
To add a new sub-Component Type ID, click + icon. It will ask you to fill out two empty boxes in a single row. In the first one, provide a functional position name. This name needs to be unique within this Component Type, such as ASIC-001, SMB00008-S13360.. etc. For us, let’s call this 1st sub-Component as My L Wheel.
For the 2nd empty box, you need to provide the actual existing Component Type name. Entring 2 characters would trigger the HWDB
to look for and display them for you, as can be seen below (be careful that the entered characters here are case-sensitive):
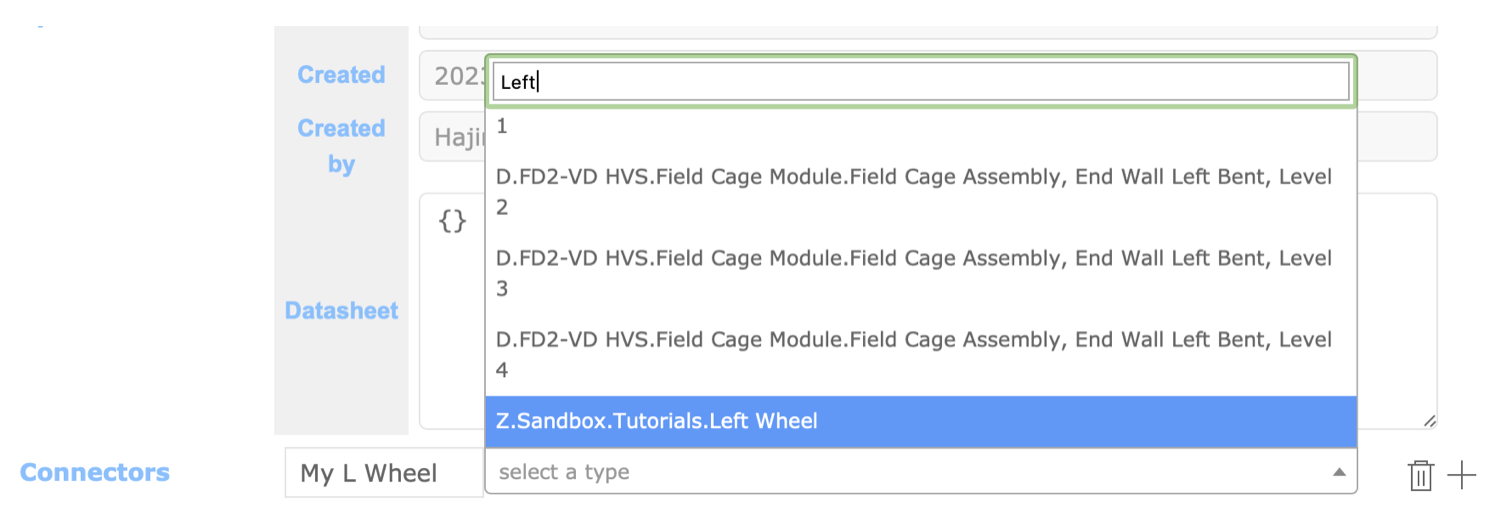 Pick the Left Wheel there.
Next, click the + icon again and setup similarly for the Right Wheel. And once you are done with the two Types,
click SAVE. The HWDB then converts the two provided sub-Component Type names to the corresponding Type IDs as shown below:
CAUTIONS!!
Once you define these sub-Component Types and start to actually use them (i.e., linking existing Items as sub-Components; we will do this in the next session), you will not be allowed to delete or edit those existing sub-Component Types. Else there could be inconsistencies between modified (updated) Component Type definitions and pre-existing Items that are linked.
Because of this, the sub-Component Type definition will be frozen once the corresponding Item(s) is linked as shown below:
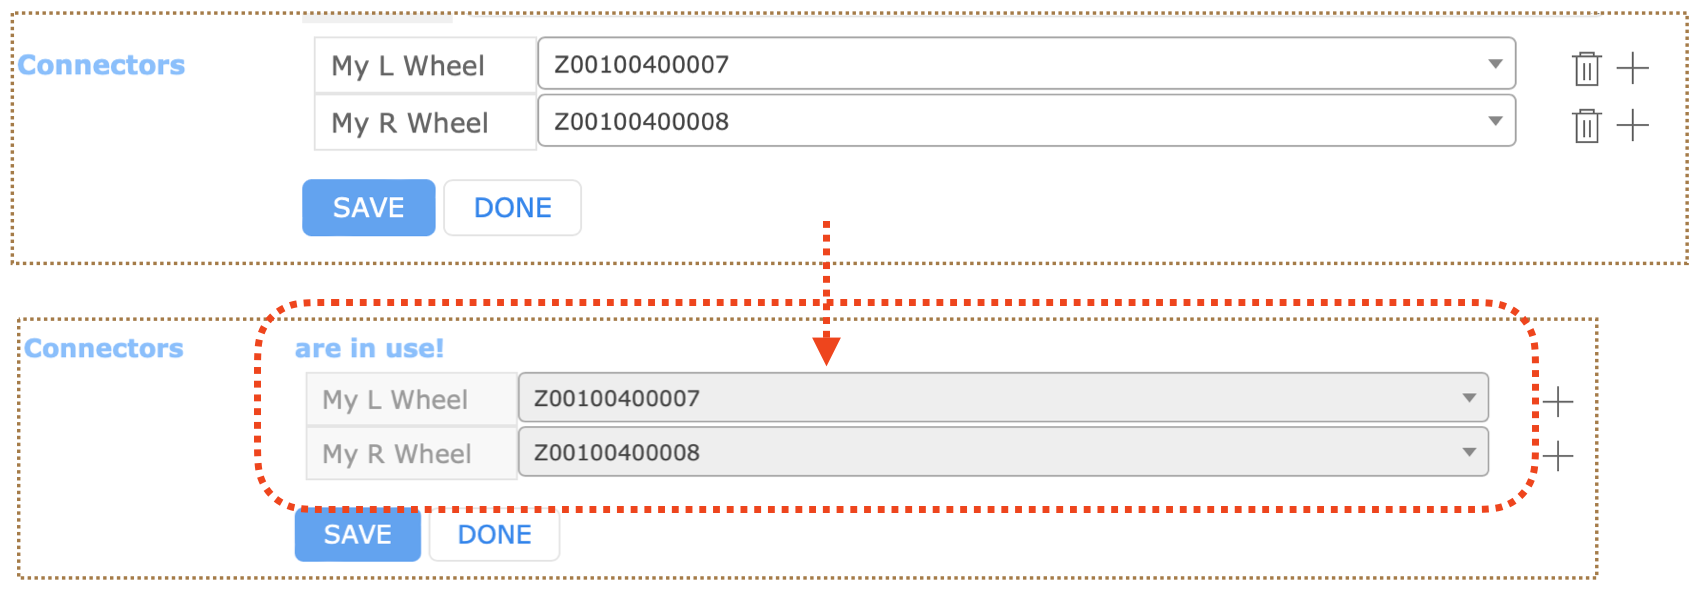
Nevertheless, you are still allowed to add new sub-Component Types by clicking the + icon.
If you absolutely need to delete or edite the existing sub-Component Type definition(s), you can do so once you undo (delete) the all existing sub-Component links in the corresponding Items.
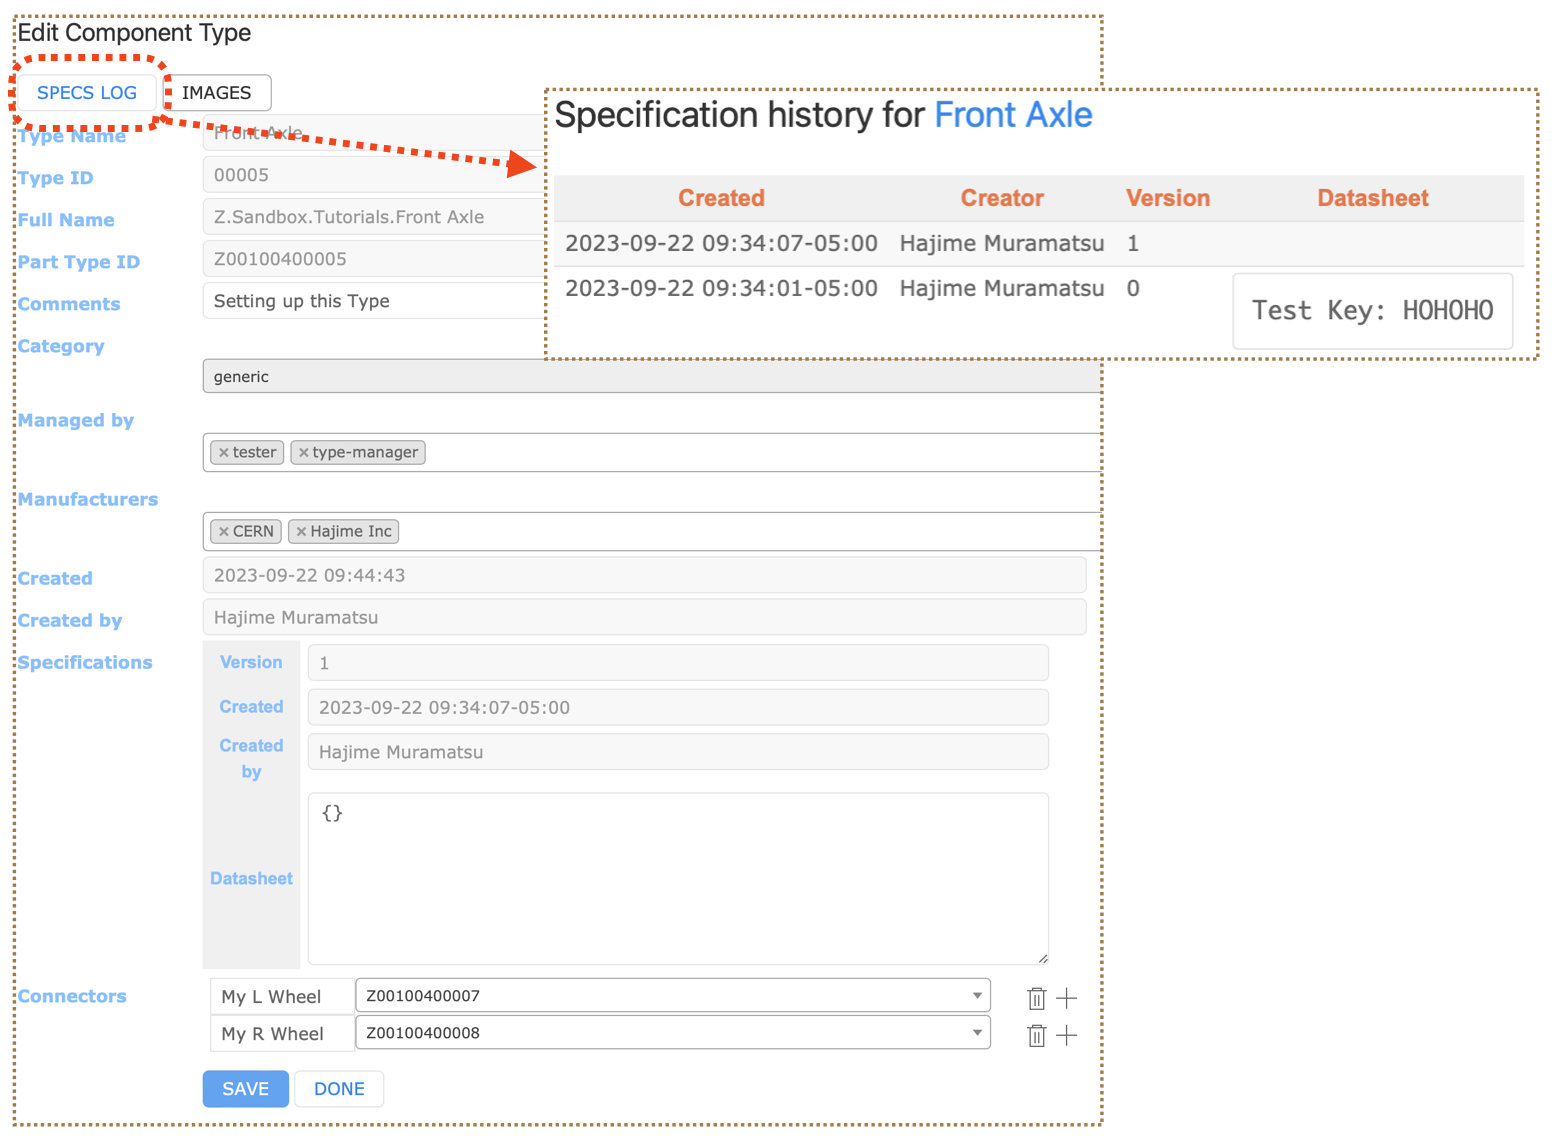
SPEC LOG
In a typical Component Type definition page, there is a tab-button, SPECS LOG at the top.
Clicking it will take you to a page, where you can see a history of modifications on that Component Type Specifications.
This could be useful not only when you need to look at the historical changes, but if you need to roll-back your Specifications definition.
Defining a Test Type
Now let’s define a Test Type, which essentially defines the DB schema for the data you store at the HWDB, such as QC test results. Also remember that we could have multiple Test Types for a given Component Type.
The procedure is very much similar to what we have done to define a Component Type.
Let us employ the Component Type, CPA_Parts_FR4_bottom, as an example again.
To find that Component Type, select Component Types from the side-menu, then click FILTER….
In the pop-up window, Apply filters, provide “CPA_Parts_FR4_bottom” in the Name field and hist SEARCH.
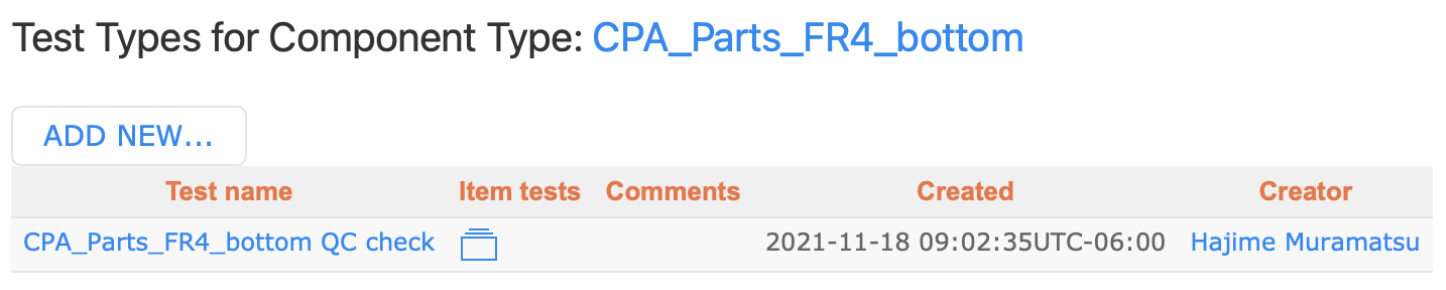
Click the folder in the Test Types column. You should be seeing a list of available Test Types for this Component Type as shown below:
Click ADD NEW… to create a new Test Type definition. This will bring a screen like the one below.
You must provide a Test Type name, which needs to be unique within its Component Type.
Again, its Specifications should be provided in YAML. Once you are done, don’t forget to hit SAVE.
REST API
Let’s try everything we have done so far in this session through the REST API of the HWDB. We will extensively employ the alias and the variable, APIPATH, that we defined in Setup. Just to remind what they were:
 alias CURL='curl --cert-type P12 --cert usercred.p12:PassWord'
 export APIPATH='https://dbwebapi2.fnal.gov:8443/cdbdev/api/v1'
Notice that the APIPATH points to both the version v1 of the API and the development version (cdbdev). If you like to access to the production version, it should be cdb, instead of cdbdev.
Please also be aware that, while we will cover API endpoints that are essential in this session, we will not cover the all available endpoints. For a complete list of endpoints, please refer to the online documentation Redoc as well as the Swagger site in which users can try the REST API endpoints interactively.
Going through the hierarchy of IDs with the REST API
With the API, it is easy to obtain lists of available Projects, Systems, Subsystems, and Component Types.
GET a list of Projects
The endpoint to get a list of Projects is simply /projects as shown below.
CURL "${APIPATH}/projects" | jq
And here is the response in JSON. As can be seen, two projects current exist in the HWDB.
{
  "data": [
    {
      "comments": null,
      "created": "2021-10-28T10:14:44.215630-05:00",
      "creator": {
        "id": 3,
        "name": "Vladimir Podstavkov",
        "username": "podstvkv"
      },
      "id": "a",
      "name": "Dummy a"
    },
    {
      "comments": "Includes approved far detector modules and near detectors",
      "created": "2022-01-31T16:12:30.338331-06:00",
      "creator": {
        "id": 3,
        "name": "Vladimir Podstavkov",
        "username": "podstvkv"
      },
      "id": "D",
      "name": "DUNE"
    },
    {
      "comments": "Test project",
      "created": "2022-01-28T16:22:22.319197-06:00",
      "creator": {
        "id": 3,
        "name": "Vladimir Podstavkov",
        "username": "podstvkv"
      },
      "id": "Z",
      "name": "Sandbox"
    }
  ],
  "link": {
    "href": "/cdbdev/api/v1/projects",
    "rel": "self"
  },
  "status": "OK"
}
GET lists of Systems, Subsystems, and Component Types
Similarly one can easily get lists of Systems, Subsystems, and Component Types with the following endpoints:
- List of Systems: /systems/<project_id>
- List of Subsystems: /subsystems/<project_id>/<system_id>
- List of Component Types: /component-types/<project_id>/<system_id>/<subsystem_id>
Quiz
GET lists of Systems, Subsystems, and Component Types for the following cases:
- Obtain a list of Systems for project_id = D
- Obtain a list of Subsystems for project_id = D and system_id = 005
- Obtain a list of Component Types for project_id = D, system_id = 005, and subsystem_id = 20
Defining a Component Type with the REST API
Now let’s define a Component Type. Let’s take the Front Axle (Type ID = Z00100400005) as an example.
The endpoint we need in this case is /component-types/<type_id> Or the actual command-line would look like the following:
CURL -H "Content-Type: application/json" -X PATCH -d @Patch_CompType.json "${APIPATH}/component-types/Z00100400005" | jq
Here;
- we are patching instead of posting as the Component Type must pre-exist (only Architect can create a Component Type)
- Type ID = Z00100400005
- Patch_CompType.json is a file and its contents are shown below:
{
  "part_type_id": "Z00100400005",
  "comments": "Setting up this Type",
  "manufacturers": [7,27],
  "roles": [3,4],
  "properties": {
      "specifications": {
      "Last name": "Muramatsu",
      "First name": "Hajime"
  }
  },
  "connectors": {
  "My L Wheel": "Z00100400007",
  "My R Wheel": "Z00100400008"
  }
}
In this file, you need to provide the followings:
- part_type_id, which is the Type ID = Z00100400005 we are modifying.
- manufacturers can be given in terms of the corresponding Manufacturer-IDs.
- roles similarly can be provided by their IDs.
- specifications holds its schema.
- connectors holds the info of Connectors. You can specify functional position names and sub-Component Type IDs here. Or you don’t need to provide the info and leave it blank (no connectors section) and patch this Component Type later, if you like.
Now let’s GET the Component Type we just patched. The endpoint we need is still the same, /component-types/<type_id>. The actual command-line is like this:
CURL "${APIPATH}/component-types/Z00100400005" | jq
And its response is long, but we show it below for completes.
{
  "data": {
    "category": "generic",
    "comments": "Setting up this Type",
    "connectors": {
      "My L Wheel": "Z00100400007",
      "My R Wheel": "Z00100400008"
    },
    "created": "2024-03-11T04:59:48.503848-05:00",
    "creator": {
      "id": 12624,
      "name": "Hajime Muramatsu",
      "username": "hajime3"
    },
    "full_name": "Z.Sandbox.Tutorials.Front Axle",
    "id": 1058,
    "manufacturers": [
      {
        "id": 7,
        "name": "Hajime Inc"
      },
      {
        "id": 27,
        "name": "CERN"
      }
    ],
    "part_type_id": "Z00100400005",
    "properties": {
      "specifications": [
        {
          "created": "2024-03-11 05:00:22-05:00",
          "creator": "Hajime Muramatsu",
          "datasheet": {
            "First name": "Hajime",
            "Last name": "Muramatsu"
          },
          "version": 6
        }
      ]
    },
    "roles": [
      {
        "id": 3,
        "name": "type-manager"
      },
      {
        "id": 4,
        "name": "tester"
      }
    ],
    "subsystem": {
      "id": 263,
      "name": "Tutorials"
    }
  },
  "link": {
    "href": "/cdbdev/api/v1/component-types/Z00100400005?history=False",
    "rel": "self"
  },
  "methods": [
    {
      "href": "/cdbdev/api/v1/component-types/Z00100400005/components",
      "rel": "Components"
    },
    {
      "href": "/cdbdev/api/v1/component-types/Z00100400005/test-types",
      "rel": "Test Types"
    },
    {
      "href": "/cdbdev/api/v1/component-types/Z00100400005/connectors",
      "rel": "Connectors description"
    },
    {
      "href": "/cdbdev/api/v1/component-types/Z00100400005/specifications",
      "rel": "Type specs"
    },
    {
      "href": "/cdbdev/api/v1/component-types/Z00100400005/images",
      "rel": "Images"
    },
    {
      "href": "/cdbdev/api/v1/component-types/Z00100400005/bulk-add",
      "rel": "Bulk Add"
    }
  ],
  "status": "OK"
}
Inside of the data blob, we see;
- comments
- manufacturers
- roles (Managed by)
- specifications and its version
- subsystem
- connectors
It shows the latest version of its Specifications by default.
If you like to see older version, you could do the following:
CURL "${APIPATH}/component-types/Z00100400005?history=true" | jq
There are other blobs:
- link: shows the href you just accessed.
- methods: shows other API endpoints available that are associated with this Component Type.
- status: reports a status of the access you just made.
Defining a Test Type with the REST API
In a similar manner we can define a new Test Type. The endpoint we need in this case is /component-types/<type_id>/test-types. And again the actual command-line would look like the following:
CURL -H "Content-Type: application/json" -X POST -d @Post_TestType.json "${APIPATH}/component-types/Z00100100046/test-types" | jq
We are posting a new Test Type here. The contents of Post_TestType.json file are shown below:
{
    "component_type": {
        "part_type_id": "Z00100100046"
    },
    "name": "Test_Parts_3_TestType_10",
    "comments": "Testing...",
    "specifications": {
        "Cleaned": 0,
        "Template": 0,
        "Visual": 0
    }
}
You must provide:
- the Test Type name (Test_Parts_3_TestType_10 in this example)
- the Specifications.
Let’s GET a list of the available Test Types for this Component Type, Z00100100046 with the following command-line.
CURL "${APIPATH}/component-types/Z00100100046/test-types" | jq
Its response is shown below. It is long, so we are not showing the entire response here.
{
  "component_type": {
    "name": "Test_Parts_3",
    "part_type_id": "Z00100100046"
  },
  "data": [
    {
      "comments": "Testing...",
      "created": "2022-04-22T15:49:13.519104-05:00",
      "creator": {
        "id": 12624,
        "name": "Hajime Muramatsu",
        "username": "hajime3"
      },
      "id": 223,
      "link": {
        "href": "/cdbdev/api/v1/component-test-types/223",
        "rel": "self"
      },
      "name": "Test_Parts_3_TestType_3"
    },
    {
      "comments": "Testing...",
      "created": "2022-04-22T15:07:07.456921-05:00",
      "creator": {
        "id": 12624,
        "name": "Hajime Muramatsu",
        "username": "hajime3"
      },
      "id": 218,
      "link": {
        "href": "/cdbdev/api/v1/component-test-types/218",
        "rel": "self"
      },
      "name": "Test_Parts_3_TestType_2"
    },
    {
      "comments": "",
      "created": "2022-04-19T10:17:00.887976-05:00",
      "creator": {
        "id": 12624,
        "name": "Hajime Muramatsu",
        "username": "hajime3"
      },
      "id": 217,
      "link": {
        "href": "/cdbdev/api/v1/component-test-types/217",
        "rel": "self"
      },
      "name": "Test_Parts_3_TestType"
    }
  ],
  "link": {
    "href": "/cdbdev/api/v1/component-types/Z00100100046/test-types",
    "rel": "self"
  },
  "status": "OK"
}
Three Test Types are seen, Test_Parts_3_TestType, Test_Parts_3_TestType_2, and Test_Parts_3_TestType_3.
Some other useful endpoints
There are some useful ones that you could easily try out:
- /users : list of registered users
- /users/whoami : your account info
- /users/<user_id> : user info
- /countries : list of countries
- /institutions : list of institutions
- /manufacturers : list of manufacturers
- /roles : list of roles, including lists of the corresponding users and Component Types
- /roles/<role_id> : info of a particular role
Useful links to bookmark
- Production version of the HWDB (WEB UI) : https://dbweb0.fnal.gov/cdb/login/sso
- Development version of the HWDB (WEB UI) : https://dbweb0.fnal.gov/cdbdev/login/sso
- Online documentation of the REST API (Redoc) : https://dbweb9.fnal.gov:8443/cdbdev/apidoc/redoc
- Where users can try API endpoints interactively (Swagger) : https://dbweb9.fnal.gov:8443/cdbdev/apidoc/swagger
Key Points
Two ways to communicate with the DUNE HWDB, with the WEB UI and the REST API.
Data Management using WEB UI
Overview
Teaching: 60 min
Exercises: 0 minQuestions
Active user privilage is required.
How do I enter and retrieve Items with the WEB UI?
How do I perform searches over Items/Tests with the WEB UI?
Objectives
To understand how one can POST and GET information of Item(s).
To understand how sub-component links could be made.
To understand how one can POST and GET information of Tests and images.
To be able to perform searches over Items and Tests.
Contents
Description Component Types Items Preparing Items to be Added Adding Item(s) Adding Single Item Bulk Adding Items Adding Subcomponents Adding Tests Adding Images More Item Operations Item Filtering Searching for Items based on chosen Filters Syntax Syntax in Filter fields Filtering with Specifications Filtering via the Specifications field Filtering with Test Data Filtering via the Test Data field
This tutorial will walk you through using the Web UI for the Hardware Database.
The development version of the HWDB can be accessed via https://dbweb0.fnal.gov/cdbdev/login/sso.
The production version of the HWDB can be accessed via https://dbweb0.fnal.gov/cdb/login/sso.
Accessing Component Types
Note: Adding component types requires the user to have “Architect” priveleges for the HWDB. This is covered by the previous tutorial, “Setting up Component Types and Test Types.” This tutorial assumes that component types being managed already exist in the HWDB, and the user has been added to the appropriate Roles defined for that component type.
Let’s try accessing a component type from the previous tutorial: “Z.Sandbox.Tutorials.Front Axle”:
- Open the Web UI in your browser and log in.
- Select “Component Types” from the left menu. The UI will display a list of all component types in the HWDB. This list will be many pages long.
- We should filter this list so that we can find our component type more easily. Find the “Filter…” button towards the top of the page and click on it. The UI should display a pop-up box titled “Apply filters.”
- In the “Name” field, type part or all of the component type’s name and click “Search.” For this example, let’s type “Tutorial,” although you could also try variations like “Sandbox.Tutorial” or “Front Axle”. You may use wildcards to omit a middle portion, e.g. “Sand%.Tut%.Front”. (Wildcards are already assumed at the beginning and end.) The UI will respond with a list of component types that only match the filter criteria.
The component types are displayed in list view. This provides a variety of options as seen below. In particular you may access the Component Type definition, the Test Types, and the list of Items of that component type.
Click on the red boxes in the image below for more information.
Click here for details about the Component Type, including the Specifications Definition and Subcomponents.
Click here for Test Type definitions for this Component Type.
Click here for a list of Items for this Component Type.
Let’s take a look at “Front Axle.”
- Click on the “Z.Sandbox.Tutorials.Front Axle” link.
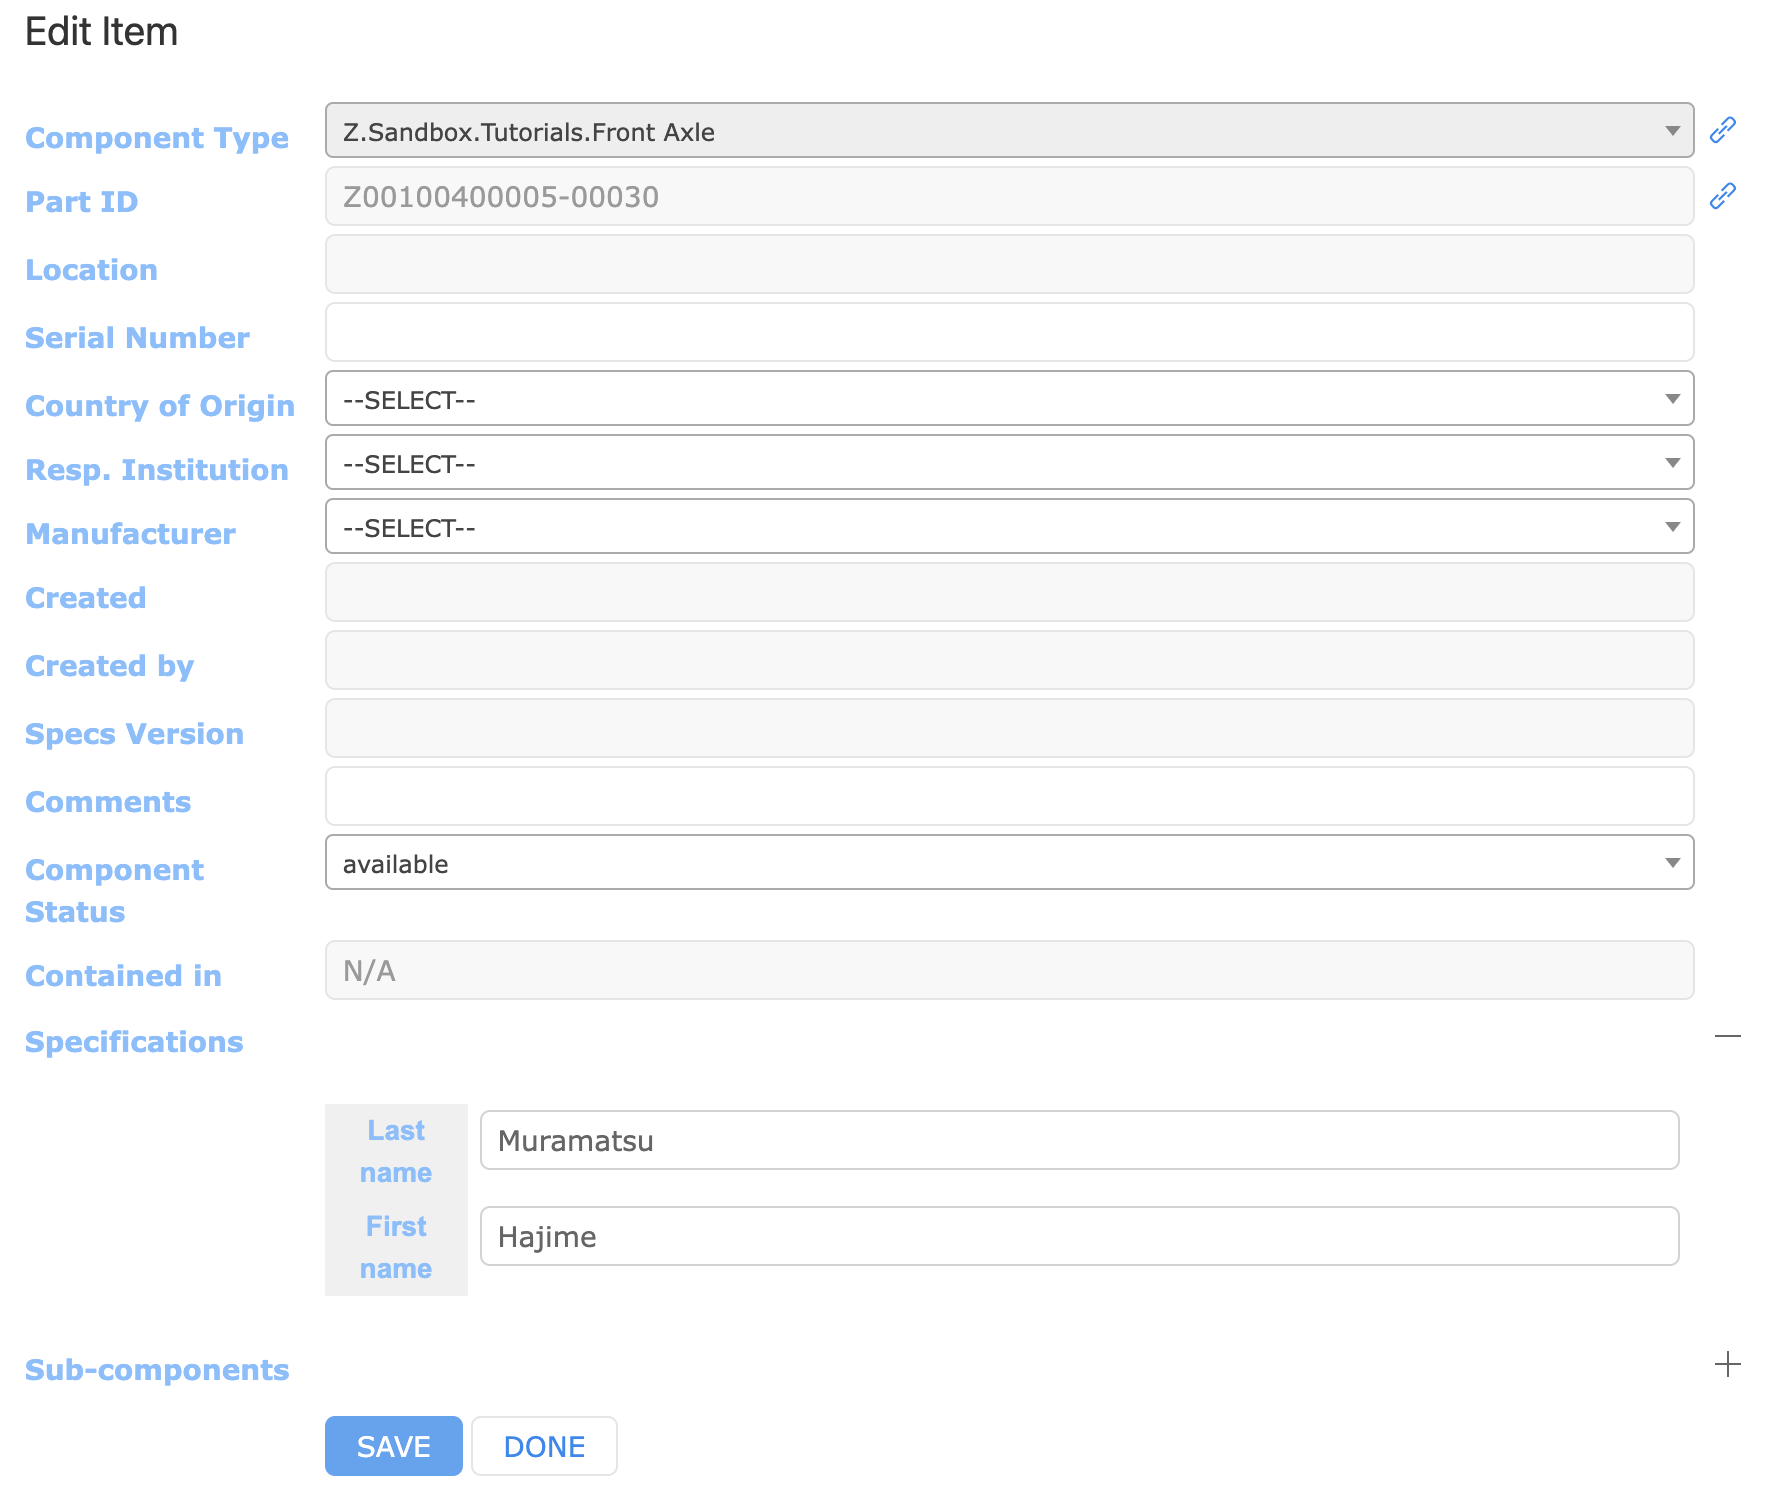
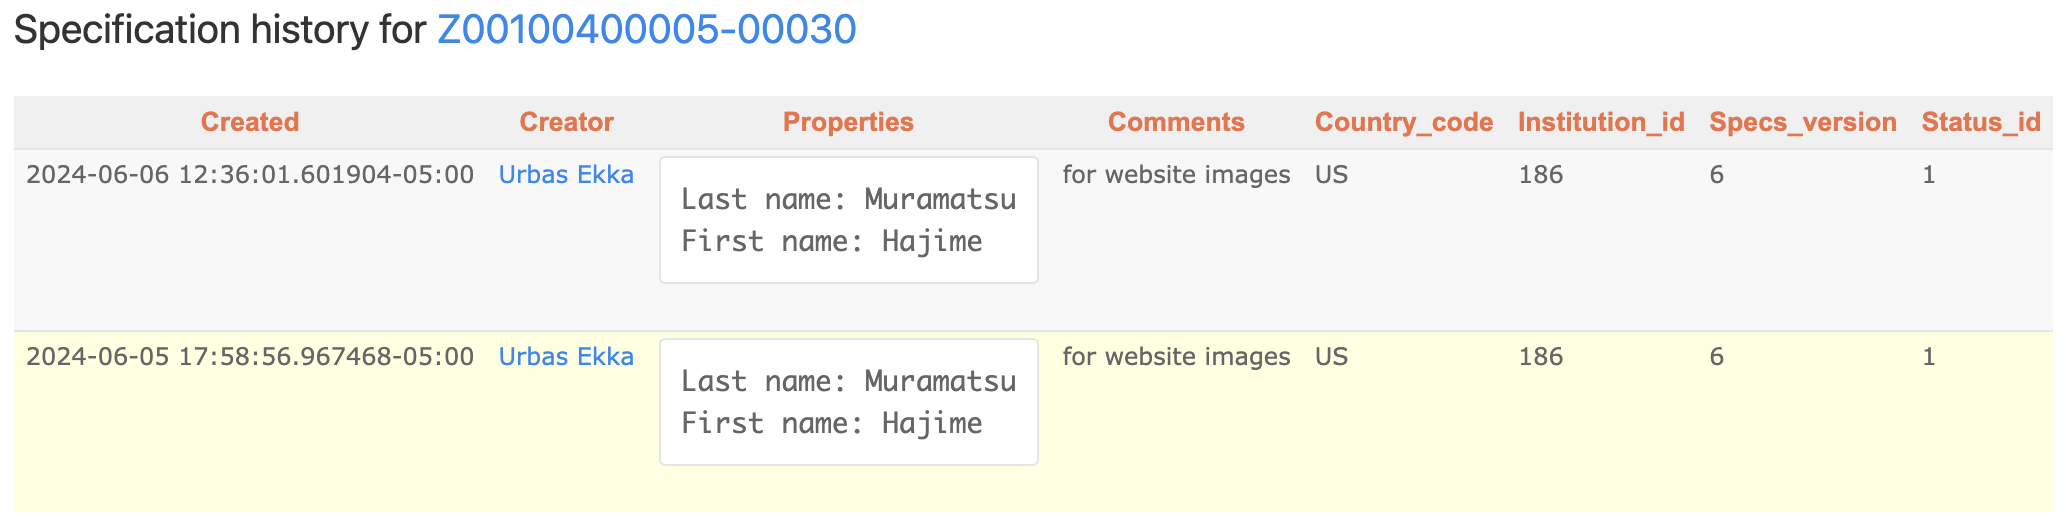
We can see in the image below that the Specifications Datasheet contains two fields: “Last Name” and “First Name”. These have been given default values of “Muramatsu” and “Hajime”. (If you wish to have no default values, you may use the value “null”.
We also see that the component type has two subcomponents (“connectors”): “My L Wheel” and “My R Wheel”, each of which has been assigned a Part Type ID.

Datasheet: When we add a new “Front Axle,” we will need to have a “Last Name” and “First Name” to assign to it.
Connectors: We can see here that we will need two other Items of a different Component Type to complete the Front Axle. (Note that we don't necessarily need to have sub-components "My L Wheel" and "My R Wheel" right away. We can create the Front Axle and add the two subcomponents later.)
Adding Item(s)
Now that we’ve examined the component type, let’s add some items!
- Use the back button on your browser to return to the filtered list of component types.
- Click on the folder icon in the “ITEMS” column in the row for “Front Axle.” The UI will respond with a list of items for this component type.
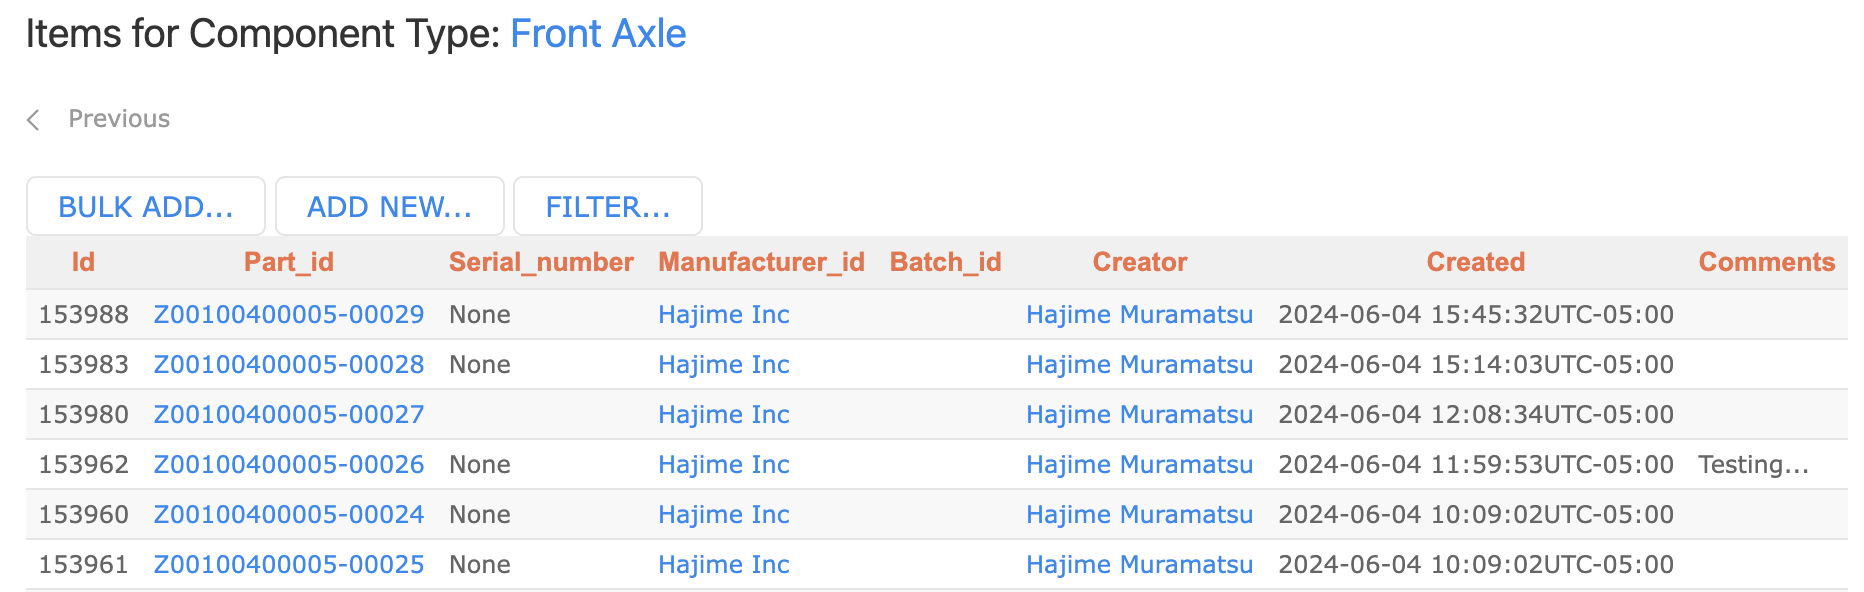
Click here to add multiple Items at the same time. These new items will have the default Specifications and will have no subcomponents. You will have to come back and edit them individually.
Click here to add a single item. You will be able to set Specifications and Subcomponents at creation time.
Use “Filter” to reduce the number of Items shown on this page
Click here to view this specific item
Adding Single Item
To add a single item:
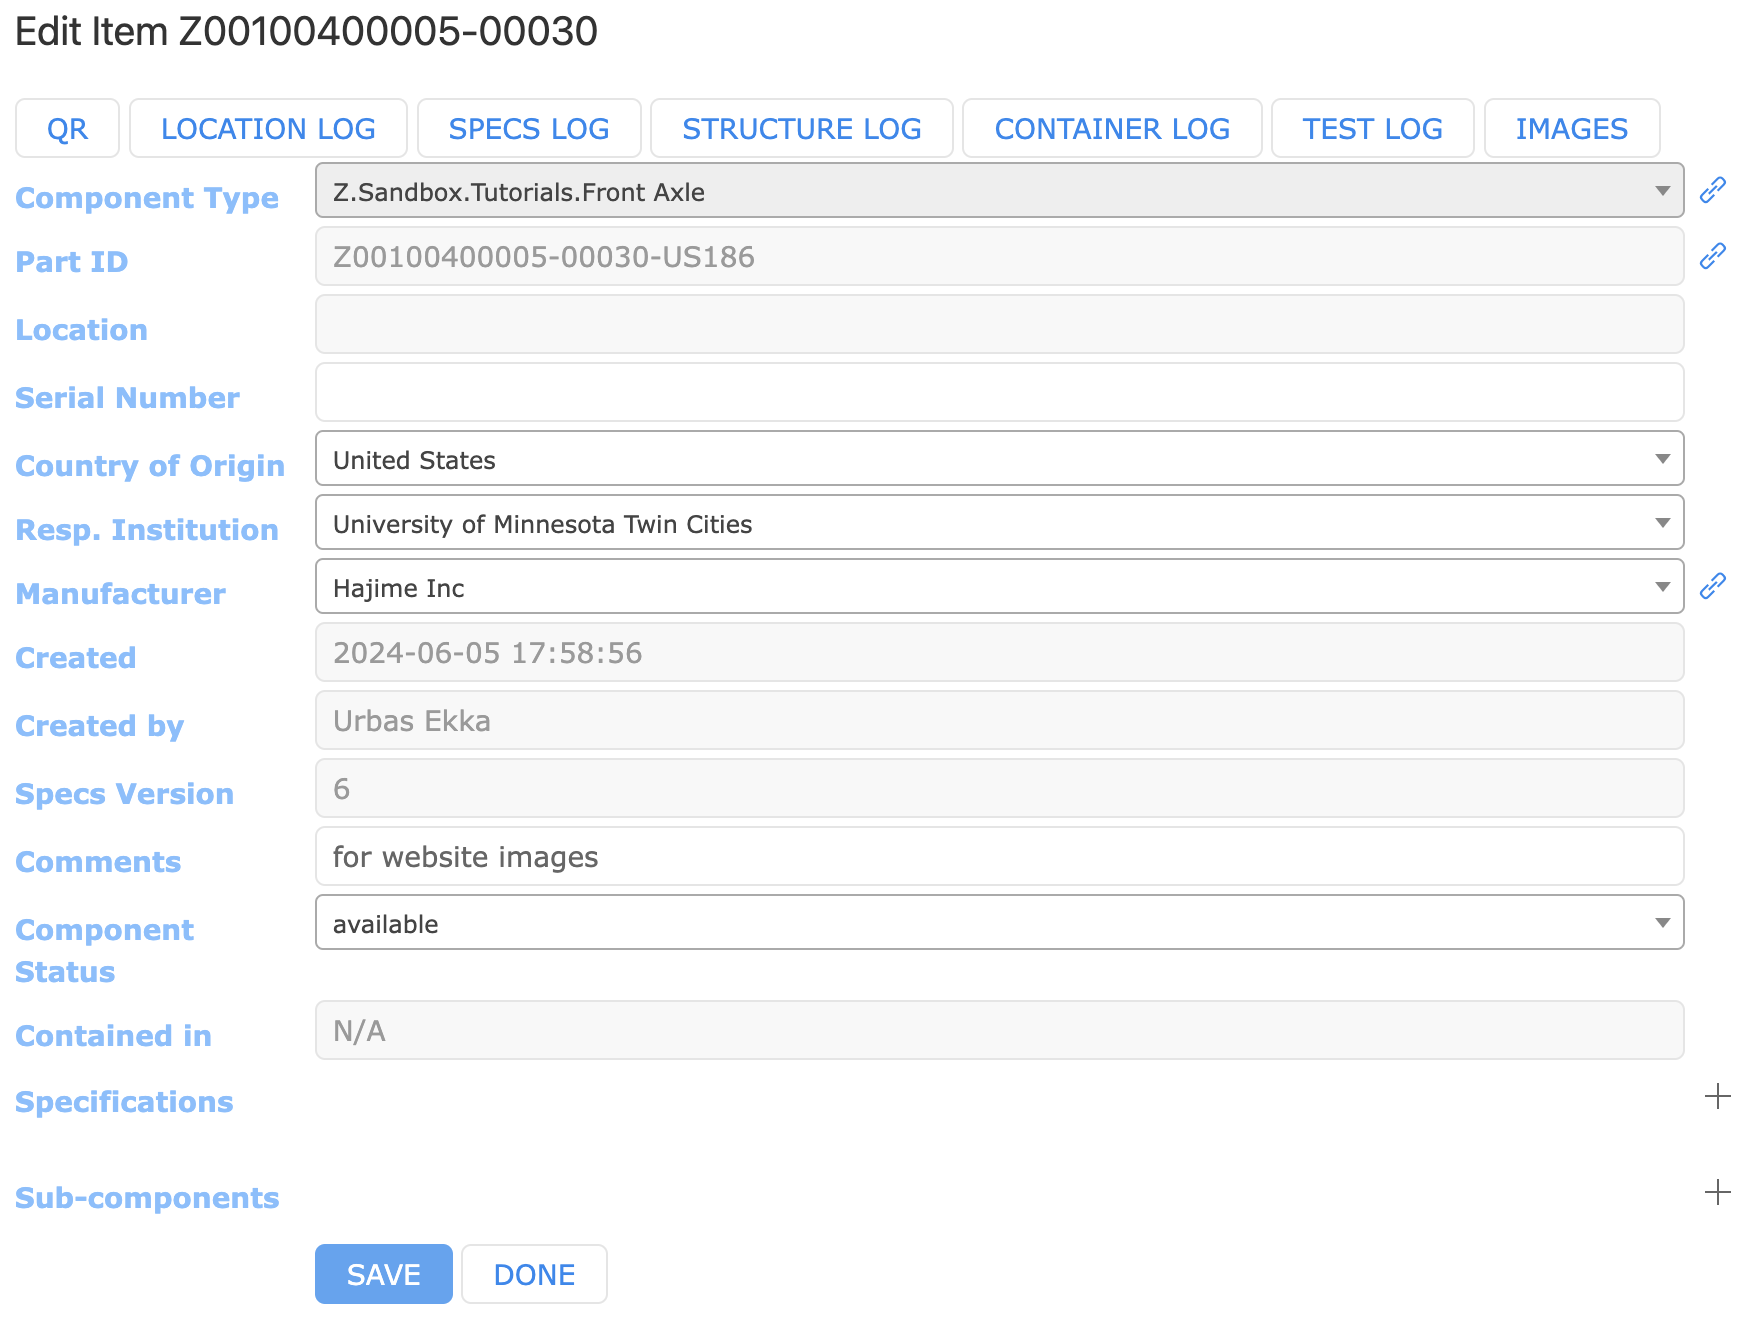
- Click on the “ADD NEW…” button towards the top of the screen. The UI will respond with the “Edit Item” screen. (Note that this screen will show both for adding and editing items. However, when editing an item, there will be more options available on the screen.
- At minimum, you must select a “Country of Origin” and “Resp. Institution.” The remaining fields are optional. IMPORTANT: Once the Country and Institution have been set, they may not be edited!
- The “Part ID” field displays the next available Part ID, which will be assigned to this item when it is added. Note that the Part ID is not reserved until you save the item, so if multiple users are adding items at the same time, that Part ID might get assigned to another user’s item before you finish adding it! If you need to make a note of the Part ID for later use, look for the Part ID that was assigned after saving!
- Location may not be set until after the item has been created.
- Sub-components may not be assigned until after the item has been created.
- Click the “Save” button to add the item.
View the Component Type definition
View the bar code for this Item. (This only works when editing an item. It will not be available when you are initially creating the item.)
Expand/Contract Specification section
Expand/Contract Sub-components section
Serial Number (optional). Use this if an item has an identifiable serial number to record. It is recommended to make this unique (within this Component type) if used, but the HWDB will not enforce uniqueness.
Manufacturer (optional). Select from the list of manufacturers defined for this Component Type
Sub-components. This is empty when initially adding the Item. We have to come back and edit the Item to add sub-components
Gives the latest location the item was at, cannot be edited during creation.
Institution/Country (required). Select the institution responsible for managing this Item.
Component status (required). Marks the Item as being active for use as a subcomponent. There are three possibilities: "available", "temporarily not available", "permanantly not available". The status must be marked as "available" to be used as a subcomponent.
Specifications. These fields are defined in the Component Type for this Item.
Bulk Adding Items
Bulk Adding allows you to add a number of items simultaneously. This is handy if you have a number of Items you wish to reserve Part IDs for, but you’re not ready to enter all the information for those Items yet.
To bulk add items:
- Use the back button on your broser to return to the list of items for “Front Axle”. (You may wish to hit the refresh button on your browser to pick up any items you have added since you were last on that screen.)
- Click on the “BULK ADD…” button towards the top of the screen. The UI will display the “Item Bulk Add” Screen.
- Select the appropriate values in the “Country of Origin” and “Resp. Institution” fields.
- Manufacturer is optional.
- Enter the number of items you wish to add in the “Count” field.
- Click the “SAVE” button. The UI will respond with a page in a new tab containing bar codes and QR codes for the items you have added. You may print these out and apply them to your physical items.
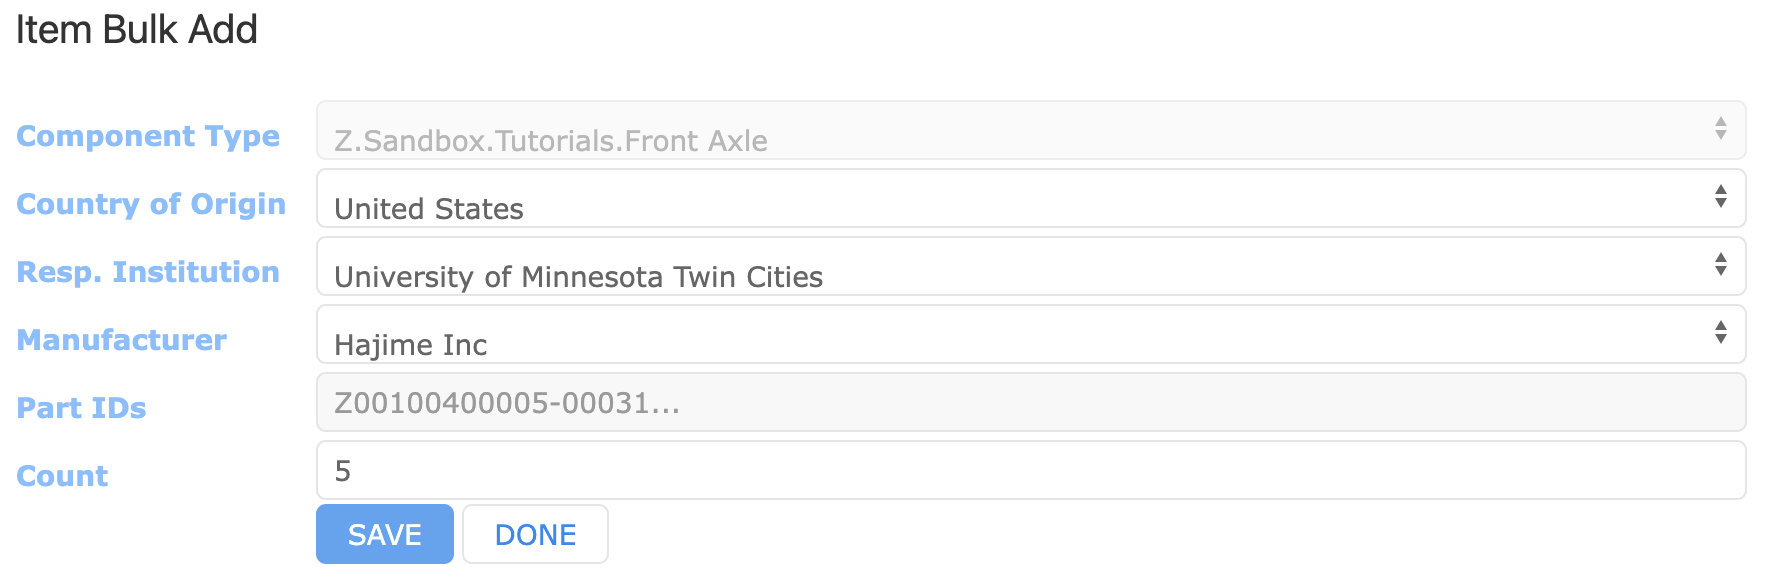
When you click “Save,” it will take you to a page containing bar codes and QR codes for the Items you have created, an example of which is below.

Adding Subcomponents
Suppose we wish to add subcomponents to the previously added item Z00100400005-00030.
Since this item has component type “Front Axle”, the component type definition requires that the
subcomponents be of component type “Left Wheel” and “Right Wheel”. Suppose we have added items
for both of these types, and their Part IDs are Z00100400007-00013 and Z00100400008-00014.
Both of these items must have their status set to “Available.”
To add these subcomponents:
- Use the back button on your browser to return to the list of items for “Front Axle.” Refresh the page to update the list.
- Click on the link for “Z00100400005-00030”. The UI will display the “Edit Item” screen for this item.
- Under “Sub-components,” click the “+” button to expand. The UI will now show the subcomponent functional positions that need to be filled.
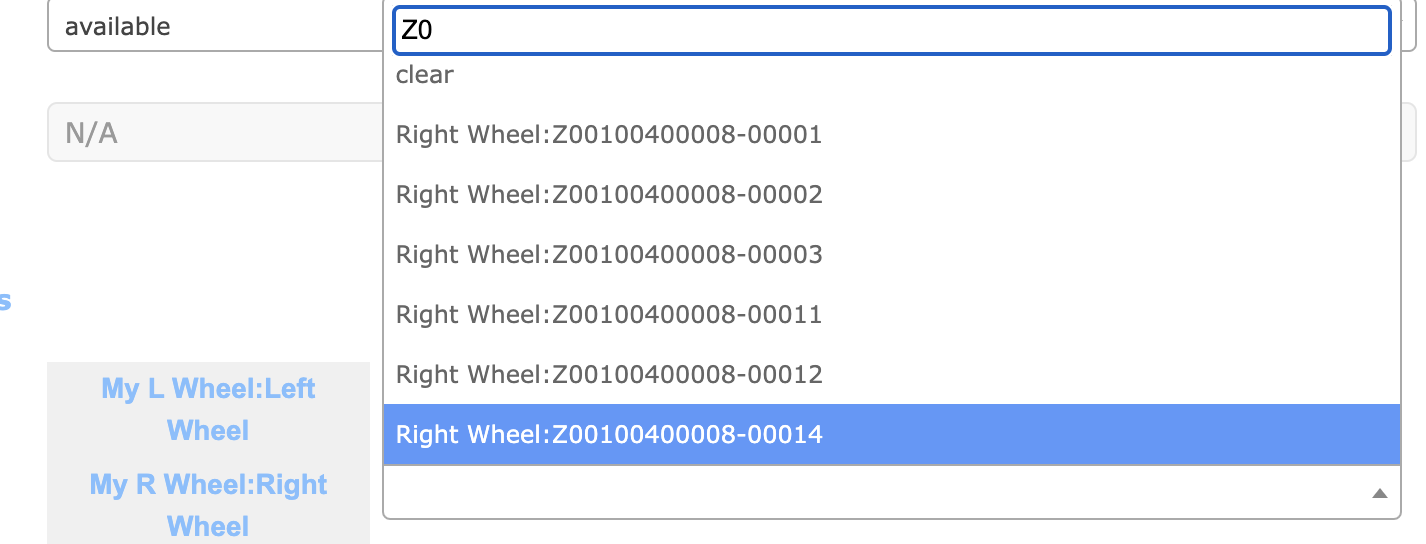
- Click the drop-down box for “My L Wheel: Left Wheel”. The box will expand to show a text field and the message “Please enter 2 or more characters.”
- Enter two or more characters for any substring of the Part ID that you want. In this case, “13” will suffice. The UI will display a list of Part IDs matching this substring.
- Click on “Z00100400007-13” to select it.
- Repeat this process for “My R Wheel:Right Wheel.”
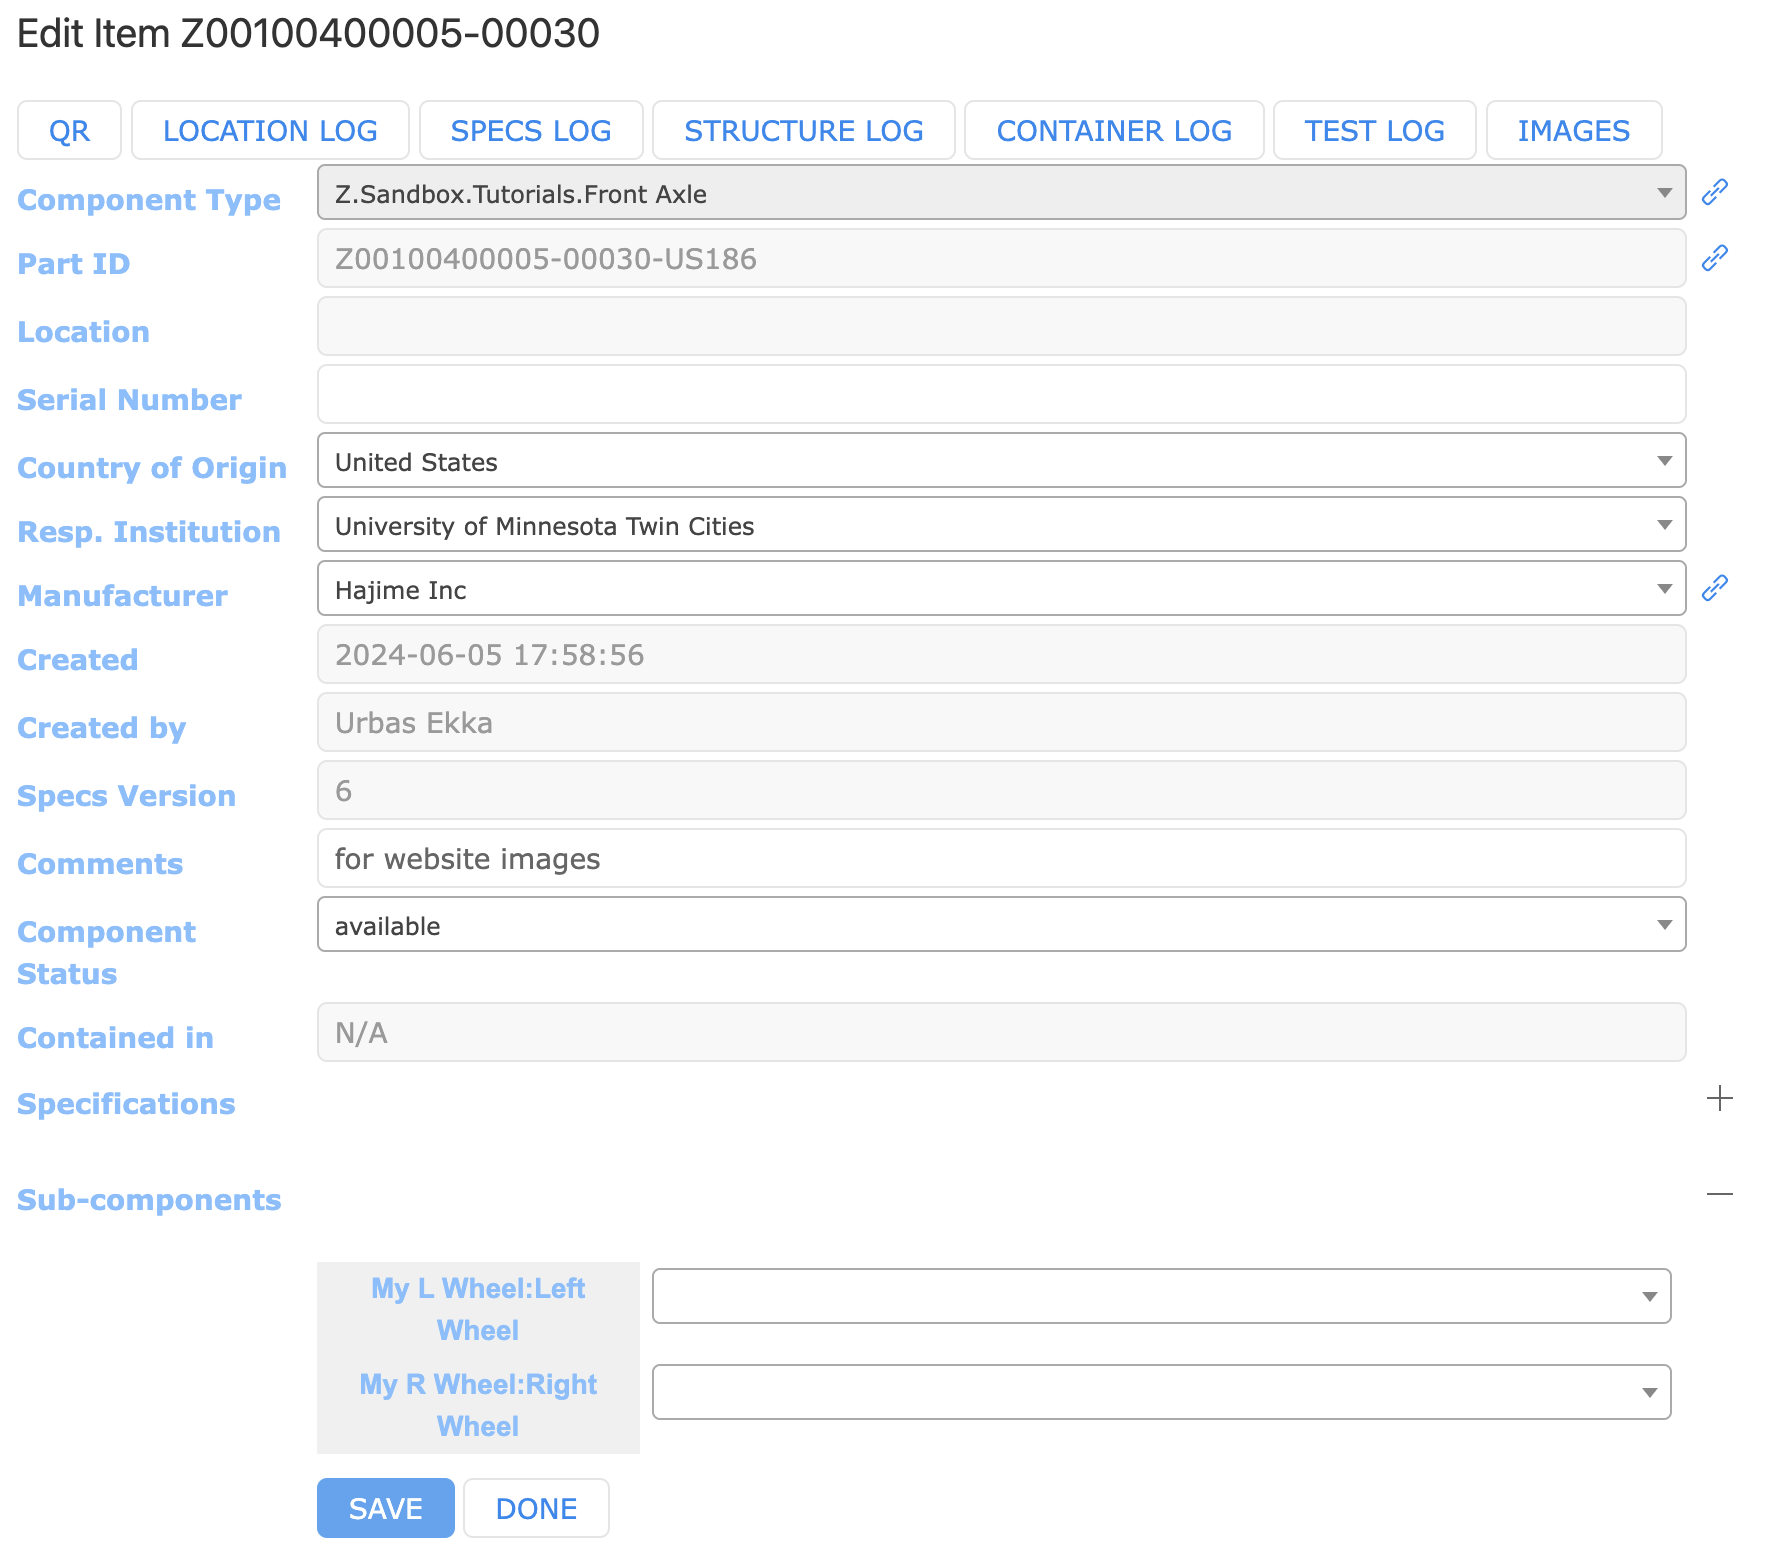
Sub-components is now available. Click on the drop-down list for “My L Wheel: Left Wheel.” It will ask you to “Please enter 2 or more characters. Enter a string of characters to help filter. (The Part Type ID is a good choice.)”

Sub-components is now available. Click on the drop-down list for “My R Wheel: Right Wheel.” It will ask you to “Please enter 2 or more characters. Enter a string of characters to help filter. (The Part Type ID is a good choice.)”
Adding Test Types & Tests
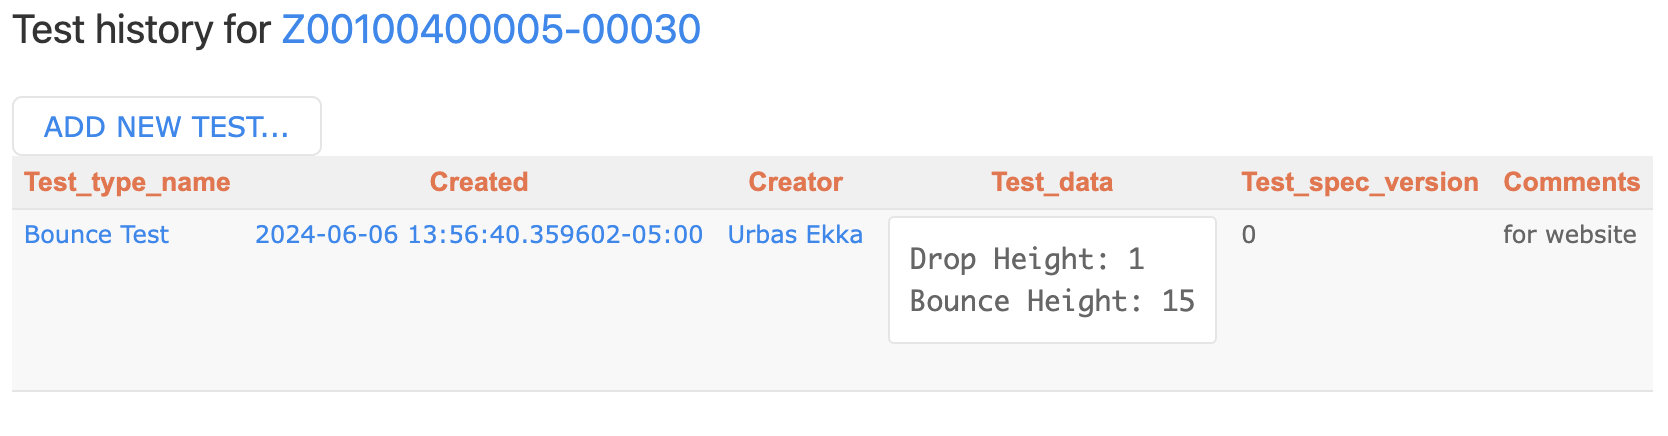
Suppose we want to add a new test type for “Front Axle” named “Bounce Test.” To do this, perform the following steps:
- Use the back button on your browser to return to the “Component Types” page that lists “Front Axle”
- Click on the “Test Types” folder in the “Front Axle” row. The UI will now show “Test Types for Component Type: Front Axle”
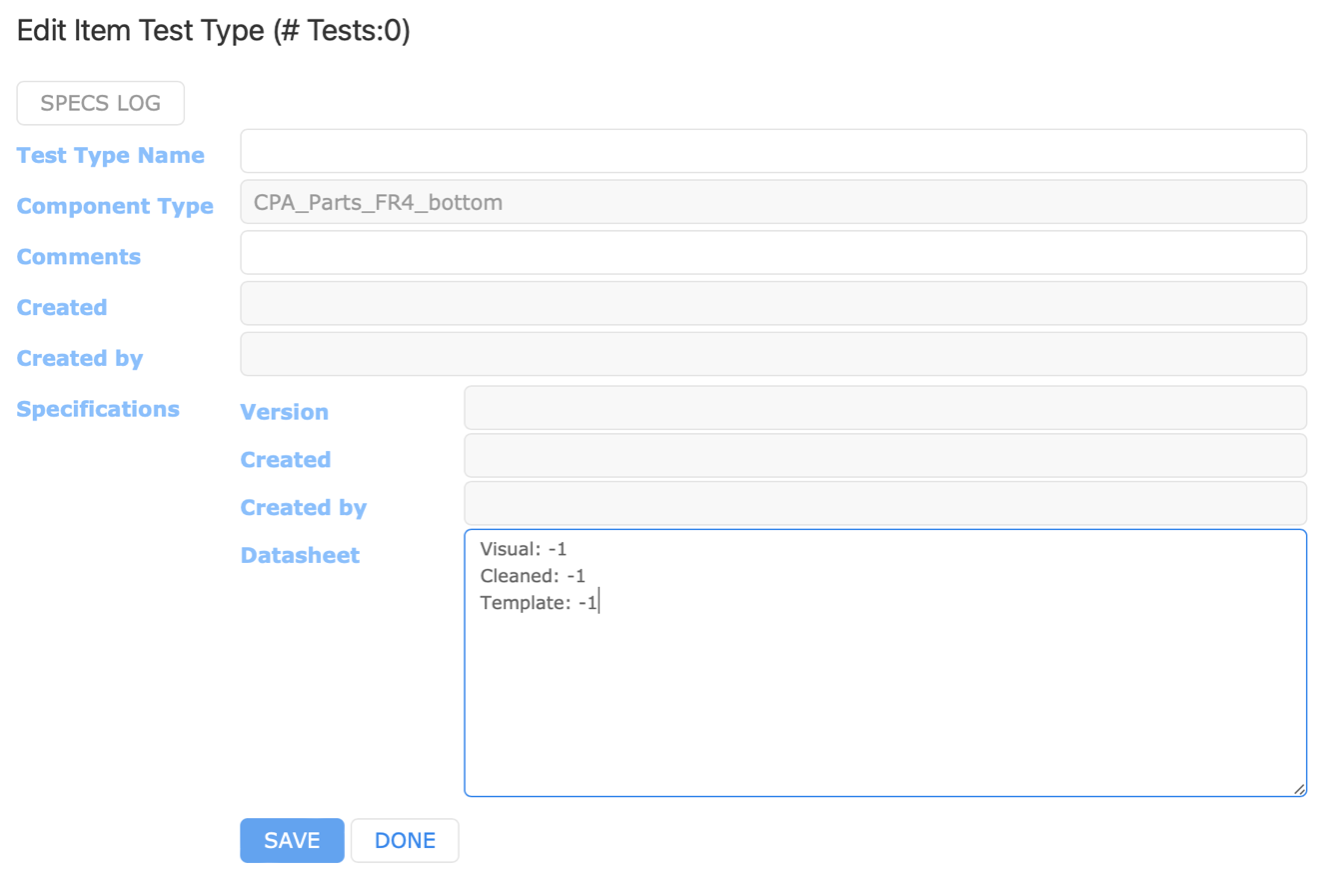
- Click on “ADD NEW…”. The UI will now show “Edit Item Test Type”
- Enter the data fields on this screen and click “DONE”. The UI will now show an updated screen “Test Types for Component Type: Front Axle”

You may now add test instances for your new test:
- Find the item you added earlier for the “Front Axle” type.
-
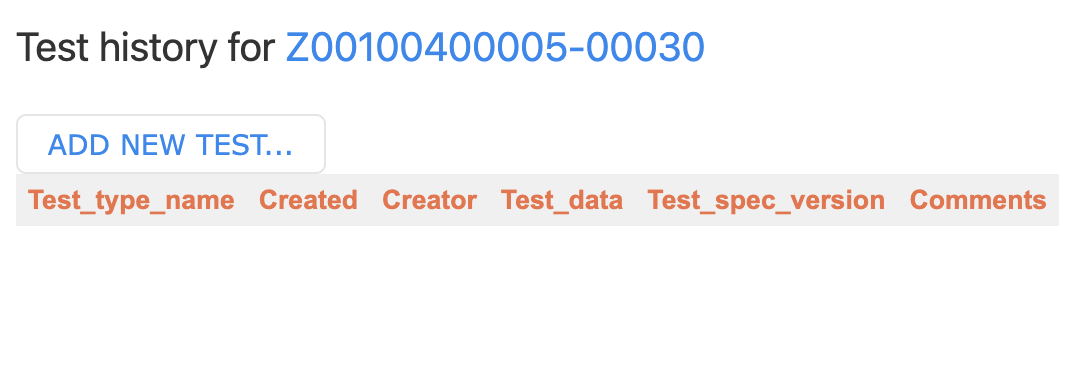
In the Edit Item screen for your item, click on “TEST LOG”. You will see “Test history for <your part id>
- Click “ADD NEW TEST…” The UI will now ask you to choose which test type you are using

- Enter the data for your test
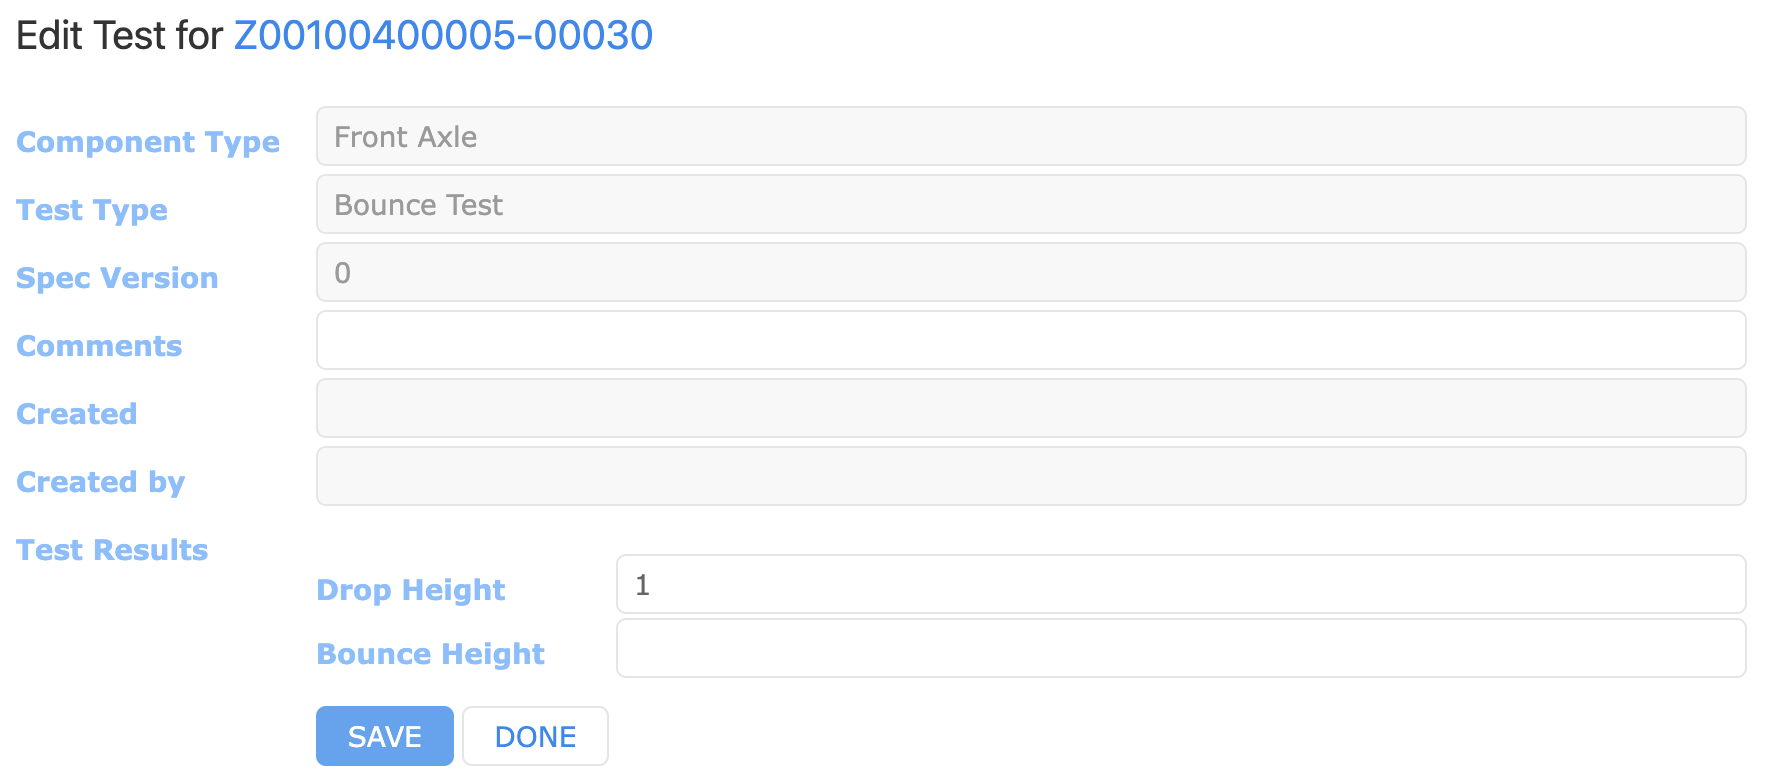
Displays available, pre-defined tests. In this case only the bounce test is defined.
Test Results: These fields are defined by the Test Type for the Component Type
- Click “DONE” when finished.
Adding Images
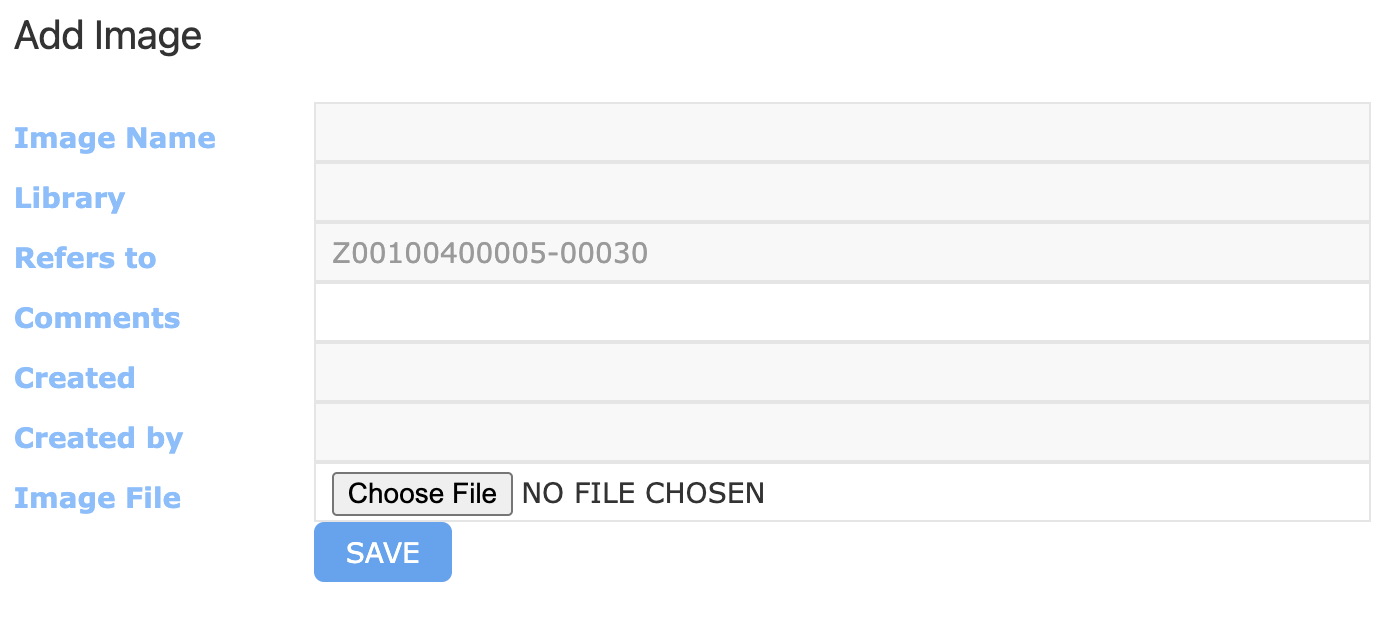
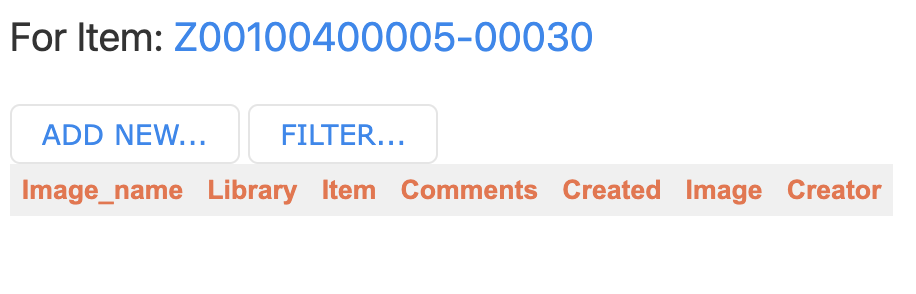
In order to add an image to a selected item, click on “Images” on the top item menu (see More Item Operations for more) which will present you with something that looks like the following.
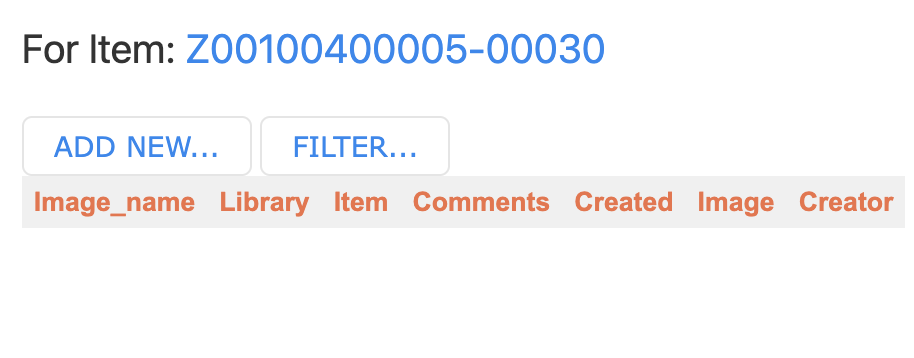
Gives you the ability to select the image, name it, and add a comment.
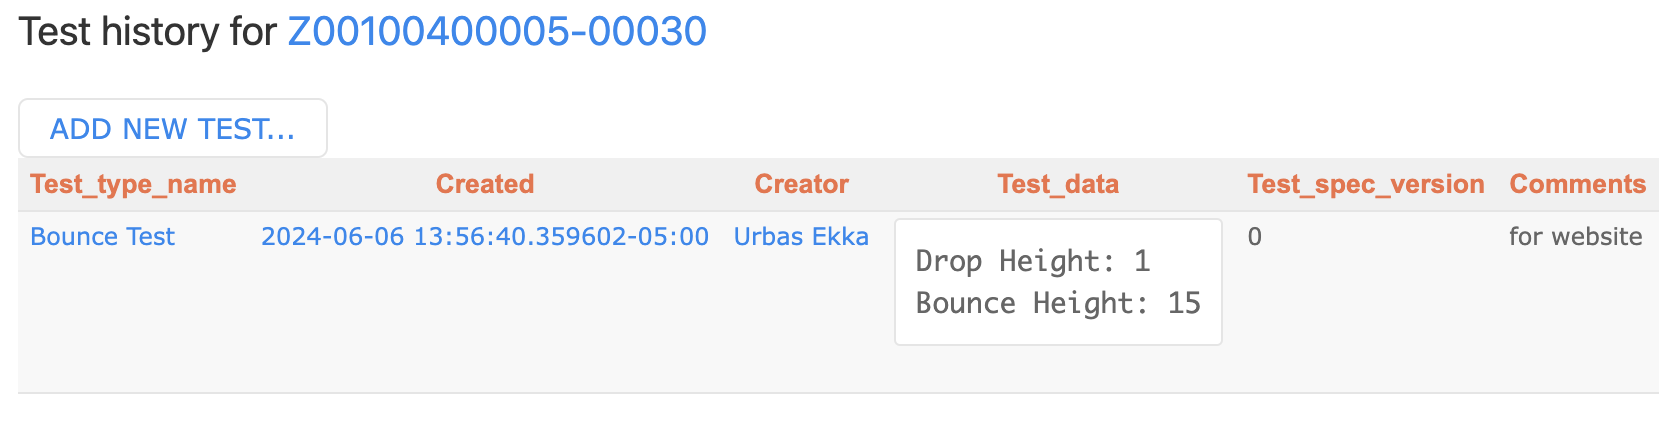
You can also add images to specific tests associated with items. Suppose we wish to add an image to the bounce test we added to Z00100400005-00030. Then navigate to the particular item and go to its “Test Log” which produces the following which allows you to add an image in the same way as shown above.
Clicking on the image button produces a menu identical to that seen in above.

You can also add an image immediately after the additon of a new test, as it gives you the option to do so.
Images are attached to that test result record ONLY. If you “edit” a test, the images you have attached will not carry forward. You will need to decide whether you should re-attach all images every time you update a test record, or regard all images in the historical sequence to be “current.” The author of this presentation has no strong opinion at the time this was written.
More Item Operations
Once an Item has been created, you are provided with more operations as shown below.
View a QR code containing a URL to this Item in the HWDB

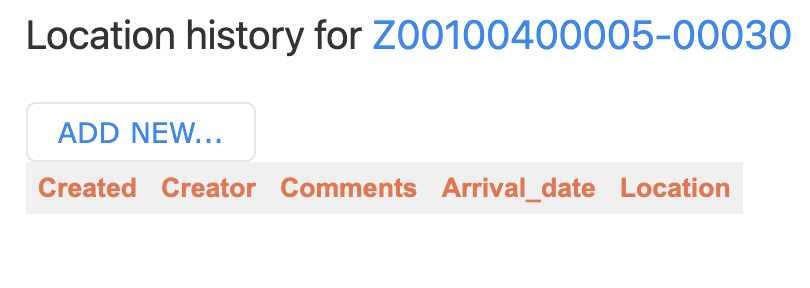
View location history of this Item. Allows you to add to it as well.
View a historical record of the Specifications for this Item
View a historical record of which Items this Item has been attached to as a sub-component (i.e., “parents” of this item).
View a historical record of the sub-components attached to this item.

View test history of this Item. Allows you to add to it as well.
View image history of this Item. Allows you to add to it as well.
Item Filtering
You can search for Items (Components) based on the usual fields such as Component_type, Part_id, Serial_number, and Creator. In addition, you can filter by the fields as shown below.
You can filter by status: any, available, temporarily not available, permanantly not available.
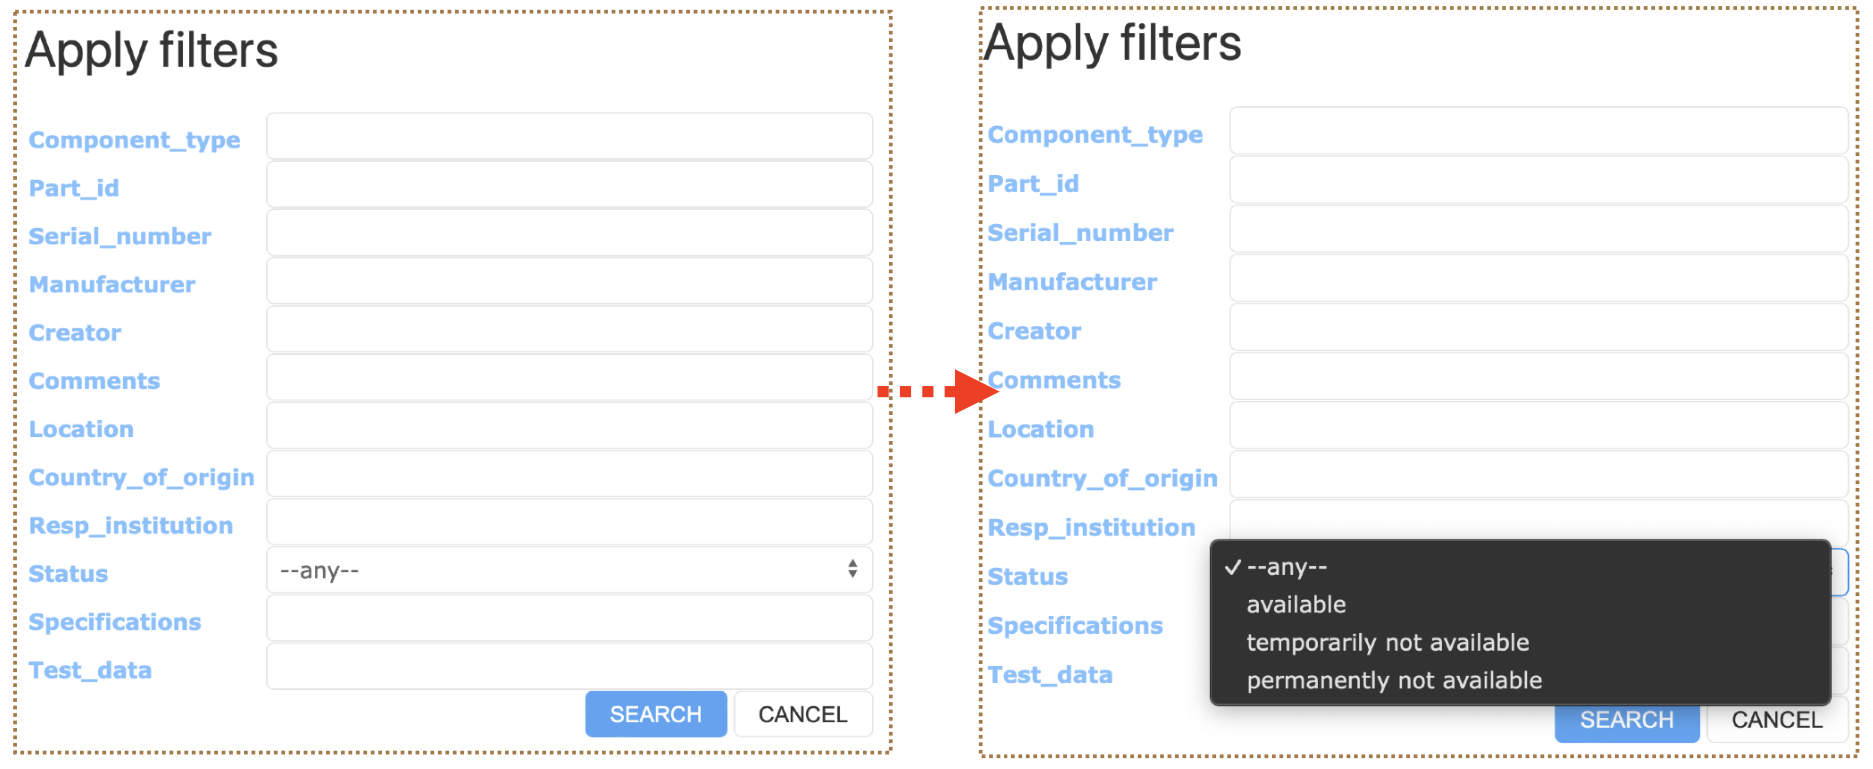
You can also filter by Location, Manufacturer, and Country of Origin. Each of which are case insensitive and need not be completely spelled out.
A more advanced discussion of filtering requires use of specific syntax.
Syntax
There is certain syntax that can be used when you are refining your search using filter fields. The following symbols can be utilized with numbers in filter fields.
symbol definition == equal to != not equal to < less than <= less than or equal to > greater than >= greater than or equal to
The following symbols can be utilized with strings and substrings in filter fields.
symbol definition == equal to != not equal to ~ case sensitive regex search ~* case insensitive regex search
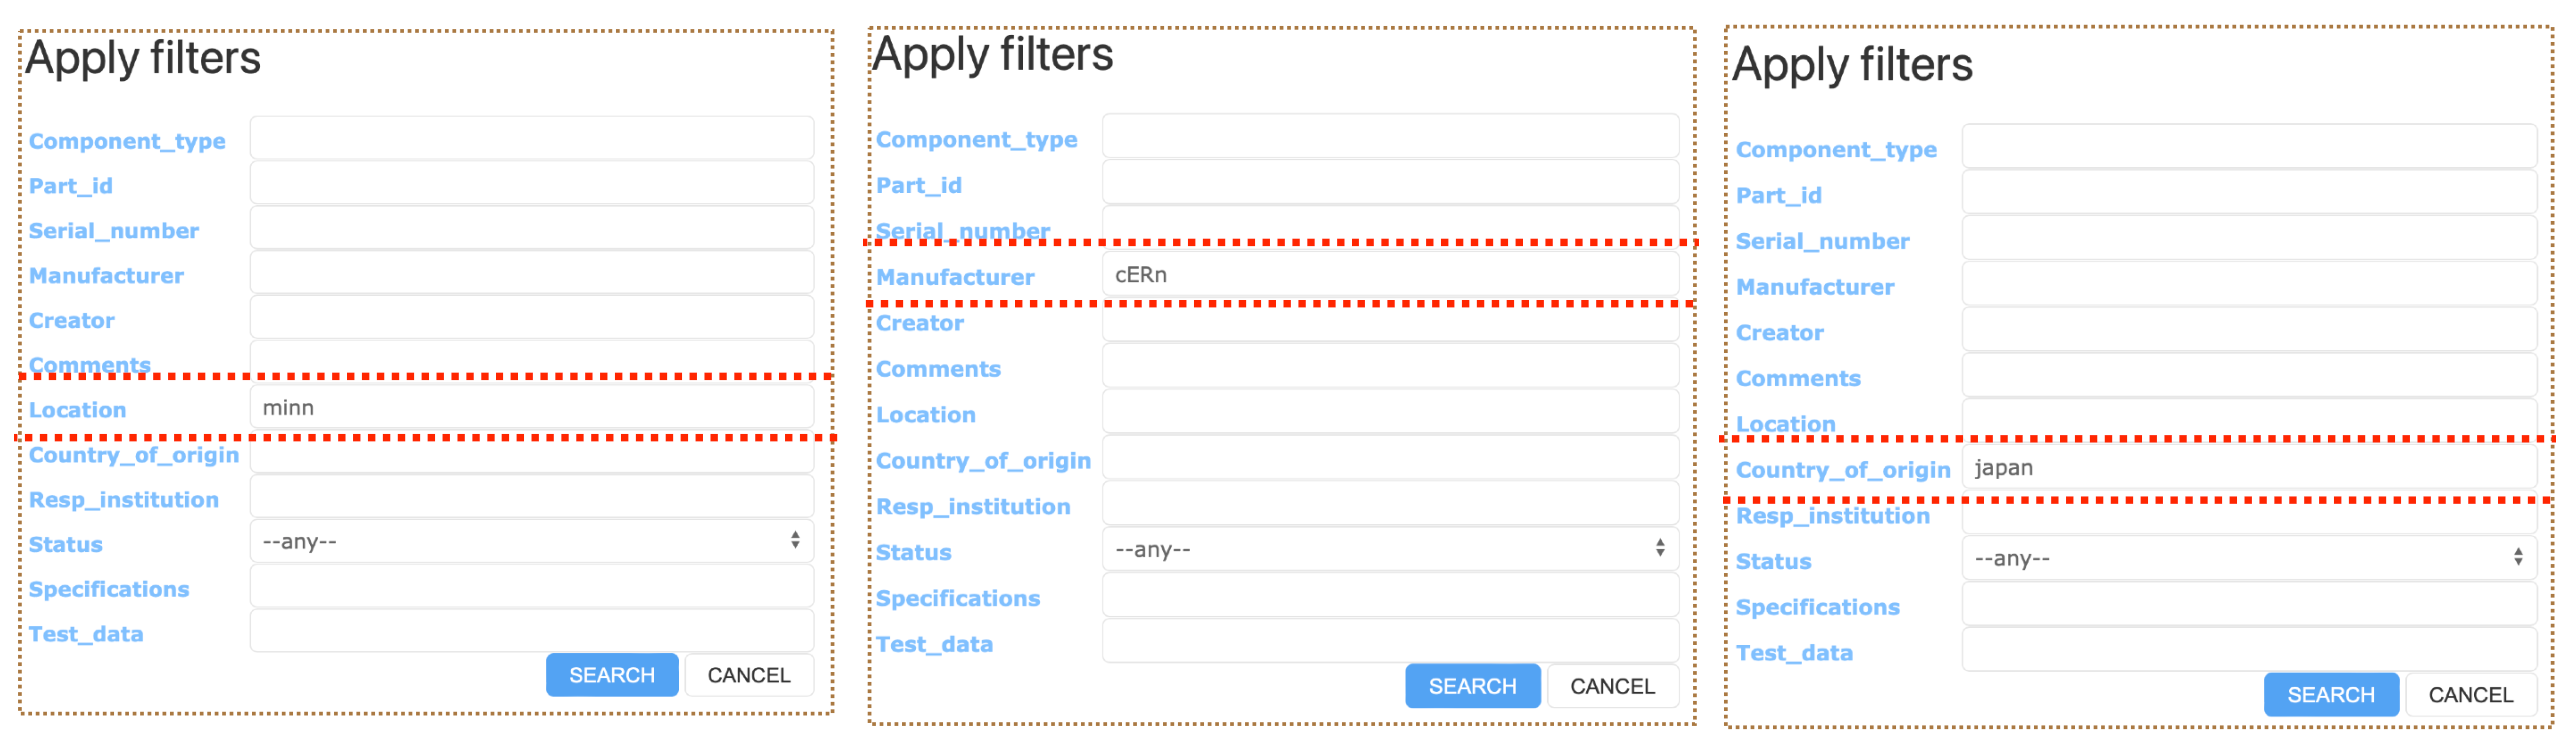
Filtering with Specifications
You can also filter based on item Specifications. Suppose there exists an item with the following specifictations:
"specifications":[
  {
    "Documentation": "https://something.com/something"
    "SiPM_Strip_ID": 4548
    "Test_Box_ID": "Mib3"
    "Tray_Number": 20
    "Vendor_box_Number": 14,
    "Vendor_Delivery_ID": "HPK_Ciemat_03"
    "_meta":{
      "_column_order:[
        "Vendor_Delivery_ID",
        "Vendor_box_Number",
        "SiPM_Strip_ID",
        "Test_Box_ID",
        "Documentation"
      ]
    }
  }
]
Then you can apply the following filters to search the item. The syntax used in the filtering field is explained in depth in the following section.
Consider an item with the following Specifications.
"specifications":[
  {
    "Vendor_Delivery_ID": "HPK_Ciemat_03"
    "DATA": {
      "Drawing Number": "DFD-21-2101",
      "Label Code": "12345",
      "Name": "Main I-Beam"
    }
  }
]
Then,
- Vendor_Delivery_ID~HPK_Ciemat_
- Vendor_Delivery_ID~*HPK_CiemaT_
- Name==Main I-Beam
- Label Code==12345
all return this item (as well as others if possible). However,
- Vendor_Delivery_ID~HPK_CiemaT_
would not return any item as ~ is case sensitive.
Filtering with Test Data
You can also filter using Test_data in the same way as Specifications. Suppose you have an item with the following test data:
"test_data":{
  "Test Results": [
    {
      "Location": "Minnesota",
      "Operator": "Scientist Red"; "Scientist Blue",
      "SiPM":[
        {
          "Comment":"",
          "List1":[
            1.77734e-06
            6.90008e-07
            -2.44907e-06
            5.33429e-06
          ]
          "List2":[
            "H_RED"
            "Z_yellow"
            "U_green"
            "J_BLUE"
          ]
        }
      ]
    }
  ]
}
Then,
- List1[0]==1.77734e-06
- List1[1]>6.9e-07
- List2[3]~*j_blue
- List[*]==H_RED
all return the intended item.
Key Points
Subcomponent links can only be made with Items, whose status = “available”.
Data Management using REST API
Overview
Teaching: 60 min
Exercises: 0 minQuestions
Active user privilage is required.
How do I enter and retrieve Items with the REST API?
How do I perform searches over Items/Tests with the REST API?
Objectives
To understand how one can POST and GET information of Item(s).
To understand how sub-component links could be made.
To understand how one can POST and GET information of Tests and images.
To be able to perform searches over Items and Tests.
Contents
In order to interface with the REST API we will use the following command line often:
curl --header "Authorization: Bearer $(cat /tmp/bt_u501)" 'https://dbwebapi2.fnal.gov:8443/cdbdev/api/v1/…'
where the file, /tmp/bt_u501, is your Bearer token file (you should have a different file name than u501 though). See the Setup page for more details, particularly how to obtain the token files, such as /tmp/bt_u501.
Due to their repeated usage, we will abbreviate the following commands as such:
alias CURL='curl -s --header "Authorization: Bearer $(cat /tmp/bt_u501)"'
export APIPATH='https://dbwebapi2.fnal.gov:8443/cdbdev/api/v1'
Note: The above path lets you access to the development version of the HWDB.
In order to access to the production version, the path would be;
export APIPATH='https://dbwebapi2.fnal.gov:8443/cdbdev/api/v1'
GET
GET Item
‘Getting’ an item calls the /components/<pid> API endpoint. For the following example we will use the following item: Z00100400005-00001. Use the following command line in order to ‘get’ the desired item.
CURL "${APIPATH}/components/Z00100400005-00001" | jq
When executed, you will get the following response.
"data": {
    "batch": {
      "id": 3,
      "received": "2020-05-15"
    },
    "category": "generic",
    "certified_qaqc": true,
    "comments": "",
    "component_id": 46435,
    "component_type": {
      "name": "Front Axle",
      "part_type_id": "Z00100400005"
    },
    "country_code": "US",
    "created": "2023-09-22T10:50:55.099050-05:00",
    "creator": {
      "id": 12624,
      "name": "Hajime Muramatsu",
      "username": "hajime3"
    },
    "institution": {
      "id": 186,
      "name": "University of Minnesota Twin Cities"
    },
    "is_installed": false,
    "location": "Fermi National Accelerator Laboratory",
    "manufacturer": {
      "id": 7,
      "name": "Hajime Inc"
    },
    "parent_part_id": null,
    "part_id": "Z00100400005-00001",
    "qaqc_uploaded": true,
    "serial_number": "",
    "specifications": [
      {
        "First name": "Hajime.",
        "Last name": "Muramatsu"
      }
    ],
    "specs_version": 12,
    "status": {
      "id": 170,
      "name": "Permanently Unavailable"
    }
  },
This can seem overwhealming at first, but notice the following important fields:
- component type id & name
- country Code
- institution id
- manufacturer
- serial number (empty)
- location
- specifications
- part_id (which is the pid generated by the database)
- status (see Updating Flags by Patching an Item(s) for more detail)
- Two shipping related flags (see Shipping handoff process for more detail):
- certified_qaqc
- qaqc_uploaded
- is_installed
GET List of Items
You can also get items by simply specifying the Component Type ID. To do so you can use the /component-types/<type_id>/components API endpoint. For the following example we will use component type ‘Front Axle’ with ID Z00100400005.
CURL "${APIPATH}/component-types/Z00100400005/components" | jq
When executed, it gives the following response:
{
  "component_type": {
    "name": "Front Axle",
    "part_type_id": "Z00100400005"
  },
  "data": [
    {
      "comments": "",
      "component_id": 46435,
      "created": "2023-09-22T10:50:55.099050-05:00",
      "creator": {
        "id": 12624,
        "name": "Hajime Muramatsu",
        "username": "hajime3"
      },
      "link": {
        "href": "/cdbdev/api/v1/components/Z00100400005-00001",
        "rel": "self"
      },
      "location": "",
      "part_id": "Z00100400005-00001",
      "serial_number": "",
      "specifications": [
        {
          "First name": "Hajime.",
          "Last name": "Muramatsu"
        }
      ],
      "status": {
        "id": 2,
        "name": "temporarily not available"
      }
    },
    {
      "comments": null,
      "component_id": 46436,
      "created": "2023-09-22T11:07:46.576790-05:00",
      "creator": {
        "id": 12624,
        "name": "Hajime Muramatsu",
        "username": "hajime3"
      }
    }
  ]
}
This command returns all items with ‘Front Axle’ component type. The database returns 100 items at a time. If a component type has more than 100 items associated with it, the list of items is split into multiple pages which is managed by pagination. Take for example Z00100300030
"pagination": {
    "next": "/cdbdev/api/v1/component-types/Z00100300030/components?page=2&size=100",
    "page": 1,
    "page_size": 100,
    "pages": 2,
    "prev": null,
    "total": 182
  }
In order to access a specific page number, you can use CURL '${APIPATH}/component-types/Z00100300030/components?page=X' where X is the specific page number.
GET Test Types
You can check which test types are compatible with a given component type. In order to do so you can use the /component-types/<type_id>/test-types API endpoint. The following is an example using component type Z00100100046.
CURL "${APIPATH}/component-types/Z00100100046/test-types" | jq
The response when executed is quite long, so we display an abbreviated list.
  "data" : [
      {
         "comments" : "Testing...",
         "created" : "2024-03-11T05:24:51.211047-05:00",
         "creator" : {
            "id" : 12624,
            "name" : "Hajime Muramatsu",
            "username" : "hajime3"
         },
         "id" : 599,
         "link" : {
            "href" : "/cdbdev/api/v1/component-test-types/599",
            "rel" : "self"
         },
         "name" : "Test_Parts_3_TestType_10"
      },
      {
         "comments" : "",
         "created" : "2023-07-30T20:13:55.920030-05:00",
         "creator" : {
            "id" : 12624,
            "name" : "Hajime Muramatsu",
            "username" : "hajime3"
         },
         "id" : 477,
         "link" : {
            "href" : "/cdbdev/api/v1/component-test-types/477",
            "rel" : "self"
         },
         "name" : "My QC check 2"
      },
      {
         "comments" : "Setting up Test Type",
         "created" : "2023-05-22T12:39:44.212142-05:00",
         "creator" : {
            "id" : 12624,
            "name" : "Hajime Muramatsu",
            "username" : "hajime3"
         },
         "id" : 464,
         "link" : {
            "href" : "/cdbdev/api/v1/component-test-types/464",
            "rel" : "self"
         },
         "name" : "CPAFC Cryo Pos QC check"
      }....
  ]
GET Test Results
You can also get test results associated with particular items. This uses the /components/<eid>/tests/<test_type_name> API endpoint. For the following example, we will use item Z00100100046-00008 and test type Test_Parts_3_TestType_10.
CURL "${APIPATH}/components/Z00100100046-00008/tests/Test_Parts_3_TestType_10" | jq
Which returns the following.
"data": [
    {
      "comments": "All look ok",
      "created": "2024-05-22T09:43:37.049580-05:00",
      "creator": {
        "id": 12624,
        "name": "Hajime Muramatsu",
        "username": "hajime3"
      },
      "id": 17813,
      "images": [],
      "link": {
        "href": "/cdbdev/api/v1/component-tests/17813",
        "rel": "details"
      },
      "methods": [
        {
          "href": "/cdbdev/api/v1/component-tests/17813/images",
          "rel": "Images"
        }
      ],
      "test_data": {
        "Cleaned": 1,
        "Template": 1,
        "Visual": 1
      },
      "test_spec_version": -1,
      "test_type": {
        "id": 599,
        "name": "Test_Parts_3_TestType_10"
      }
    }
  ],
GET Location of Item
You can get the current and previous locations of an item using the /components/<pid>/locations API endpoint. The returned list is sorted by most recent first. We will use item Z00100300030-00103 for the following example.
CURL "${APIPATH}/components/Z00100300030-00103/locations" | jq
Which returns the following.
"data": [
    {
      "arrived": "2024-04-10T14:50:12-05:00",
      "comments": "now testing through the REST API",
      "created": "2024-04-10T14:09:44.316278-05:00",
      "creator": "Hajime Muramatsu",
      "id": 92,
      "link": {
        "href": "/cdbdev/api/v1/locations/92",
        "rel": "details"
      },
      "location": {
        "id": 187,
        "name": "University of Mississippi"
      }
    },
    {
      "arrived": "2024-04-10T09:51:44.735194-05:00",
      "comments": "testing...",
      "created": "2024-04-10T09:51:44.735194-05:00",
      "creator": "Hajime Muramatsu",
      "id": 91,
      "link": {
        "href": "/cdbdev/api/v1/locations/91",
        "rel": "details"
      },
      "location": {
        "id": 186,
        "name": "University of Minnesota Twin Cities"
      }
    },
    {
      "arrived": "2024-04-10T14:50:12-05:00",
      "comments": "now testing through the REST API",
      "created": "2024-04-04T08:16:44.333658-05:00",
      "creator": "Hajime Muramatsu",
      "id": 15,
      "link": {
        "href": "/cdbdev/api/v1/locations/15",
        "rel": "details"
      },
      "location": {
        "id": 9,
        "name": "Universidade Federal de Alfenas"
      }
    }
]
GET QR/Barcode
You can use the designated API endpoints /get-barcode/<pid> and /get-qrcode/<pid> to get a barcode and QR code respectively. Consider Z00100100048-00033.
CURL "${APIPATH}/get-barcode/Z00100100048-00033-US186" --output test.png
Which produces the following.

The process is identical for producing QR codes.
GET Images
Regardless of how the image was posted (for a given Component Type, Item, or Test entry) the process of GETting the image and downloading it is very similar. The following are the API endpoints for Component type, Item, and Test entry respectively. Note that GETting an image from a test entry requires the OID. The manner in which the OID can be obtained is shown here.
 CURL "${APIPATH}/component-types/<type_id>/images"
 CURL "${APIPATH}/components/<eid>/images"
 CURL "${APIPATH}/component-tests/<oid>/images"
We will only guve an example for GETting an image for a given component type, as aside from the inital API endpoint, the process is identical. Suppose you have the type id Z00100100048.
CURL "${APIPATH}/component-types/Z00100100048/images"
{
  "component_type": {
    "name": "Test_Parts_1",
    "part_type_id": "Z00100100048"
  },
  "data": [
    {
      "comments": null,
      "created": "2024-05-22T14:03:26.007944-05:00",
      "creator": {
        "id": 12624,
        "name": "Hajime Muramatsu",
        "username": "hajime3"
      },
      "image_id": "fa636f5c-186d-11ef-ba26-2f96aeb61232",
      "image_name": "myimage.pdf",
      "library": "type",
      "link": {
        "href": "/cdbdev/api/v1/img/fa636f5c-186d-11ef-ba26-2f96aeb61232",
        "rel": "self"
      }
    },
    {
      "comments": null,
      "created": "2024-05-22T14:09:14.068344-05:00",
      "creator": {
        "id": 12624,
        "name": "Hajime Muramatsu",
        "username": "hajime3"
      },
      "image_id": "c9dfdd88-186e-11ef-ba26-c76e454071ee",
      "image_name": "myimage.pdf",
      "library": "type",
      "link": {
        "href": "/cdbdev/api/v1/img/c9dfdd88-186e-11ef-ba26-c76e454071ee",
        "rel": "self"
      }
    }
  ],
  "link": {
    "href": "/cdbdev/api/v1/component-types/Z00100100048/images",
    "rel": "self"
  },
  "status": "OK"
}
Notice that there are mulitple “myimage.pdf”s, but the image_id is unique. In order to download the desired image, we will require the image_id, since we will utilize the /img/<image_id> API endpoint.
CURL "${APIPATH}/img/fa636f5c-186d-11ef-ba26-2f96aeb61232" -o myimage.pdf
POST
POST item
When you post an item, the database generates a unique DUNE PID and assigns it to the item. Posting an item calls on the /component-types/<type_id>/components API endpoint. For the following example we will post an item with Component Type ID Z00100400005. You can execute the command using the following line:
CURL -H "Content-Type: application/json" -X POST -d @Add_AnItem_Test_Parts_1.json "${APIPATH}/component-types/Z00100400005/components" | jq
And entering the following JSON.
{
    "component_type": {
        "part_type_id": "Z00100400005"
    },
    "country_code": "US",
    "comments": "Testing...",
    "institution": {
        "id": 186
    },
    "manufacturer": {
        "id": 7
    },
    "specifications": {
	"Last name" : "Muramatsu",
	"First name" : "Hajime"
    }
}
When posting an item, the following fields are required:
- part_type_id
- country_code
- institution
- specifications
When excecuted, you should receive a response similar to the following:
{
  "component_id": 153639,
  "data": "Created",
  "part_id": "Z00100400005-00014",
  "status": "OK"
}
Which displays the assigned PID, Z00100400005-00014.
POST mulitple items
You can also post multiple items for a specified Component Type ID at once. To do so, you can use the /component-types/<type_id>/bulk-add API endpoint. For the following example we will post items with Component Type ID Z00100400005. You can execute the command using the following line:
CURL -H "Content-Type: application/json" -X POST -d @Add_ItemS_Test_Parts_1.json "${APIPATH}/component-types/Z00100400005/bulk-add" | jq
And enter the following JSON:
{
    "component_type": {
	"part_type_id": "Z00100400005"
    },
    "country_code": "US",
    "institution": {
	"id": 186
    },
    "manufacturer": {
	"id": 7
    },
    "count": 2
}
Notice that we specify how many items we wish to post by “count”. When excecuted, you should receive a response similar to the following:
{
  "data": [
    {
      "link": {
        "href": "/cdbdev/api/v1/components/Z00100400005-00015",
        "rel": "self"
      },
      "part_id": "Z00100400005-00015"
    },
    {
      "link": {
        "href": "/cdbdev/api/v1/components/Z00100400005-00016",
        "rel": "self"
      },
      "part_id": "Z00100400005-00016"
    }
  ],
  "status": "OK"
}
You can see that two distinct PIDs have been assigned Z00100400005-00015 and Z00100400005-00016.
POST Test Type
Creating a Test Type for a particular Component Type calls upon the /component-types/<type_id>/test-types API endpoint. When posting a test type, the test type name and specifications are required. We will continue using Component Type Z00100400005.You can excecute the following command line:
CURL -H "Content-Type: application/json" -X POST -d @Post_TestType_Test_parts_3.json "${APIPATH}/component-types/Z00100100046/test-types" | jq
And submit the following JSON file:
{
    "component_type": {
        "part_type_id": "Z00100100046"
    },
    "name": "Test_Parts_3_TestType_10",
    "comments": "Testing...",
    "specifications": {
        "Cleaned": 0,
        "Template": 0,
        "Visual": 0
    }
}
When executed, a response similar to the following should be displayed.
{
   "data" : "Created",
   "name" : "Test_Parts_3_TestType_10",
   "status" : "OK",
   "test_type_id" : 599
}
Which displays that a test type of name Test_Parts_3_TestType_10 was created.
POST Test Result
Posting test results calls upon the /components/<pid>/tests API endpoint. you must specify the name of the test and the specifications. It is important to note that you should know the schema of the specifications prior to submission of the JSON file. Comments are optional. For the following example, the external ID is Z00100100046-00008. The command is as follows:
CURL -H "Content-Type: application/json" -X POST -d @Post_TestResult_Test_parts_10.json "${APIPATH}/components/Z00100100046-00008/tests" | jq
And the JSON file is as such:
{
    "test_type": "Test_Parts_3_TestType_10",
    "comments": "All look ok",
    "test_data": {
        "Cleaned": 1,
        "Template": 1,
        "Visual": 1
    }
}
When executed, it should produce a response similar to the following:
{
  "data": "Created",
  "status": "OK",
  "test_id": 17813,
  "test_type_id": 599
}
POST New location
You can post a new location to an item by using the /components/<pid>/locations API endpoint. The location is specified by Institution ID, which can be found here. When adding a new location to an item, if the time zone is not specified for the arrival time the time zone defaults to CST. The following is an example.
CURL -H "Content-Type: application/json" -X POST -d @Post_ALocation.json "${APIPATH}/components/Z00100300030-00103/locations" | jq
{
  "arrived": "2024-05-10 13:27:18",
  "comments": "now testing through the REST API",
  "location": {
    "id": 187
  }
}
When executed, it should produce a similar response to the following.
{
  "data": "Created",
  "id": 95,
  "status": "OK"
}
POST Images
You can also post images in three different ways: for a given Component Type, for a given Item, and for a given Test entry. Most major image types are supported including .jpeg, .tiff, .pdf, .bmp, and .png.
POST Image for Component Type
Posting an image for a given Component Type utilizes the /component-types/<type_id>/images API endpoint. Suppose you wish to post an image myimage.pdf to the component type Z00100100048.
CURL -H "comments=testing from curl" -F "image=@myimage.pdf" "${APIPATH}/component-types/Z00100100048/images" | jq
When executed, the response is as follows.
{
  "data": "Created",
  "image_id": "fa636f5c-186d-11ef-ba26-2f96aeb61232",
  "status": "OK"
}
POST Image for Item
Posting an image for a specific item utilizes the /components/<eid>/images API endpoint. Suppose you wish to post an image myimage.pdf to the item Z00100100048-00033.
CURL -H "comments=testing from curl" -F "image=@myimage.pdf" "${APIPATH}/components/Z00100100048-00033/images" | jq
When executed, the response is as follows.
{
  "data": "Created",
  "image_id": "0c5cb65e-189c-11ef-bcbf-af36911a955c",
  "status": "OK"
}
POST Image for Test
In order to post an image to a particular Test entry you require a unique IF assigned to each entry, called an OID. To obtain the OID, you need to GET the particular test result. For this example, suppose you have item Z00100200040-00001 and test type CPA_Parts_FR4_main QC check. You can use the ` /components/
CURL "${APIPATH}/components/Z00100200040-00001/tests/CPA_Parts_FR4_main%20QC%20check?history=true" | jq
  "data": [
    {
      "comments": "here is the 1st test of the test result...",
      "created": "2020-11-16T10:13:48.704421-06:00",
      "creator": {
        "id": 12624,
        "name": "Hajime Muramatsu",
        "username": "hajime3"
      },
      "id": 110,
      "images": [
        {
          "id": "12529424-86a6-11eb-a31b-936fd91bb429",
          "name": "DFD-20-A017.pdf"
        }
      ],
      "link": {
        "href": "/cdbdev/api/v1/component-tests/110",
        "rel": "details"
      },
      "methods": [
        {
          "href": "/cdbdev/api/v1/component-tests/110/images",
          "rel": "Images"
        }
      ],
      "test_data": {
        "Cleaned": 0,
        "Comments": null,
        "Template": 1,
        "Visual": 40
      },
      "test_spec_version": -1,
      "test_type": {
        "id": 15,
        "name": "CPA_Parts_FR4_main QC check"
      }
    },
    {
      "comments": "here is the 1st test of the test result...",
      "created": "2020-11-16T10:13:18.708351-06:00",
      "creator": {
        "id": 12624,
        "name": "Hajime Muramatsu",
        "username": "hajime3"
      },
      "id": 109,
      "images": [],
      "link": {
        "href": "/cdbdev/api/v1/component-tests/109",
        "rel": "details"
      },
      "methods": [
        {
          "href": "/cdbdev/api/v1/component-tests/109/images",
          "rel": "Images"
        }
      ],
      "test_data": {
        "Cleaned": 0,
        "Comments": "All looked/passed good...",
        "Template": 1,
        "Visual": 40
      },
      "test_spec_version": -1,
      "test_type": {
        "id": 15,
        "name": "CPA_Parts_FR4_main QC check"
      }
    }
  ]
Here we see two test results, the first one with an image, OID = 110 and the second without, OID = 109. Notice that, independent of whether there is an image(s) associated with a particular test or not, there is always an OID assigned to each of the entries. You can use the ` /component-tests/
CURL -H "comments=testing from curl" -F "image=@myimage.pdf" "${APIPATH}/component-tests/109/images" | jq
When executed, the response is as follows.
{
  "data": "Created",
  "image_id": "ccdd1168-18a0-11ef-ad0c-0bc7358d82dc",
  "status": "OK"
}
Item Filtering
One can get items using specification and test data as seen in Item Filtering in the WEB UI section. The following are the templates for the bash commands.
/api/v1/components?specs=<XXX>
/api/v1/components?testdata=<XXX>
The following are a list of specific examples for get via specifications:
/api/v1/components?specs=SiPM_Strip_ID==4548 | jq.data[].part_id
/api/v1/components?specs=Test_Box_ID==Mib3 | jq.data[].part_id
/api/v1/components?specs=Label%20Code==12345| jq.data[].part_id
The following is a list of specific examples for get via test data:
/api/v1/components?testdata=RPFSSRes%20RP%20Drawing%20N==DFD-20-A503 | jq.data[].part_id
/api/v1/components?testdata=I[0]==1.2604860486048603e-06 | jq.data[].part_id
Syntax
There is certain syntax that can be used when you are refining your search using filter fields. The following symbols can be utilized with numbers in filter fields.
symbol definition == equal to != not equal to < less than <= less than or equal to > greater than >= greater than or equal to
The following symbols can be utilized with strings and substrings in filter fields.
symbol definition == equal to != not equal to ~ case sensitive regex search ~* case insensitive regex search
Updating Flags by Patching an Item(s)
There are the following four flags that you can update by patching the corresponding item(s):
- Component Status flag (10 options with its initial value being set as “Unknown” (Status ID = 0))
- certified_qaqc
- qaqc_uploaded
- is_installed
Here,
certified_qaqc corresponds to Consortium Certified QA/QC flag
and qaqc_uploaded represents All QA/QC Test and Documentation Uploaded.
First, let’s determine values of these flags from an item:
There are two ways to check for this, one is by simply checking the item itself via the /components/<eid> API endpoint. The other is to do so directly through the /components/<eid>/status API end point. Let’s take Z00100400005-00001 as an example here.
CURL "${APIPATH}/components/Z00100400005-00001/status" | jq
This returns the following.
{
  "component": {
    "id": 46435,
    "part_id": "Z00100400005-00001"
  },
  "data": {
    "certified_qaqc": true,
    "is_installed": false,
    "qaqc_uploaded": true,
    "status": {
      "id": 170,
      "name": "Permanently Unavailable"
    }
  },
  "link": {
    "href": "/cdbdev/api/v1/components/Z00100400005-00001/status",
    "rel": "self"
  },
  "status": "OK"
}
We can see values of those binary (true or false) flags, certified_qaqc, qaqc_uploaded, and is_installed.
We can also see the information on the Component Status flag with its ID = 170 and name = “Permanently Unavailable” in this example. In general, a Component Status can be one of the following 10 options:
| Status ID | Status Name |
|---|---|
| 0 | Unknown (initial value) |
| 100 | In Fabrication |
| 110 | Waiting on QA/QC Tests |
| 120 | QA/QC Tests - Passed All |
| 130 | QA/QC Tests - Non-conforming |
| 140 | QA/QC Tests - Use As Is |
| 150 | In Rework |
| 160 | In Repair |
| 170 | Permanently Unavailable |
| 180 | Broken or Needs Repair |
Now let’s update these flags using PID = D00599800009-00002 as an example:
CURL -H "Content-Type: application/json" -X PATCH -d @Patch_AnItem_2.json "${APIPATH}/components/D00599800009-00002" | jq
where Patch_AnItem_2.json is;
{
    "part_id": "D00599800009-00002",
    "manufacturer": {
        "id": 7
    },
    "status": {
        "id": 120
    },
    "certified_qaqc": false,
    "qaqc_uploaded": false,
    "is_installed": true
}
You can also PATCH the status of multiple items at once via the /component-types/<type id>/bulk-update" API endpoint. Let’s update flag values of two items, Z00100300001-06363 and Z00100300001-06364 with this method.
CURL -H "Content-Type: application/json" -X PATCH -d @Patch_Items.json "${APIPATH}/component-types/Z00100300001/bulk-update" | jq
And Patch_Items.json is this:
{
    "data": [
        {
            "comments": "Patched component types",
            "manufacturer": {
                "id": 7
            },
            "part_id": "Z00100300001-06363",
            "status": {
                "id": 120
            },
            "certified_qaqc": true,
            "qaqc_uploaded": true,
            "is_installed": false,
            "specifications": {
                "Color": "Blue"
            }
        },
        {
            "comments": "Patched component types",
            "manufacturer": {
                "id": 7
            },
            "part_id": "Z00100300001-06364",
            "status": {
                "id": 120
            },
            "certified_qaqc": true,
            "qaqc_uploaded": true,
            "is_installed": false,
            "specifications": {
                "Color": "Red"
            }
        }
    ]
}
When executed, it returns the following:
{
  "data": [
    {
      "link": {
        "href": "/cdbdev/api/v1/components/190431",
        "rel": "self"
      },
      "part_id": "Z00100300001-06363"
    },
    {
      "link": {
        "href": "/cdbdev/api/v1/components/190432",
        "rel": "self"
      },
      "part_id": "Z00100300001-06364"
    }
  ],
  "status": "OK"
}
Subcomponents
Adding subcomponents is a way to link existing items. Before attempting to link them, it is important to insure that the subcomponent type definitions are correct. The defining of subcomponent types can be done via WEB-UI or REST API.
To be linked
In order to link items, the component status of the intended subcomponent must be one of the following four statuses:
- In Fabrication (id = 100)
- Waiting on QA/QC Tests (id = 110)
- QA/QC Tests - Passed All (id = 120)
- QA/QC Tests - Use As is (id = 140)
Linking Subcomponents
There are two ways to link a subcomponent. One is to do so directly when posting an item and specifying subcomponents, the other is patching an existing item to add the subcomponents. As previously mentioned, the intended subcomponents must be available to be linked. For the following examples, consider items Z00100400007-00001,Z00100400008-00001. As well as an item with subcomponent schema defined as:
"subcomponents": {
	"My L Wheel": <pid>
	"My R Wheel": <pid>
    }
POST
In order to link items via post, the process it identical to posting an item without subcomponents via the /component-types/<type_id>/components API endpoint. It is important to not that you cannot link items that are already linked to other items.
CURL -H "Content-Type: application/json" -X POST -d @Add_AnItem_Test_Parts_1-2.json "${APIPATH}/component-types/Z00100400005/components" | jq
The JSON passed:
{
    "component_type": {
        "part_type_id": "Z00100400005"
    },
    "country_code": "US",
    "comments": "Testing...",
    "institution": {
        "id": 186
    },
    "manufacturer": {
        "id": 7
    },
    "specifications": {
	"Last name": "Muramatsu",
	"First name": "Hajime"
    },
    "subcomponents": {
        "My L Wheel": "Z00100400007-00001",
        "My R Wheel": "Z00100400008-00001"
    }
}
Notice the only difference is the specified subcomponents. When executed, it returns the following.
{
  "component_id": 153657,
  "data": "Created",
  "part_id": "Z00100400005-00017",
  "status": "OK"
}
PATCH to Link
You can patch an item to add subcomponents via the /components/<eid>/subcomponents API endpoint.
CURL -H "Content-Type: application/json" -X PATCH -d @Patch_AnItem_Test_Parts_1.json "${APIPATH}/components/Z00100400005-00001/subcomponents" | jq
Submit the following JSON.
{
    "component": {
	"part_id": "Z00100400005-00001"
    },
    "subcomponents": {
	"My L Wheel": "Z00100400007-00002",
	"My R Wheel": "Z00100400008-00002"
    }
}
When executed, it returns the following.
{
  "component_id": 46435,
  "data": "Updated",
  "part_id": "Z00100400005-00001",
  "status": "OK"
}
Notice that “data” has been “Updated.”
PATCH to Clear
You can also undo or clear links using PATCH and the /components/<eid>/subcomponents API endpoint.
CURL -H "Content-Type: application/json" -X PATCH -d @Patch_AnItem_Test_Parts_1_clean.json "${APIPATH}/components/Z00100400005-00001/subcomponents" | jq
In order to clear, pass null in the schema of the defined subcomponent.
  {
    "component": {
        "part_id": "Z00100400005-00001"
    },
    "subcomponents": {
        "My L Wheel": null,
        "My R Wheel": null
    }
}
When executed, the following is returned.
{
  "component_id": 46435,
  "data": "Updated",
  "part_id": "Z00100400005-00001",
  "status": "OK"
}
GET Subcomponent
You can also use GET and the /components/<eid>/subcomponents API endpoint to return a list of all subcomponents linked to a particular item. For example, consider Z00100400005-00001.
CURL "${APIPATH}/components/Z00100400005-00001/subcomponents" | jq
Which returns the following.
"data": [
    {
      "comments": null,
      "created": "2024-05-22T10:45:08.718759-05:00",
      "creator": {
        "id": 12624,
        "name": "Hajime Muramatsu",
        "username": "hajime3"
      },
      "functional_position": "My L Wheel",
      "link": {
        "href": "/cdbdev/api/v1/components/Z00100400007-00002",
        "rel": "self"
      },
      "operation": "mount",
      "part_id": "Z00100400007-00002",
      "type_name": "Left Wheel"
    },
    {
      "comments": null,
      "created": "2024-05-22T10:45:08.727897-05:00",
      "creator": {
        "id": 12624,
        "name": "Hajime Muramatsu",
        "username": "hajime3"
      },
      "functional_position": "My R Wheel",
      "link": {
        "href": "/cdbdev/api/v1/components/Z00100400008-00002",
        "rel": "self"
      },
      "operation": "mount",
      "part_id": "Z00100400008-00002",
      "type_name": "Right Wheel"
    }
  ],
GET Parent-Component
You can also check it see if a particular item is a subcomponent, that is check to if if it has a parent-component. You can do so by calling the /components/<eid>/container API endpoint. Consider the item “My L Wheel”, Z00100400007-00001.
CURL "${APIPATH}/components/Z00100400007-00002/container" | jq
Which returns the following.
"data": [
    {
      "comments": null,
      "container": {
        "component_type": {
          "name": "Front Axle",
          "part_type_id": "Z00100400005"
        },
        "link": {
          "href": "/cdbdev/api/v1/components/Z00100400005-00001",
          "rel": "self"
        },
        "part_id": "Z00100400005-00001"
      },
      "created": "2024-05-22T10:45:08.718759-05:00",
      "creator": {
        "id": 12624,
        "name": "Hajime Muramatsu",
        "username": "hajime3"
      },
      "functional_position": "My L Wheel",
      "link": {
        "href": "/cdbdev/api/v1/components/Z00100400005-00001",
        "rel": "self"
      },
      "operation": "mount",
      "part_id": "Z00100400007-00002",
      "type_name": "Left Wheel"
    }
  ]
Notice “container” or the parent-component.
Key Points
Subcomponent links can only be made with Items, whose status is one of the followings… In Fabrication (id = 100), Waiting on QA/QC Tests (id = 110), QA/QC Tests - Passed All (id = 120), or QA/QC Tests - Use As is (id = 140).
Using the iPad App
Overview
Teaching: 30 min
Exercises: 0 minQuestions
Active user privilage is required.
How do I go/down through PID hieratchy, scan QR codes, and post Locations via iPad?
Objectives
To be able to go through the PID hieratchy with the PID Display
To be able to deal with Item Locations with the Shipment Tracker
Contents
Section Description Basics General overview of the iPad app. Requirements Device requirements Deployment How to download the app Login Page How to login PID Display PID management system Shipment Tracker Utilizing the pid system to keep track of shipment crates
Basics
Requirements
The iPad app can be run on iPad, iPhone, or even on Mac. The following are the specifics for each device.
iPad (and iPhone):
- iPadOS/iOS 14.0 or newer For reference, we have been using an iPad with the following specifications since 2019:
- 6th generation
- 128 GB storage
- 9.7 inch (diagonal) display
- A10 Fusion Chip with 64-bit architecture, Embedded M10 coprocessor
- Model # : MR7J2LL/A
Mac:
- macOS 11 (Big Sur) or newer The app also runs on Macs with both Intel and Apple M chips.
Deployment
iPad app Deployment: As of now, you must contact Hajime Muramatsu and send send him your E-mail address. You will then be sent an invitation, which includes a link to download an app called TestFlight. You can then intsall the app via TestFlight. This method is subject to change.
Mac Deployment: The latest version of the app can be downloaded at https://www-users.cse.umn.edu/~hmuramat/iOS/CPAProductionChecklists.zip. To do so you will need Username: DUNE and Password: DUNEana.
Login Page
When the app is launched, you will see the following page. You can either login using your credentials or run a “guest” session, which allows you to use all the capabilities of the app except for communicating with the HWDB. You can also choose between the “Production” version or “Development” version of the app.
When you select “Login”, your iPad’s default web browser starts up automatically and takes you to a CILogon cite,
where you will be asked to provide your FNAL SSO credential.
| iPad or Mac | iPhone |
|---|---|
 |
 |
Once you have logged in, you will see the following home page:
| iPad or Mac | iPhone |
|---|---|
 |
 |
In home page, before proceeding further, you will need to provide/select the following three items:
- Name : The Name will be attached to file names that are stored locally on iPad, to be distinguished from files saved by other users.
- Email : Email can be sent directly from within the app. Addresses provided here will be used in such case.
- Country/Institution : A country and an institution must be selected. The combo will be used when a new PID needs to be assigned.
Once these three fields are filled/selected, one can proceed to either PID Display or Shipment Tracker sessions. We will describe about these sessions in the following sections.
While the iPhone version offers only these two sessions, the iPad version offers three more sessions: DUNE, ProtoDUNE II, and Excel sheet uploader. In these sessions, checklists that are dedicated to specific consortia can be found. Since these are not for general usage, we will not describe what they are. You are still welcome to peek through those sections, however.
At the bottom of the home page, the remaining time before the issued Vault token gets expired is displayed, along with the botton, Refresh your Vault token. You can tap this button to force to refresh your Vault token.
When it is a minute before your Bearer token is expired, a bannar appears at the top of the screen to warn user. The bannar auto-disappears after 5 seconds. After 60 seconds, your Bearer token then gets auto-refreshed.
When your Vault token is expired, another bannar shows up. This one will stay on screen until you tap the bannar, which then triggers its renewing process.
(In the example screenshots shown below, please ignore the displayed expiration times. We just did not want to wait for 3 hours/7 days to take these screenshots)
| iPad or Mac | iPhone |
|---|---|
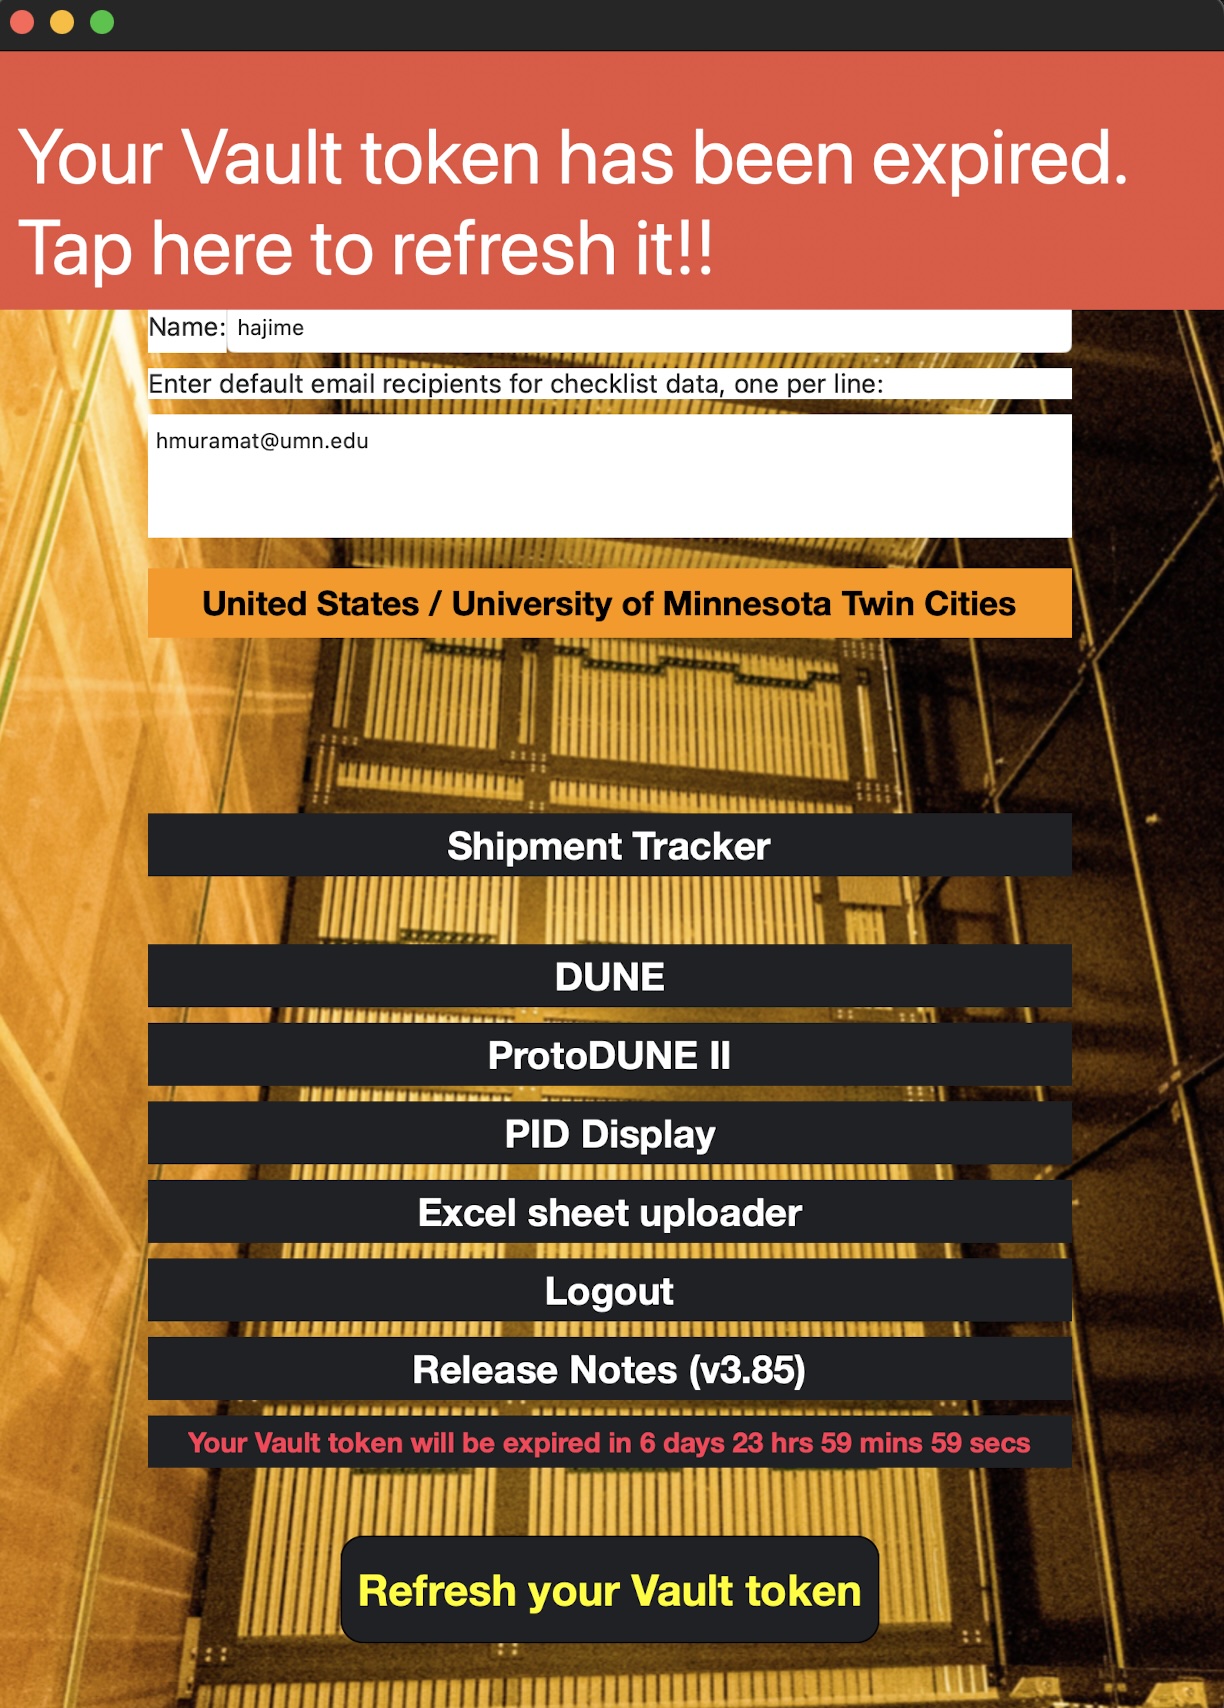 |
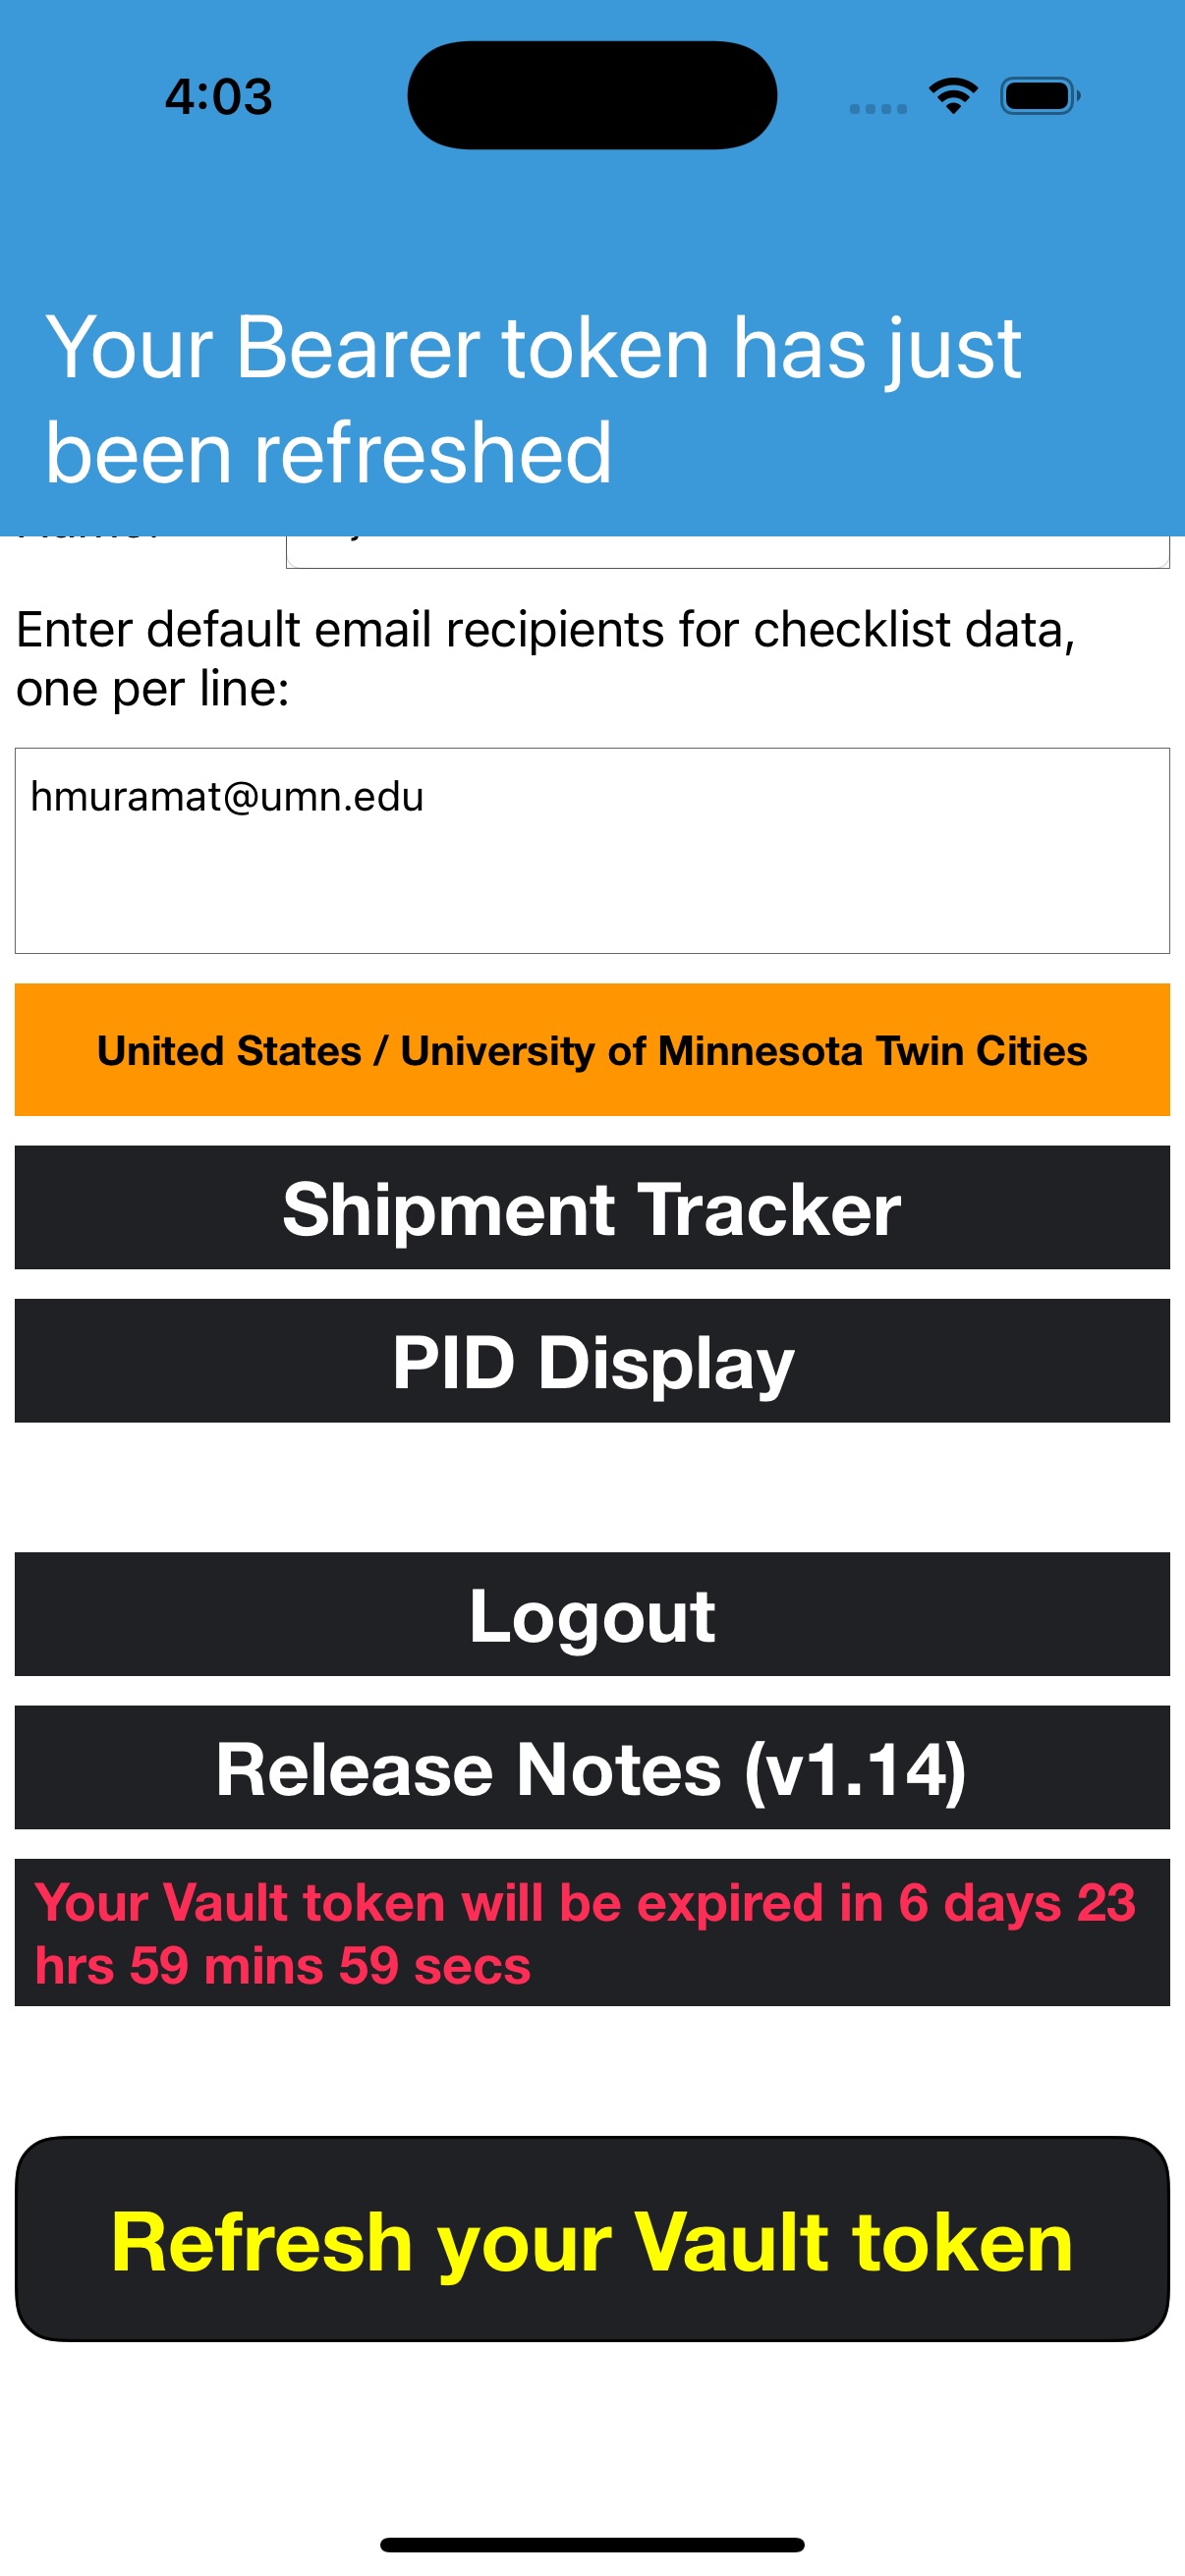 |
PID Display
The PID Display is a HWDB ID viewer that is hierarchically structured, meaning you are first provided the highest-level category Project ID from which you can tap a particular Project, that then takes you a list of System IDs… ans so on.
The hierarchical structure that PID Display offers is: Project ID List ➞ System ID List ➞ Subsystem ID List ➞ Component Type ID List ➞ PID List.
In each list, if you have previously synced to the HWDB, the app shows the contents based on what it locally stores (SQLite). If not or when you need to refresh the local data, tap Synce to HWDB. It will update the stored (and displayed) list. This is useful if you need PID lists (particularly long lists) with poor network connections.
As an example, screenshots of PID List are shown below:
| iPad or Mac | iPhone |
|---|---|
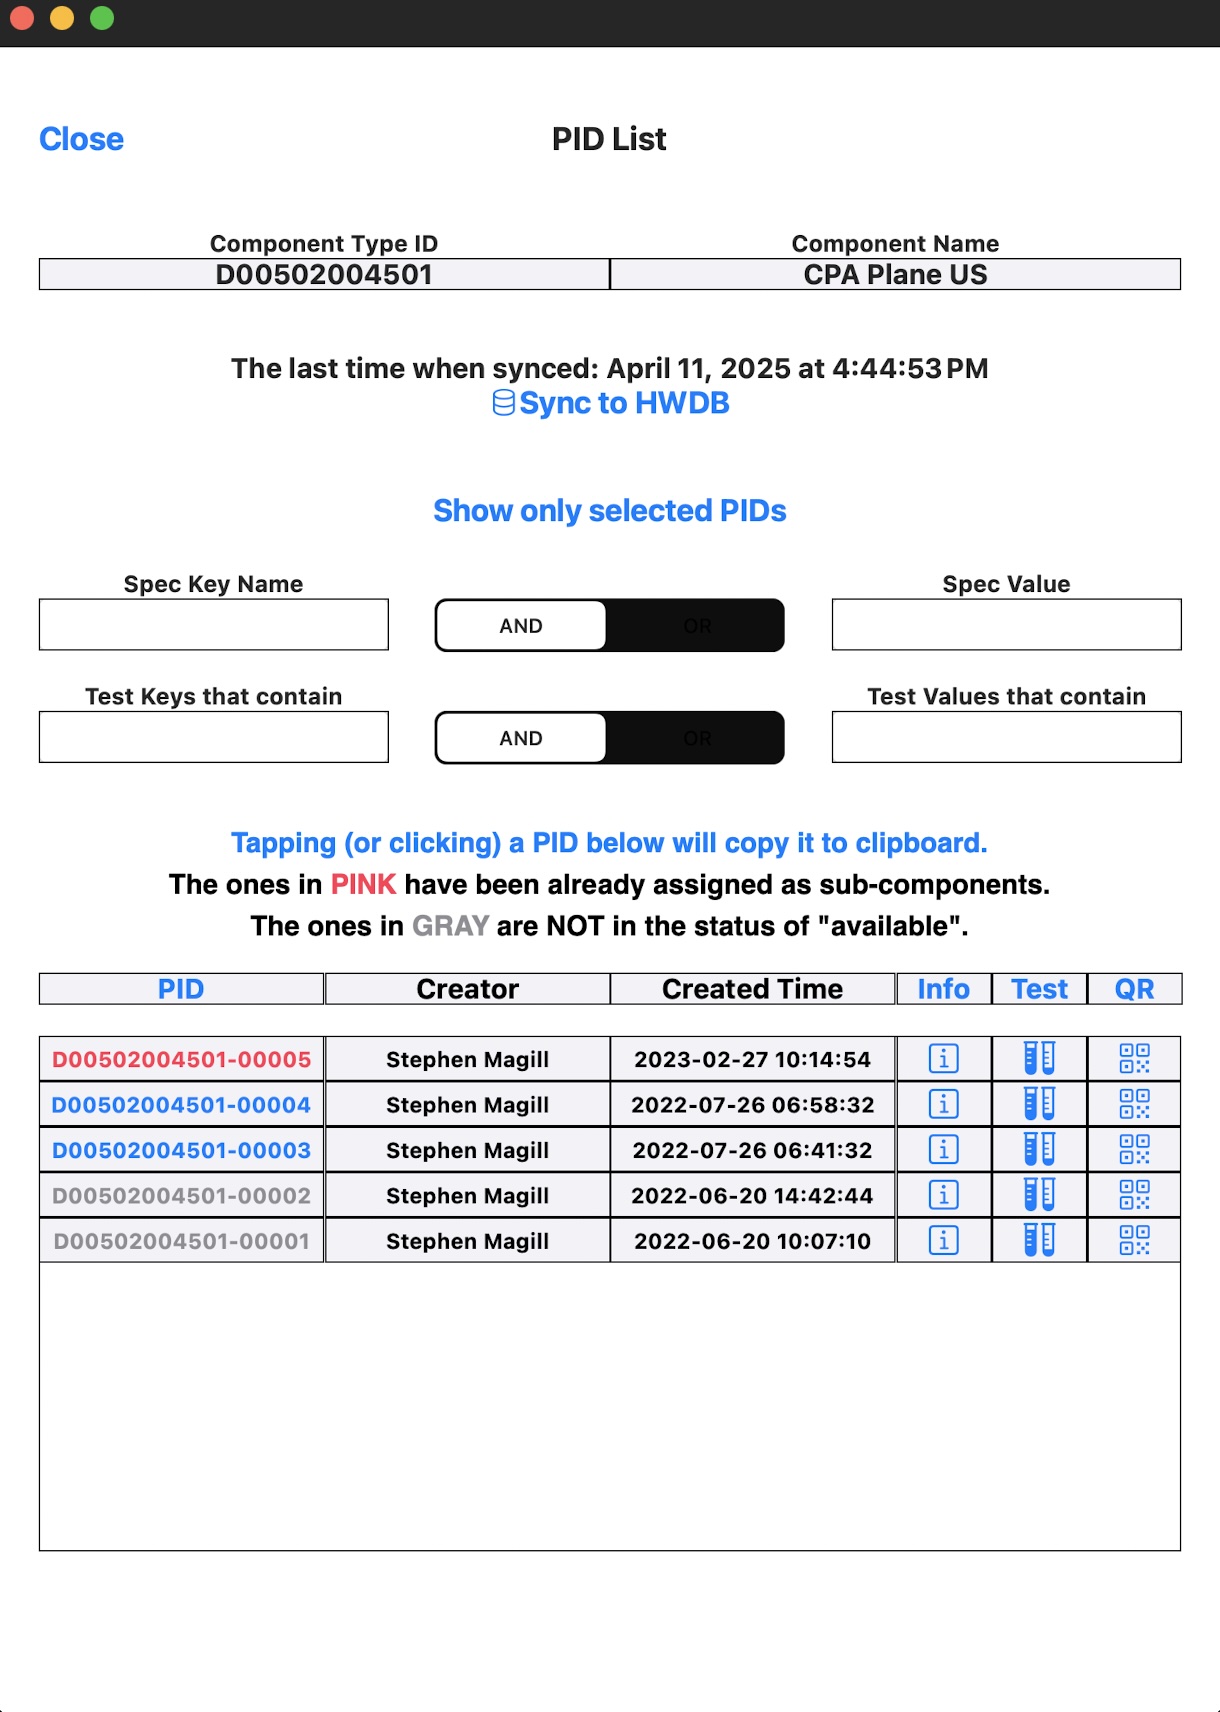 |
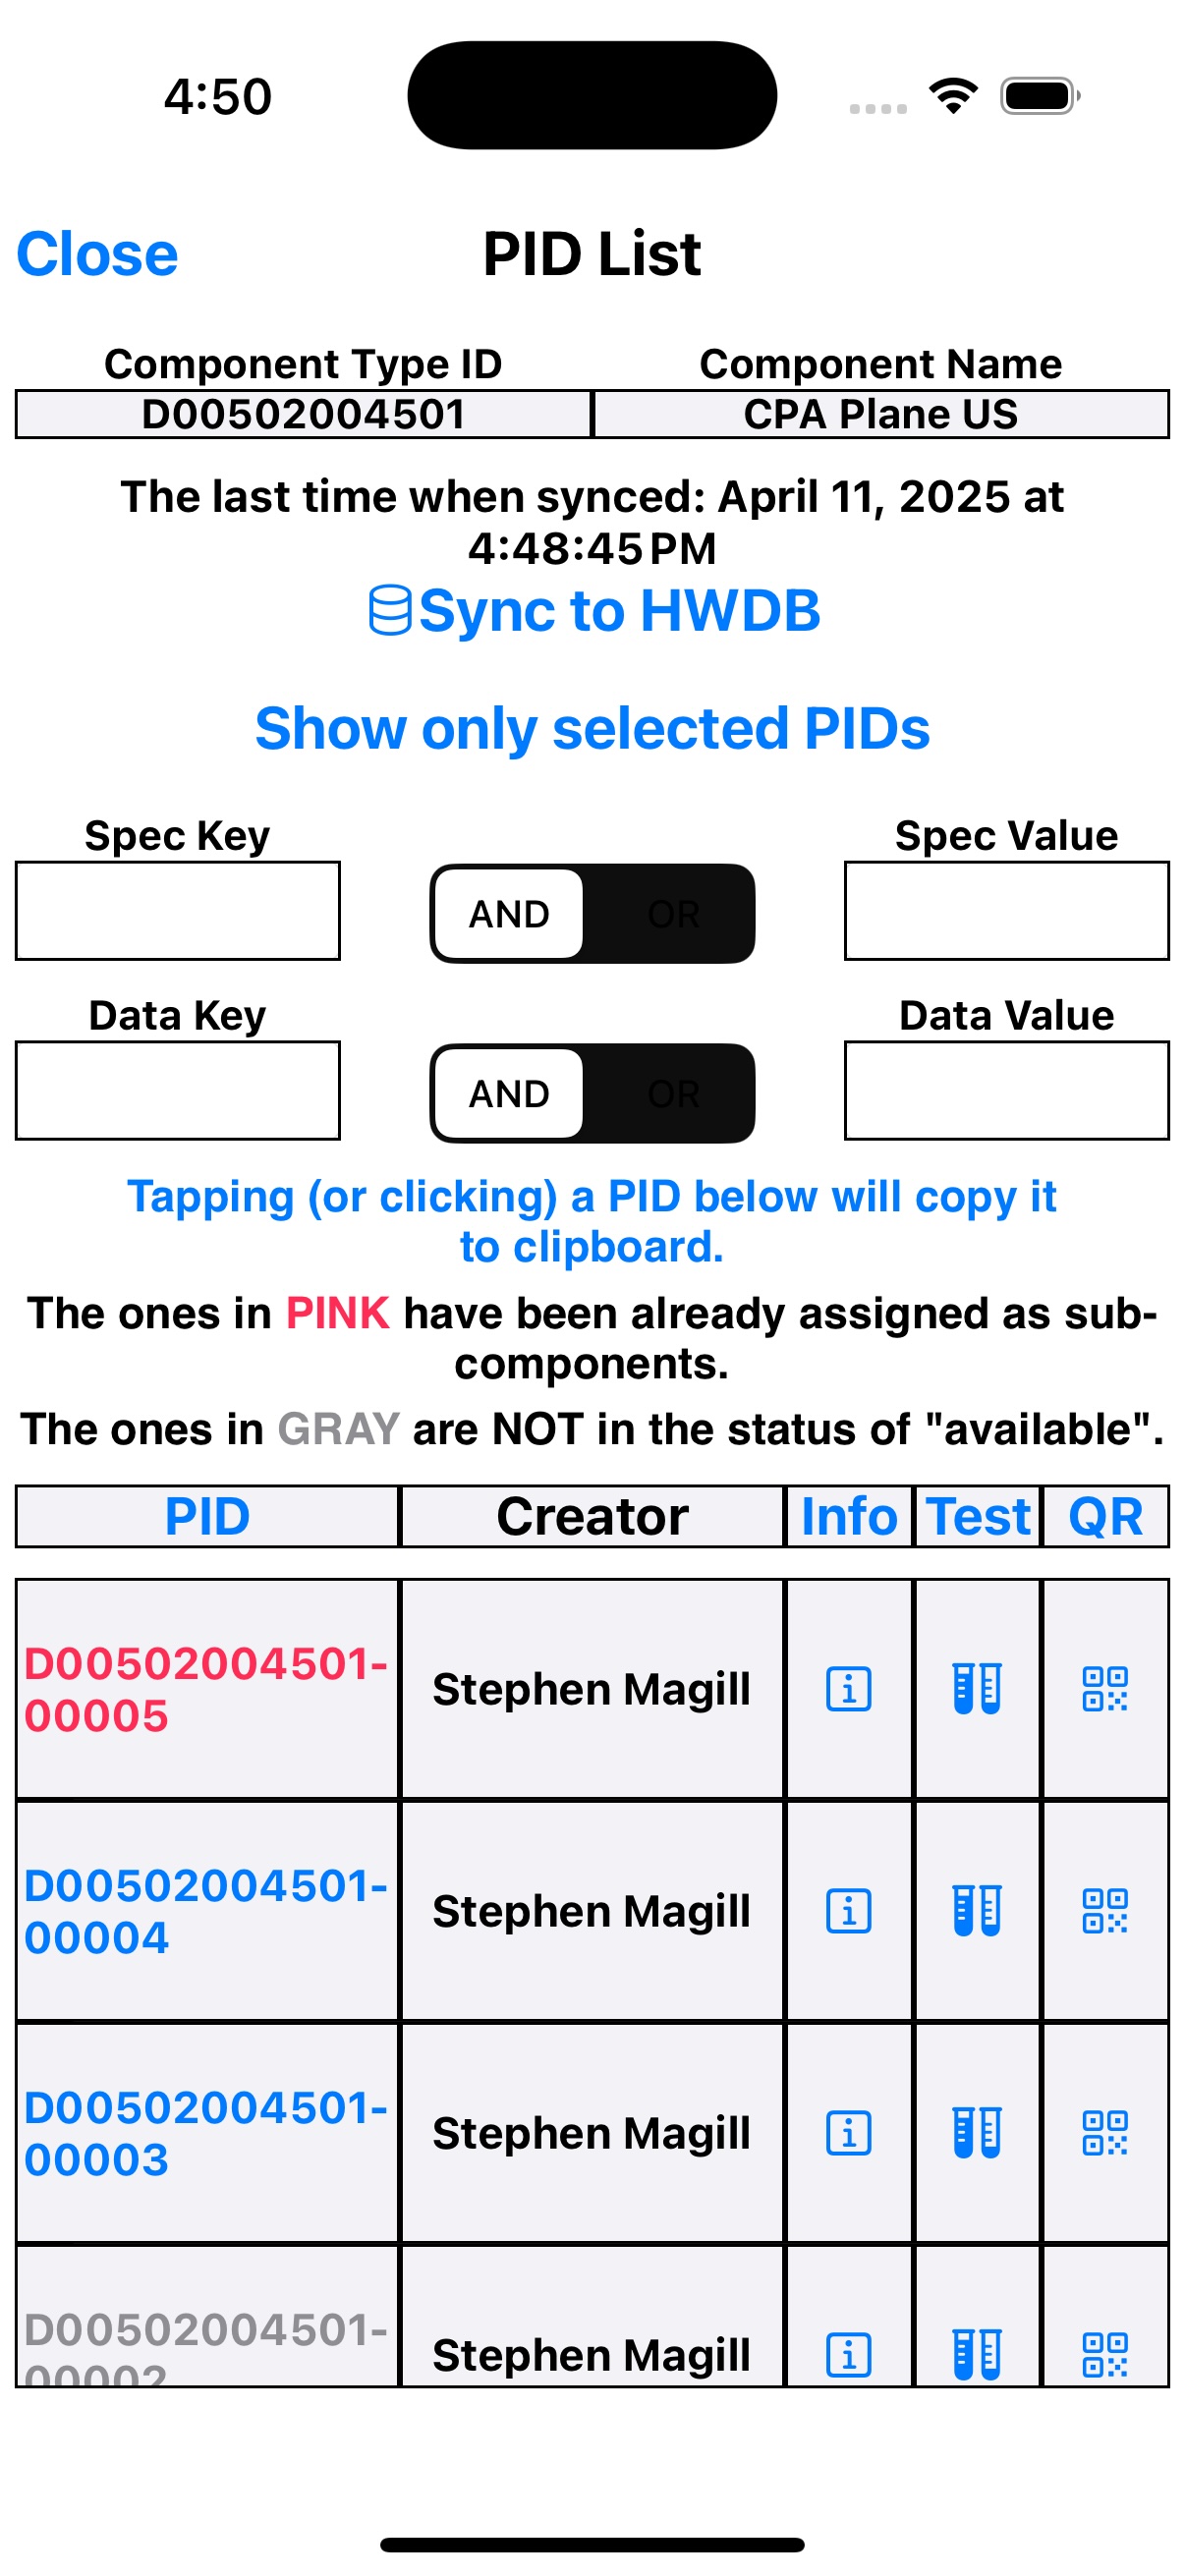 |
As can be seen above, the page comes with a simple filterling functionality.
Also those PIDs in GRAY correspond to the items that are NOT in the status of available. And those in RED have their parents already assigned, meaning that they are not available to be newly linked.
In the actul PID table, there are three clickable columns: Info, Test, and QR:
- Info : Tapping this button takes you to another page, where information of the selected Item (a PID) is provided. The information includes: its Item Specifications, its Parent’s PID (with link) if it exists, as well as its Daughter’s PIDs (with links) if exist.
- Test : This takes you to a list of Test Types that are available for the selected Item, in which a particular Test Type can be selected. It will then display the corresponding stored Test data of the selected Test Type. If there is multiple entries (a history) for the selected Test Type, it will then display all stored data of that Test Type.
- QR : This takes you to a page where you can see & edit the corresponding QR-code as can be seen below. By default, it generates a QR-code with two additional human readable lines, its Component Type Name and PID. It also allows you to store the generated QR-code locally and print it (you will need a printer that is compatible with AirPrint).
| iPad or Mac | iPhone |
|---|---|
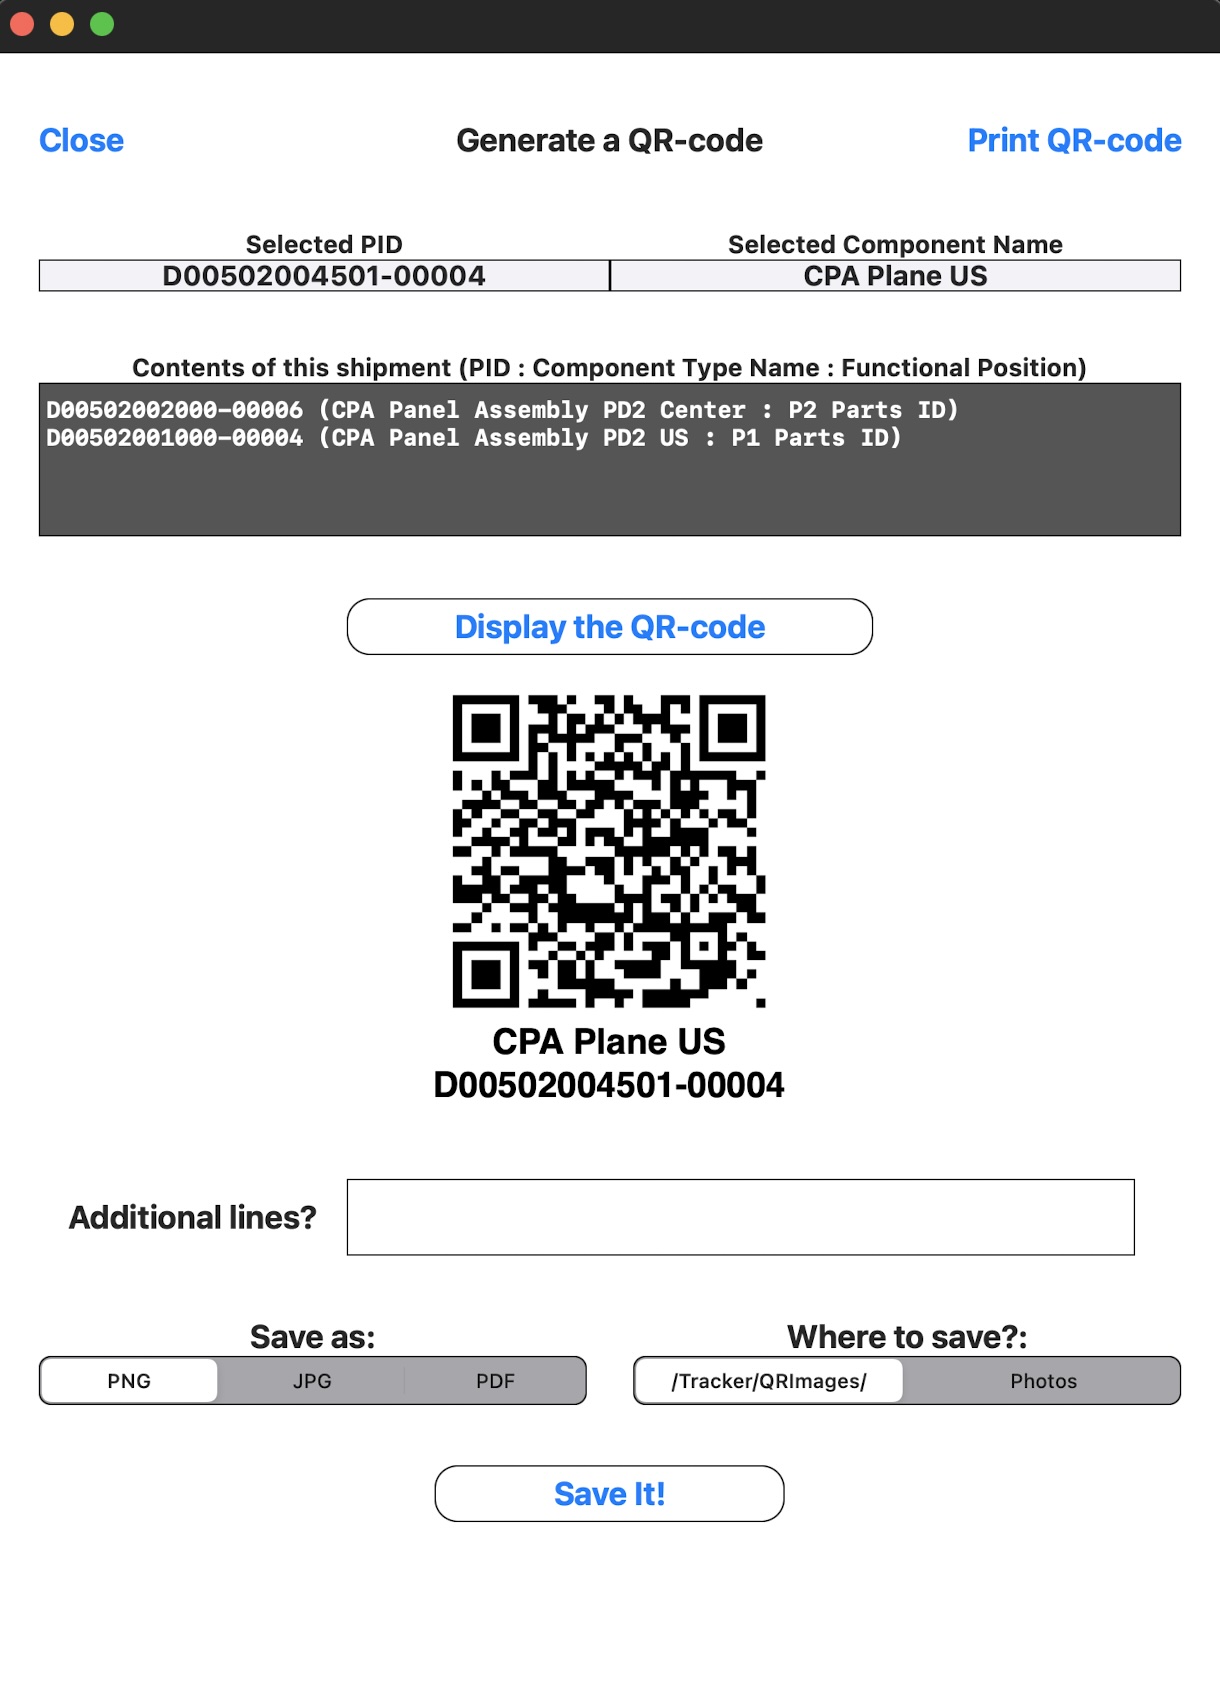 |
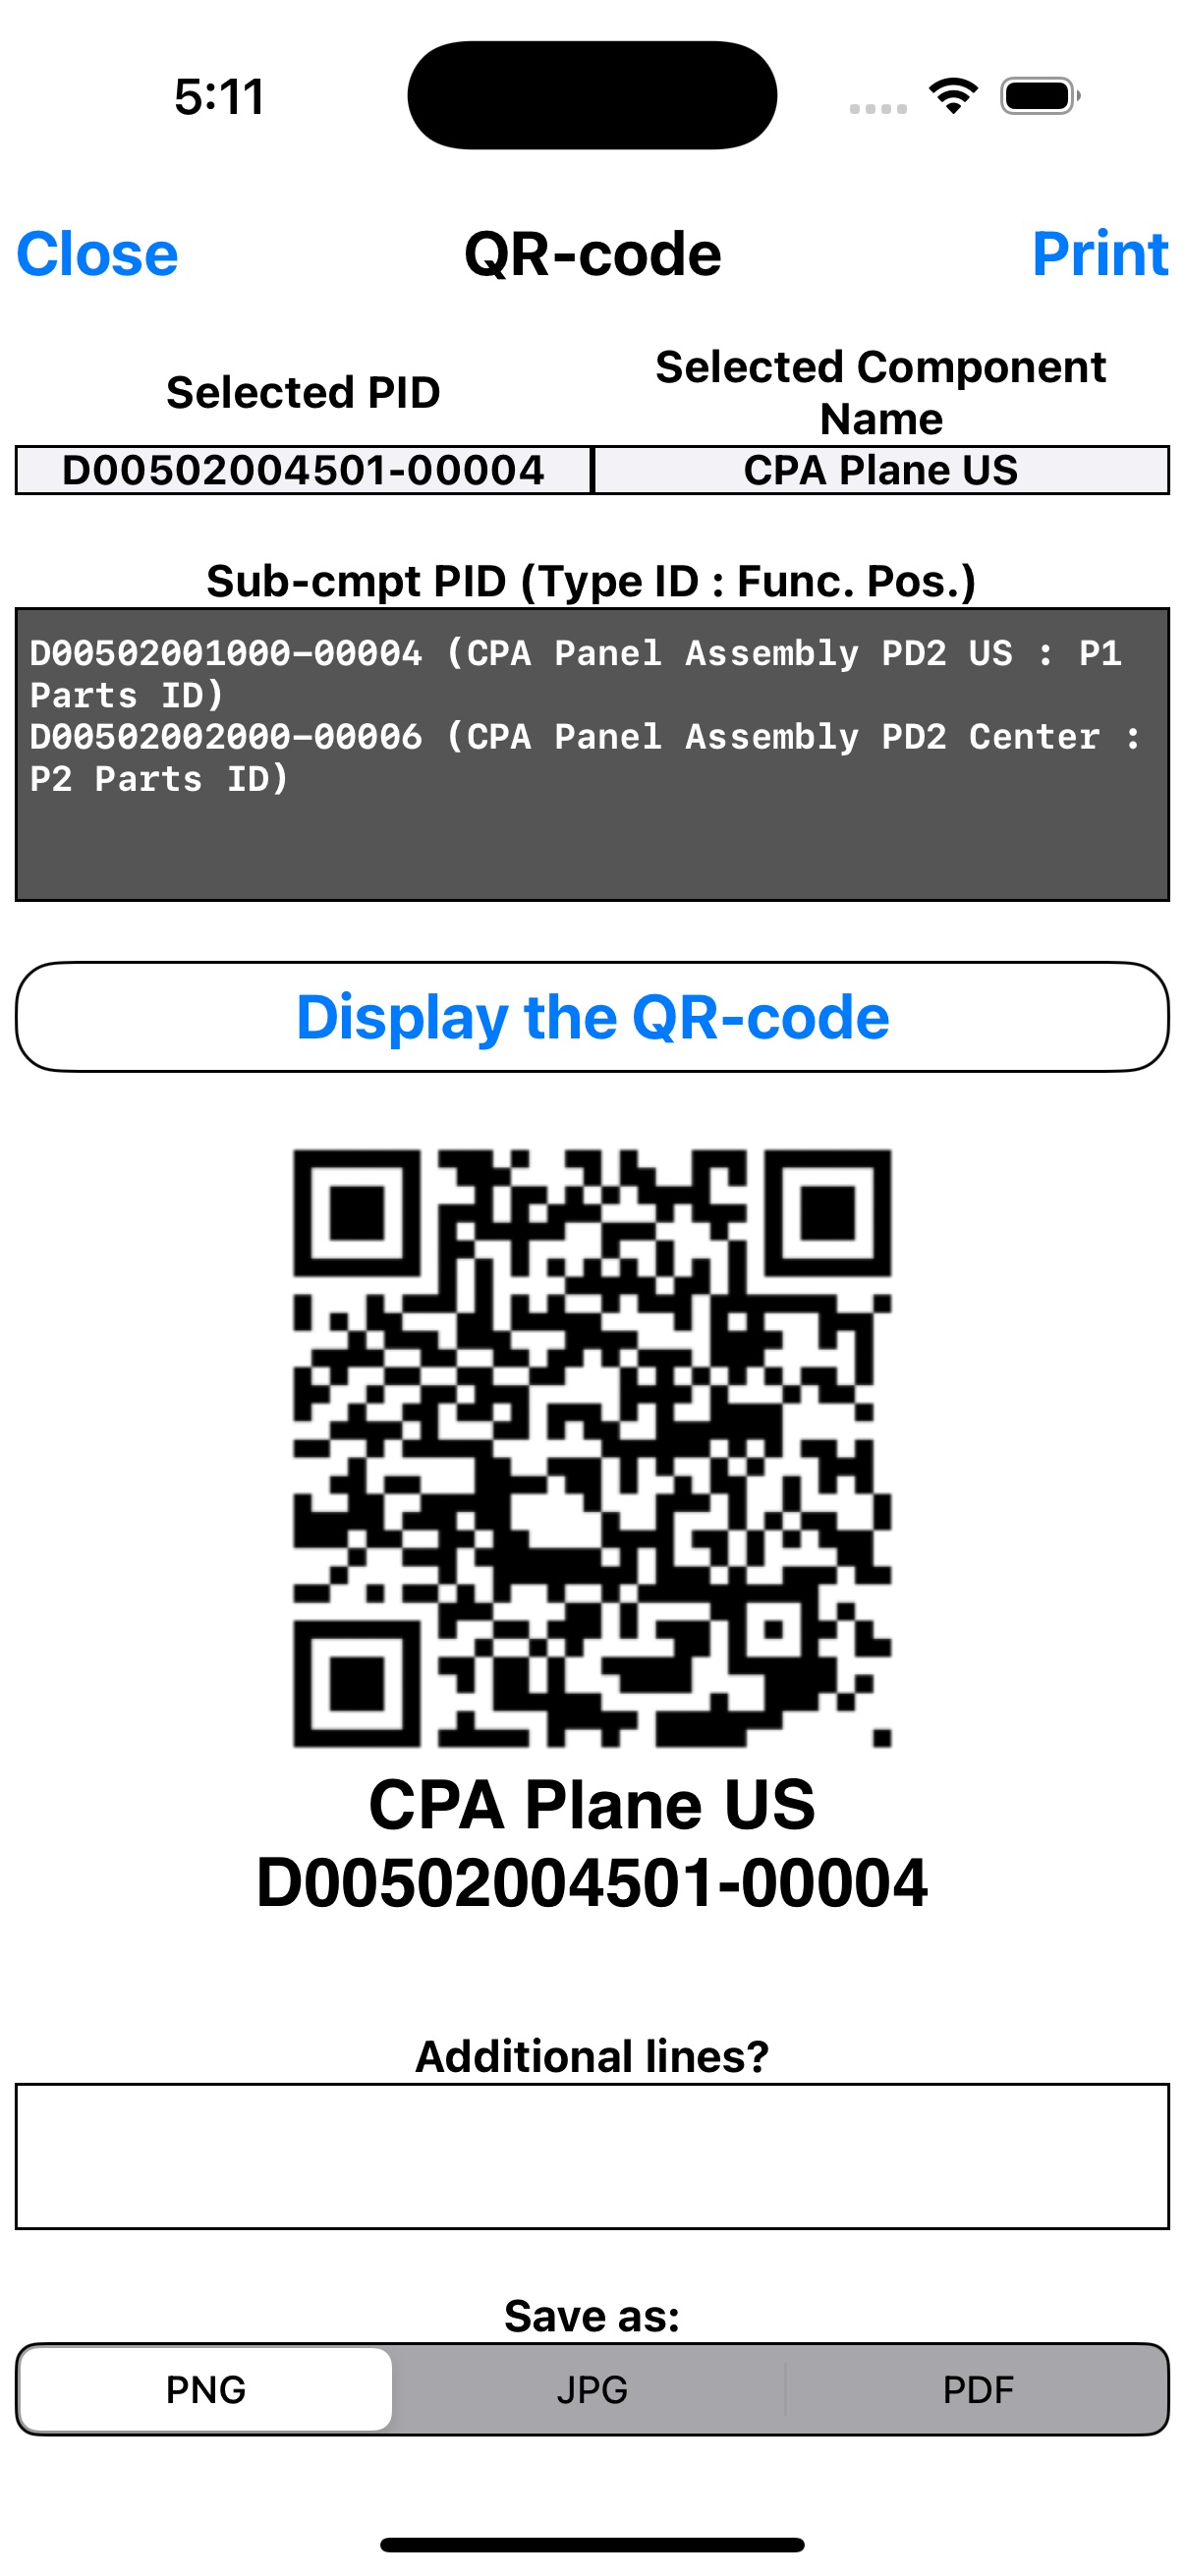 |
Shipment Tracker
Still workin on this…
Key Points
Currently need to send an email to Hajime Muramatsu to register your iPad.
For the Mac version, you can directly download (a zip file). It runs with both Intel/Apple chips.
Using the Python HWDB Tools
Overview
Teaching: 120 min
Exercises: 0 minQuestions
Active user privilage is required.
How does one upload bulk data with the Python HWDB Tools?
Objectives
upload a component specification (thus, obtain its assigned DUNE PID)
update a component specification (for a given PID)
create and/or update a serial number of the component
create and/or update the component’s location
create links to its sub-components
upload images to the component
create and/or update the component’s tests
Contents
Introduction
The Python HWDB Tools is a package of applications, written in Python that helps users to communicate with the HWDB.
It is consists of multiple applications:
- Uploader : Uploads massive data to the HWDB. User provides data by means of spreadsheets to the app. The app then simply uploads them. The app can also accept a docket file, along with spreadsheets, in which complex database schema can be defined as well. The detail usage is described later in this very page.
- Shipping Tracker : Helps user to follow the official DUNE shipping procedure. It also generates/uploads shipping label, along with the required shipping documentations.
- Label Generator : Generates labels of QR- and bar-codes. Allows user to define label & paper sizes as well as to detail orientations of codes.
- HWDB Dashboard : Helps to provide information stored in the HWDB. Runs within a web-browser with multiple tabs (Type Getter, Plots, Shipment Tracker, Binary/Test Downloader). See the link for more details.
Requirements
This software was developed on Ubuntu 20.04 running under WSL for Windows 11, and was tested for compatibility on macOS 14.7 (Sonoma; M1) as well as on Ubuntu 24.04 with an Intel Linux box. We strongly recommend to employ Anaconda (Python distribution), which should get you most of the needed packages for the Tool. It can be obtained from https://www.anaconda.com/download for free and is available for Windows, Linux, and macOS.
Installation
There are 3 ways to install.
Binaries
Perhaps the easiest way is to obtain standalone binaries. We have a linux version, built under Ubuntu 24.04.4 LTS on a x86_64 machine. We have tested it also within a WSL2 environment. A Mac version is also available, which was built on a ARM64-based machine. These binaries can be obtained from https://github.com/DUNE/DUNE-HWDB-Python/releases/latest. Make sure to access to v1.7.5 or later. And look for HWDBTools_lnx_x8664.tar.gz or HWDBTools_mac_arm64.tar.gz under Assets there.
Once downloaded, you can put it anywhere you like. Extract the contents and make sure to run the attached shell script, setup_path.sh, inside of the HWDBTools folder to setup file permissions correctly. It will also write a line into your login file (e.g., .bashrc) to include <path to your HWDBTools folder> to your $PATH.
For instance,
  cd <path to your downloaded file, HWDBTools_mac_arm64.tar.gz>
  tar -xzf HWDBTools_mac_arm64.tar.gz
  cd HWDBTools_mac_arm64
  ./setup_path.sh
The following commands should be available now:
- hwdb-configure
- hwdb-upload
- hwdb-shipping
- hwdb-labels
- hwdb-dash
- hwdb-list-institutions
- hwdb-list-manufacturers
- hwdb-logs
- hwdb-htgettoken
- setup_path.sh
Source codes
You can download the source codes.
-
Download the Source code(zip) (or Source code (tar.gz), whichever you prefer) of the Tool from https://github.com/DUNE/DUNE-HWDB-Python/releases/latest.
-
Extract the source code to a directory of your choosing. For the purposes of this document, we will assume this directory is $HOME/DUNE-HWDB-Python.
- To have the necessary paths available in your Bash shell, add the following lines to your
.bashrc file. (If you are using a different shell, modify accordingly.)
export HWDB=~/DUNE-HWDB-Python export PATH=$HWDB:$HWDB/bin:$HWDB/devtools:$PATH export PYTHONPATH=$HWDB/lib:$PYTHONPATH - Although we have attempted to have the executable flag set in GitHub on the appropriate files,
it appears to be inconsistent, so you may need to set these manually.
- In your Bash shell, go to your installation directory ($HOME/DUNE-HWDB-Python)
- Enter the following to set executable permissions:
chmod +x hwdb-*
- If you don’t have reportlab on your devide, which doesn’t come with the Anaconda distro unfortunately,
the Tool will suggest you to install it. The Tool itself will run fine without this extra library, but it will not generate bar/QR-code labels in that case.
To install this, simple execute the following command:
pip install reportlabor
conda install conda-forge::reportlab - And as described in these steps, make sure you have htgettoken installed.
Again, you could install it via;
pip install htgettokenor
conda install conda-forge::htgettoken
Auto ENV Setup
You can download the source codes as described above. But once extracted the downloaded archived file, you can find the shell script, setup_hwdbtools_env.sh inside. Executing the script there would crete a new virtual environment, auto-download the required additional modules, and set up the needed environmental variables for you.
Configuration
Try to execute the following command:
hwdb-configure
If everything is setup correctly, you should see a screen similar to the one below.
This will check to see if your two tokens (Bearer and Vault) are still valid. If your Vault token is expired or if you are running the Tool for the first time, you will be prompted to provide your FNAL SSO credential in your web browser session. Once you are done with the authentication process there, you should see the above screen. The obtained two tokens are saved in $HOME/.sisyphus/.
When your Bearer token is expired, which happens every 3 hours, the token is refreshed automatically in background. Whereas when your Vault token is expired (its lifetime is 7days), you will be prompted again to provide your credential in a browser session.
Notice that the REST API base path points to the development version of the HWDB, which is the default setup. When you are ready to work with the official Production server, enter:
hwdb-configure --prod
Likewise, to set it back to Development, enter:
hwdb-configure --dev
Note that the –prod and –dev switches may also be added to the initial configuration command, $HOME/.sisyphus/config.json instead of being run separately.
Configuring a Component Type and a Test Type in the HWDB:
-
If your Component Type is already setup, skip this step. Otherwise your Component Type needs to be setup as described in the 03-Setting-up-Types.
- In the Datasheet of your Component Specifications, insert the following (notice that you must have the Administrator privilege in order to modify Component Type definitions):
DATA: {} _meta: {} - If you are planning to store data in Tests, create and define a new Test Type as described in the 03-Setting-up-Types. And then in the Datasheet of the newly created Test Type,
insert the following:
DATA: {} _meta: {} -
All contents uploaded by the Tool are stored within “DATA: {}”.
- “_meta: {}” is used by the Tool only and users should just ignore it.
Lesson 1: Some Simple Examples
The examples in this lesson demonstrate how to upload simple spreadsheets that do not require an additional “docket” file that describes their contents. Typically, if the component type has no specifications, or the specifications are simple key/value pairs, it is possible to upload item sheets directly, as demonstated in these examples.
HWDB Setup
The examples below assume that the following configuration has been set up in the HWDB. These should already be available on the Development server, but since they are not protected from modification, it is possible that they may be edited by others. If the examples appear not to work, check the following:
• A component type named “Z.Sandbox.HWDBUnitTest.doodad” has been created, which has a type ID of Z00100300012.
• The component is managed by (at least) the group “tester,” and the user running the examples is a member of this group.
• The component has “Acme Corporation” listed as one of its available manufacturers.
• The component’s specifications are: { “DATA”: {}, “_meta”: {} }
For the first several examples, we will only be uploading Item information with no tests attached, but most of the principles involved with uploading tests is the same as uploading items, so it is worthwhile to follow all the item examples before moving on to tests.
Example 1.1: A very simple example
The simplest way to upload hardware items to the HWDB is to create a spreadsheet where the top several rows form a “header” that indicates, at minimum, that the “Record Type” being uploaded is “Item,” and either the “Part Type ID” or the “Part Type Name.” (Both may be given, but they must indicate the exact same component type. There must be an empty row between the header and the section containing the actual data.
| A | B | C | |
|---|---|---|---|
| 1 | Record Type | Item | |
| 2 | Part Type ID | Z00100300012 | |
| 3 | Part Type Name | Z.Sandbox.HWDBUnitTest.doodad | |
| 4 | |||
| 5 | Serial Number | Institution | Manufacturer |
| 6 | SN000001 | (186) University of Minnesota Twin Cities | (50) Acme Corporation |
| 7 | SN000002 | (186) University of Minnesota Twin Cities | (50) Acme Corporation |
| 8 | SN000003 | (186) University of Minnesota Twin Cities | (50) Acme Corporation |
| 9 | SN000004 | (186) University of Minnesota Twin Cities | (50) Acme Corporation |
| 10 | SN000005 | (186) University of Minnesota Twin Cities | (50) Acme Corporation |
| Ex_1-1.xlsx | |||
This sheet is available here; Ex_1-1.xlsx.
To do a mock test of uploading this spreadsheet, enter the following. This will not actually commit the changes to the HWDB. It will only do a trial run to test for errors.
hwdb-upload Ex_1-1.xlsx
If this appears to run without errors, you may commit the update by using “–submit”
hwdb-upload Ex_1-1.xlsx --submit
Reconstructed Excel file
When the above command is executed, the Tool also generates an Excel file locally inside of folder with a timestamp being its folder name. This Excel file contains the contents of Items just uploaded, including the newly assigned PIDs in External ID column.
About label names in spreadsheet
In spreadsheet(s), user provides contents with specific labels. There are specific label names that are reserved for the Tool. We list those special labels below. These special labels have specific meanings and we’ll go through them in the following examples.
- External ID
- Serial Number
- Comments
- Manufacturer
- Manufacturer ID
- Manufacturer Name
- Institution
- Institution ID
- Institution Name
- Location
- Location ID
- Location Name
- Arrived
- Location Comments
- Image File
Example 1.2: Providing default values
In the above example, every item had the exact same Institution and Manufacturer. A shortcut is available for this case. Additional fields may be provided in the header indicating default values for a column. The column itself may be omitted if there are no exceptions to the default values.
| A | B | |
|---|---|---|
| 1 | Record Type | Item |
| 2 | Part Type ID | Z00100300012 |
| 3 | Part Type Name | Z.Sandbox.HWDBUnitTest.doodad |
| 4 | Institution | (186) University of Minnesota Twin Cities |
| 5 | Manufacturer | (50) Acme Corporation |
| 6 | ||
| 7 | Serial Number | |
| 8 | SN000001 | |
| 9 | SN000002 | |
| 10 | SN000003 | |
| 11 | SN000004 | |
| 12 | SN000005 | |
| Items.xlsx | ||
This sheet is available here; Ex_1-2.xlsx.
Example 1.3: Editing Items
Once a sheet has been uploaded to the HWDB, any subsequent attempts to upload the sheet will only result in the HWDB attempting to edit the items instead of adding new ones. But, if you explicity want to edit an item, you may use an “External ID” column instead of or in addition to the “Serial Number” column. You may even change the existing serial numbers this way!
Note that you may not change the Institution for an item after it was initially set.
| A | B | C | |
|---|---|---|---|
| 1 | Record Type | Item | |
| 2 | Part Type ID | Z00100300012 | |
| 3 | Part Type Name | Z.Sandbox.HWDBUnitTest.doodad | |
| 4 | Institution | (186) University of Minnesota Twin Cities | |
| 5 | Manufacturer | (50) Acme Corporation | |
| 6 | |||
| 7 | External ID | Serial Number | Comments |
| 8 | Z00100300012-00001 | AAA000001 | first |
| 9 | Z00100300012-00002 | AAA000002 | second |
| 10 | Z00100300012-00003 | AAA000003 | third |
| 11 | Z00100300012-00004 | AAA000004 | fourth |
| 12 | Z00100300012-00005 | AAA000005 | fifth |
| Ex_1-3.xlsx | |||
This sheet is available here; Ex_1-3.xlsx.
Example 1.4: Providing values on the command line
If you do not wish to provide a header inside a spreadsheet, you may provide values on the command line.
| A | |
|---|---|
| 1 | Serial Number |
| 2 | SN000001 |
| 3 | SN000002 |
| 4 | SN000003 |
| 5 | SN000004 |
| 6 | SN000005 |
| Ex_1-4.xlsx | |
This sheet is available here; Ex_1-4.xlsx.
To upload this example:
hwdb-upload \
    --part-type-id=Z00100300012 \
    --record-type=Item \
    --value "Manufacturer ID" 50 \
    --value "Institution ID" 186 \
    Items.xlsx \
    --submit
Example 1.5: Providing values via a docket file
Another alternative way to provide external values is by using a docket file.
| A | |
|---|---|
| 1 | Serial Number |
| 2 | SN000001 |
| 3 | SN000002 |
| 4 | SN000003 |
| 5 | SN000004 |
| 6 | SN000005 |
| Ex_1-5.xlsx | |
This sheet is available here; Ex_1-5.xlsx.
{
    "Sources": [
        {
            "Source Name": "Item Source",
            "Files": "Ex_1-5.xlsx"
        }
    ],
    "Values": {
        "Record Type": "Item",
        "Part Type ID": "Z00100300012",
        "Part Type Name": "Z.Sandbox.HWDBUnitTest.doodad",
        "Institution": "(186) University of Minnesota Twin Cities",
        "Manufacturer": "(50) Acme Corporation"
    }
}
|
|
| Ex_1-5_docket.json | |
This sheet is available here; Ex_1-5_docket.json.
To upload this example:
hwdb-upload Ex_1-5_docket.json --submit
Example 1.6: Specification fields
The type “doodad” has a specification field named “DATA.” (Ignore the “_meta” field. It is for internal use by the application.) Top-level specification fields such as “DATA” can be provided the same way as Institution or Manufacturer.
| A | B | |
|---|---|---|
| 1 | Record Type | Item |
| 2 | Part Type ID | Z00100300012 |
| 3 | Part Type Name | Z.Sandbox.HWDBUnitTest.doodad |
| 4 | Institution | (186) University of Minnesota Twin Cities |
| 5 | Manufacturer | (50) Acme Corporation |
| 6 | ||
| 7 | Serial Number | DATA |
| 8 | SN000001 | ABC |
| 9 | SN000002 | 123 |
| 10 | SN000003 | {"A":1,"B":2} |
| 11 | SN000004 | [2,3,5,7,11] |
| 12 | SN000005 | <null> |
| Ex_1-6.xlsx | ||
This sheet is available here; Ex_1-6.xlsx.
Lesson 2: Subcomponents
HWDB Setup
For this lesson, we want to create a hierarchy of components. We will therefore need a second component type. The examples below assume that the following configuration has been set up in the HWDB, in addition to the configuration from Lesson 1:
• A component type named “Z.Sandbox.HWDBUnitTest.doohickey” has been created, which has a type ID of Z00100300013.
• The component is managed by (at least) the group “tester,” and the user running the examples is a member of this group.
• The component has “Acme Corporation” listed as one of its available manufacturers.
• The component’s specifications are: { “DATA”: {}, “_meta”: {} }
• The component type has a single subcomponent slot named “Doodad” of type “Z.Sandbox.HWDBUnitTest.doodad”
Example 2.1: Linking a subcomponent
For this example, we need to upload items of two different component types. We can do this by adding multiple worksheets to our Excel file.
| A | B | |
|---|---|---|
| 1 | Record Type | Item |
| 2 | Part Type ID | Z00100300012 |
| 3 | Part Type Name | Z.Sandbox.HWDBUnitTest.doodad |
| 4 | Institution | (186) University of Minnesota Twin Cities |
| 5 | Manufacturer | (50) Acme Corporation |
| 6 | ||
| 7 | Serial Number | Comments |
| 8 | SN000001 | first |
| 9 | SN000002 | second |
| Ex_2-1_doodad.xlsx | ||
This sheet is available here; Ex_2-1_doodad.xlsx.
| A | B | C | |
|---|---|---|---|
| 1 | Record Type | Item | |
| 2 | Part Type ID | Z00100300013 | |
| 3 | Part Type Name | Z.Sandbox.HWDBUnitTest.doohickey | |
| 4 | Institution | (186) University of Minnesota Twin Cities | |
| 5 | Manufacturer | (50) Acme Corporation | |
| 6 | |||
| 7 | Serial Number | Comments | Doodad |
| 8 | SN900001 | by serial number | SN000001 |
| 9 | SN900002 | by part id | Z00100300012-00010 |
| 10 | SN900003 | keep as it is | |
| 10 | SN900004 | void it out | <null> |
| Ex_2-1_doohickey.xlsx | |||
This sheet is available here; Ex_2-1_doohickey.xlsx.
To upload this example, first make the two items newly:
hwdb-upload Ex_2-1_doodad.xlsx --submit
then to make links to those two;
hwdb-upload Ex_2-1_doohickey.xlsx --submit
Some notes on linking subcomponents:
• The “Doodad” column may contain the serial number of the item to be connected, or the Part ID if the item already exists in the database.
• If the subcomponent item is already in the database, it is not strictly necessary to include a sheet defining the item.
• The subcomponent to be linked must not have its “status” set to anything besides “available.” (“Available” is the default status for an item, so an item will not have a different status unless deliberately changed.)
Some notes on linking subcomponents:
- The “Doodad” column may contain the serial number of the item to be connected, or the Part ID if the item already exists in the database.
- If the subcomponent item is already in the database, it is not strictly necessary to include a sheet defining the item.
- The subcomponent to be linked must not have its “status” set to anything besides “available.” (“Available” is the default status for an item, so an item will not have a different status unless deliberately changed.)
Lesson 3: Item Images
Example 3.1: Uploading images
To individual item
This example demonstrates how to upload image files for items.
| A | B | C | |
|---|---|---|---|
| 1 | Record Type | Item Image | |
| 2 | Part Type ID | Z00100300012 | |
| 3 | |||
| 4 | External ID | Comments | Image File |
| 5 | Z00100300012-00001 | This is fine. | this_is_fine.jpg |
| 6 | Z00100300012-00002 | This is fine. | this_is_fine.jpg |
| 7 | Z00100300012-00003 | This is fine. | this_is_fine.jpg |
| Ex_3-1.xlsx | |||
This sheet is available here; Ex_3-1.xlsx.
To individual test entry
We can also upload images to individual test entry, to even older test entries if wish. Let’s do this with a docket file and a spreadsheet as an example. Take a look at the spreadsheet below.
| A | B | C | D | |
|---|---|---|---|---|
| 1 | External ID | Comments | Image File | History Order |
| 2 | Z00100300012-00001 | This is fine. | this_is_fine.jpg | 0 |
| 3 | Z00100300012-00002 | This is fine. | this_is_fine.jpg | 0 |
The History Order column is optional. It take a positive integer and its default value is 0.
It tells the app which test entry it uploads images to.
History Order = 0 corresponds to the latest entry, 1 corresponds to its next latest entry, and so on.
The corresponding docket file could look like below:
{
    "Values": {
        "Part Type ID": "Z00100200040",
        "Institution": "(186) University of Minnesota Twin Cities",
        "Manufacturer": "(7) Hajime Inc"
    },
    "Sources": [
	{
            "Files": "test_images.xlsx",
	    "Sheet": "My Test Image",
            "Encoder": "My Test Image Encoder",
        }
    ],
    "Encoders": [
	{
	    "Encoder Name": "My Test Image Encoder",
            "Record Type": "Test Image",
	    "Part Type ID": "Z00100200040",
	    "Test Name": "CPA_Parts_FR4_main QC check",
            "Schema": {
		"type": "group",
		"key": "External ID",
		"members": {
		    "External ID": "string",
		    "Comments": "string",
		    "Image File": "string"
                }
	    }
        }
    ]
}
Executing a command line like this;
hwdb-upload test_docket.json --submit
will upload the image file, this_is_fine.jpg, to the latest test entries of Test Type Name = “CPA_Parts_FR4_main QC check” of the 2 PIDs, Z00100300012-00001 and Z00100300012-00002, for instance.
Lesson 4: Tests
Now let’s try to post some in the Test area of the HWDB. As mentioned before, a Test Type must be created and pre-defined as described in the 03-Setting-up-Types.
Example 4.1: Simple Test
This sheet will post “pass” under Test Type, Doodad Test, of Serial Number of SN000001. Notice that the Record Type is Test, instead of Item.
| A | B | C | |
|---|---|---|---|
| 1 | Record Type | Test | |
| 2 | Part Type ID | Z00100300012 | |
| 3 | Part Type Name | Z.Sandbox.HWDBUnitTest.doodad | |
| 4 | Test Name | Doodad Test | |
| 5 | |||
| 6 | Serial Number | DATA | |
| 7 | SN000001 | pass | |
| Ex_4-1.xlsx | |||
This sheet is available here; Ex_4-1.xlsx.
Example 4.2: Complex Structures
Now let’s try with more complex scheme. The docket file below will post the contents of the sheet to the corresponding serial number entries under Test Type, Doodad Test.
| A | B | C | D | E | F | G | H | I | |
|---|---|---|---|---|---|---|---|---|---|
| 1 | Record Type | Test | |||||||
| 2 | Part Type ID | Z00100300012 | |||||||
| 3 | Part Type Name | Z.Sandbox.HWDBUnitTest.doodad | |||||||
| 4 | Test Name | Doodad Test | |||||||
| 5 | |||||||||
| 6 | Serial Number | Test Date | Test Operator | Operator Note | Overall Status | Subtest Name | Trial Number | Trial Description | Trial Result |
| 7 | SN000001 | 2024-03-22 08:45:00 | Alex | heavy snow | pass | bounce | 1 | drop from 1 meter | pass |
| 8 | SN000001 | 2024-03-22 08:45:00 | Alex | heavy snow | pass | bounce | 2 | drop from 2 meter | pass |
| 9 | SN000001 | 2024-03-22 08:45:00 | Alex | heavy snow | pass | smash | 1 | smash with 5# hammer | pass |
| 10 | SN000001 | 2024-03-22 08:45:00 | Alex | heavy snow | pass | smash | 2 | smash with 9# hammer | pass |
| 11 | SN000001 | 2024-03-29 14:00:00 | Bill | cold, windy | pass | bounce | 1 | drop from 1 meter | pass |
| 12 | SN000001 | 2024-03-29 14:00:00 | Bill | cold, windy | pass | bounce | 2 | drop from 2 meter | pass |
| Ex_4-2.xlsx | |||||||||
This sheet is available here; Ex_4-2.xlsx.
{
    "Sources": [
        {
            "Source Name": "Doodad Tests",
            "Files": "Ex_4-2.xlsx",
            "Encoder": "Doodad Test Encoder"
        }
    ],
    "Encoders": [
        {
            "Encoder Name": "Doodad Test Encoder",
            "Record Type": "Test",
            "Part Type Name": "Z.Sandbox.HWDBUnitTest.doodad",
            "Part Type ID": "Z00100300012",
            "Test Name": "Doodad Test",
            "Schema": {
                "Test Results": {
                    "DATA": {
                        "type": "group",
                        "key": [
                            "Test Date",
                            "Test Operator"
                        ],
                        "members": {
                            "Test Date": "string",
                            "Test Operator": "string",
                            "Overall Status": "string",
                            "Operator Note": "null,string",
                            "Subtest": {
                                "type": "group",
                                "key": "Subtest Name",
                                "members": {
                                    "Subtest Name": "string",
                                    "Trial": {
                                        "type": "group",
                                        "key": "Trial Number",
                                        "members": {
                                            "Trial Number": "integer",
                                            "Trial Description": "null,string",
                                            "Trial Result": "any"
                                        }
                                    }
                                }
                            }
                        }
                    }
                }
            }
        }
    ]
}
|
|
| Ex_4-2_docket.json | |
This sheet is available here; Ex_4-2_docket.json.
Notice that the Tool sort out rows based on column labels specified by “key”. For instance, with the above docket file, it sorts out based on two columns “Test Date” and “Test Operator”, forst. And then there will be a sub-structure “Subtest”, sub-sub-structure “Subtest Name” and “Trial” and so on. In each of structures, things are sorted by the specified “key”.
Lesson 5: Item Locations
Example 5.1: Uploading location info
This example demonstrates how to upload location information for two items.
| A | B | C | D | |
|---|---|---|---|---|
| 1 | Record Type | Item | ||
| 2 | Part Type ID | D00599800015 | ||
| 3 | Institution | (186) University of Minnesota Twin Cities | ||
| 4 | Manufacturer | (7) Hajime Inc | ||
| 5 | ||||
| 6 | Serial Number | Location | Arrived | Location Comments | </td>
| 7 | HA-MURAMATSU-00003 | (186) University of Minnesota Twin Cities | 10/15/2024 10:12:13 AM | comments for 1st item |
| 8 | HA-MURAMATSU-00004 | (186) University of Minnesota Twin Cities | 10/14/2024 9:38:59 PM | comments for 2nd item |
| Ex_5-1.xlsx | ||||
This sheet is available here; Ex_5-1.xlsx.
Lesson 6: Do them all at once!
Now let’s try to upload Item specifications, Test specifications, some images, make links to a few sub-components, and upload locations of Items, all at once.
The spreadsheet file can be obtained from here: QuickStartExample.xlsx. It has 3 tabs, “My Items”, “My Images”, and “My Tests”.
The corresponding docket file can be obtained from here: QE-docket.json.
We’ll start to look at the example spreadsheet file first and understand our contents. We’ll then go through the docket file to see how it works, including setting up the database schema for Specifications.
QuickStartExample.xlsx: “My Items” sheet:
The example spreadsheet file includes 3 sheets. One of them, “My Items” sheet, looks like the below:
| A | B | C | D | E | |
|---|---|---|---|---|---|
| 1 | Serial Number | Comments | Drawing Number | MySubComp 1 | MySubComp 2 |
| 2 | HA-MURAMATSU-00003 | here is my item | DFD-XX-FF00 | HA-MURAMATSU-00001 | HA-MURAMATSU-00002 |
| 3 | HA-MURAMATSU-00004 | another item | DFD-XX-FF01 | ||
| the first half of My Items sheet | |||||
| F | G | H | |
|---|---|---|---|
| 1 | Location | Arrived | Location Comments |
| 2 | (186) University of Minnesota Twin Cities | 10/14/2024 10:12:13 AM | comments for 1st item |
| 3 | (186) University of Minnesota Twin Cities | 10/13/2024 9:38:58 PM | comments for 2nd item |
| the second half of My Items sheet | |||
| Column | Description |
| A | It defines a specific Item, and thus acts as a PID. There is no specific scheme to define serial numbers, but each of them must be unique for a given Component Type. One could use External ID as its label name here, instead. In that case, you would have to specify existing PIDs. The Tool then overwrite the contents of the specified PIDs. |
| B | This column represents comments for each of the Items. |
| C | Drawing numbers, to be stored in each of the Item’s Specifications in the HWDB. |
| D & E | The label names here need to coincide with those functional position names that are defined in its Component Type definition. Notice that the Item, HA-MURAMATSU-00003, will have 2 sub-component links, one to HA-MURAMATSU-00001 and another to HA-MURAMATSU-00002, while the Item, HA-MURAMATSU-00004, will not have any sub-component link. |
| F | The column specifies a location of the Item. It expects both Institution ID and Institution name. If you like, you could only specify ID (name) with a label name, Institution ID (Institution Name), instead. |
| G | Represents arriving date&time of the corresponding Item. One can add a time-zone. Without it, by default it takes it in the North American Central Time Zone. |
| H | Represents comments for each locations. |
-
If you don’t have any sub-component to be linked, you could just remove the columns D & E altogether.
-
Similarly, if you don’t need to enter locations of your Items, go ahead to remove columns F, G, and H.
QuickStartExample.xlsx: “My Images” sheet:
“My Images” sheet should look like the below:
| A | B | C | |
|---|---|---|---|
| 1 | Serial Number | Image File | Comments |
| 2 | HA-MURAMATSU-00003 | images/apple.jpeg | image 1 |
| 3 | HA-MURAMATSU-00003 | images/banana.jpeg | image 2 |
| 4 | HA-MURAMATSU-00004 | images/broccoli.jpeg | image 3 |
| 4 | HA-MURAMATSU-00004 | images/apple.jpeg | image 4 |
| My Images sheet | |||
| Column | Description |
| A | Represents the same Serial Numbers that are found in the My Items sheet. |
| B | Specifies the locations and file names of the images to be uploaded. |
| C | Comments for each image files. |
- Again, if you don’t have any image to be uploaded, you could delete the entire “My Images” sheet.
QuickStartExample.xlsx: “My Tests” sheet:
“My Tests” sheet should look like the below:
| A | B | C | D | E | F | G | H | I | |
|---|---|---|---|---|---|---|---|---|---|
| 1 | Serial Number | Comments | Operator | Test Location | PSU Serial Number | Visual Inspection | PSU Manufacturer | PSU Test 1 | PSU Test 2 |
| 2 | HA-MURAMATSU-00003 | Looks good | Hajime | Minneapolis | 2PH30-230 | Passed | TOSHIBA | Failed | Passed |
| 3 | HA-MURAMATSU-00004 | Looks ok | Andy | Tucson | 2PH30-231 | Passed | TOSHIBA | Passed | Failed |
| the first half of My Tests sheet | |||||||||
| J | K | L | M | |
|---|---|---|---|---|
| 1 | Fan Serial Number | Fan Manufacturer | Fan Test 1 | Fan Test 2 |
| 2 | W0909101451 | Champion Lab | Passed | Failed |
| 3 | W0909101452 | Champion Lab | Failed | Passed |
| the second half of My Tests sheet | ||||
| Column | Description |
| A | Represents the same Serial Numbers that are found in the My Items and My Images sheets. |
| B | Comments on each of the Tests. |
| C-M | These columns represent my test data. We’ll describe how exactly we like to format them below. |
- Again, if you don’t need to upload any test data, but only Items, you could just delete this “My Tests” sheet.
QE-docket.json: “Values” blob:
“Values” blob in QE-docket.json should look like the below:
 "Values": {
        "Part Type ID": "D00599800015",
        "Institution": "(186) University of Minnesota Twin Cities",
        "Manufacturer": "(7) Hajime Inc"
    }
Here, you provide Component Type ID of the Items you like to upload (in this case, D00599800015), your Institution, and Manufacturer.
QE-docket.json: “Sources”:
“Sources” in QE-docket.json should look like the below:
 "Sources": [
        {
            "Files": "QuickStartExample.xlsx",
	        "Sheet Name": "My Items",
            "Encoder": "My Item Encoder"
        },
	    {
            "Files": "QuickStartExample.xlsx",
	        "Sheet Name": "My Images",
            "Encoder": "My Image Encoder"
        },
	    {
            "Files": "QuickStartExample.xlsx",
	        "Sheet Name": "My Tests",
            "Encoder": "My Test Encoder"
        }
    ]
-
Here you specify the 3 spreadsheet file names, the 3 sheet names, and the 3 Encoder names.
-
We have only one single spreadsheet file in our example. But we could have those 3 sheets in 3 different files separately.
-
We’ll describe each of the Encoders in the next sub-sections.
QE-docket.json: Encoders: “My Item Encoder”:
“My Item Encoder” in QE-docket.json should look like the below:
            "Encoder Name": "My Item Encoder",
            "Record Type": "Item",
            "Part Type ID": "D00599800015",
            "Schema": {
                "Specifications": {
                    "DATA": {
                        "type": "group",
                        "key": "Serial Number",
                        "members": {
                            "Serial Number": "string",
                            "Drawing Number": "string",
			                "My Doc": {
				               "value": "https://edms.cern.ch/document/2505353/"
			                },
			                "Serial Number": "string",
			                "Location": "string",
			                "Arrived": "string",
			                "Location Comments": "string"
                        }
                    }
                },
		        "Subcomponents": {
		            "MySubComp 1": {
			            "column": "MySubComp 1"
		            },
		            "MySubComp 2": {
			           "column": "MySubComp 2"
		            }
		        }
            }
-
Within the Specifications blob, its database scheme is defined.
-
“key” tells the Tool that “Serial Number” defines an Item (one-to-one correspondance between a “Serial Number” and an Item).
- The “members” blob defines the scheme. In the database, we like to store them like the one shown below:
"Drawing Number": "DFD-XX-FF00", "My Doc" : "https ://edms.cern.ch/document/2505353/" -
For “My Doc”, since we know the documentation link is the same for this Component Type, instead of specifying it in every row of “My Items” sheet, we provide the constant value here. Notice that we don’t need to specify the label name, “My Doc” in our sheet either.
- The “Subcomponents” blob just specifies label names for sub-component PIDs (or Serial Numbers).
QE-docket.json: Encoders: “My Image Encoder”:
“My Image Encoder” in QE-docket.json should look like the below:
            "Encoder Name": "My Image Encoder",
            "Record Type": "Item Image",
            "Part Type ID": "D00599800015",
            "Schema": {
                "type": "group",
                "key": "Serial Number",
                "members": {
                    "Serial Number": "string",
                    "Image File": "string",
		            "Comments": "string"
                }
            }
- Similar to “My Item Encoder” typesets of the labels are defined.
QE-docket.json: Encoders: “My Test Encoder”:
“My Test Encoder” in QE-docket.json should look like the below:
            "Encoder Name": "My Test Encoder",
            "Record Type": "Test",
	        "Part Type ID": "D00599800015",
	        "Test Name": "My Test",
            "Schema": {
                "Test Results": {
                    "DATA": {
                        "type": "group",
                        "key": "Serial Number",
                        "members": {
			                "Serial Number": "string",
                            "Operator": "string",
			                "Location": "string",
			                "PSU": {
				                "type": "group",
				                "key": "PSU Serial Number",
				                "members": {
				                     "PSU Serial Number": "string",
				                     "Visual Inspection": "string",
				                     "PSU Manufacturer": "string",
				                     "PSU Test 1": "string",
				                     "PSU Test 2": "string"
				                }
			                },
			                "Fans": {
				                "type": "group",
				                "key": "Fan Serial Number",
				                "members": {
				                     "Fan Serial Number": "string",
				                     "Fan Manufacturer": "string",
				                     "Fan Test 1": "string",
				                     "Fan Test 2": "string"
				                }
			                }
                        }
                    }
                }
            }
-
Again, it has a very similar form to what we have seen in Item and Image Encoders.
-
This time, however, it has a nested structure in its scheme. E.g., this scheme would store the contents in “My Tests” sheet as shown below:
"Serial Number": "HA-MURAMATSU-00003",
"Operator"     : "Hajime",
"Location"     : "Minneapolis",
"PSU"          : [
                     "PSU Serial Number": "2PH30-230",
                     "Visual Inspection": "Passed",
                     "PSU Manufacturer" : "TOSHIBA",
                     "PSU Test 1"       : "Failed",
                     "PSU Test 2"       : "Passed"
				   ],
"Fans"         : [
                     "Fan Serial Number": "W0909101451",
                     "Fan Manufacturer" : "Champion Lab",
                     "Fan Test 1"       : "Passed",
                     "Fan Test 2"       : "Failed"
				   ]
Let’s upload them:
- If you have modified your sheet(s) and docket file according to your needs, you should be ready to upload them. Execute the following command. Don’t worry. It will not upload, yet. It will only check the contents of the provided files.
hwdb-upload QE-docket.json - If you don’t see any error message from the above command-line, let’s upload them for real:
hwdb-upload QE-docket.json --submit - If everything goes well, you should see a screen similar to the one shown below:
 and new PIDs are assigned to each of the newly uploaded Items (i.e., the corresponding Serial Numbers).
-
Again, if you don’t need to upload Tests, you can remove the Test sheet from the spreadsheet file and the Tests portion from “Sources” and “Endoder” of the docket file.
-
Likewise, if you don’t plan to upload images, remove the corresponding parts from the spreadsheet and docket files.
with External IDs (or Serial Numbers) that already exist in the HWDB
- If you upload with Serial Numbers (or External IDs) that already exist in the HWDB, it will overwrite the existing Item Specifications and Tests (don’t worry, their histories are kept in the HWDB). This is actually a useful feature when you need to update contents in the HWDB.
Lesson 7: Generating bar/QR-code labels with the Tool
One can produce massive numbers of labels with the Tool.
Please refer to our Generating bar/QR-code labels section.
Lesson 8: Filling out the DUNE Shipping checklists with the GUI-based Tool
A link to this new section is coming soon.
Key Points
keypoint 1
Inserting Component Types
Overview
Teaching: 30 min
Exercises: 0 minQuestions
Architect privilage is required.
How do I newly create Components (only available with the WEB UI)?
Objectives
Users with the Architect privilege should be able to insert new Component Types.
Contents
Description A requirement and preparation Know what you want to insert! Inserting manually Inserting a spreadsheet
A requirement and preparation
This page is to teach a user how to insert new Component Types into the DUNE HWDB. Only users with the Architect privilege are allowed to do so. If you don’t have such privilege, you likely do not go through the contents on this page. If you think you should know how to, but don’t have the Architect privilege, please contact the DUNE database group.
Let’s check if your account in the HWDB already has the Architect privilege. From the side-menu of the HWDB, go to Users and find your own account. If you have the Architect privilege, you should have a check-mark under architect as shown below.
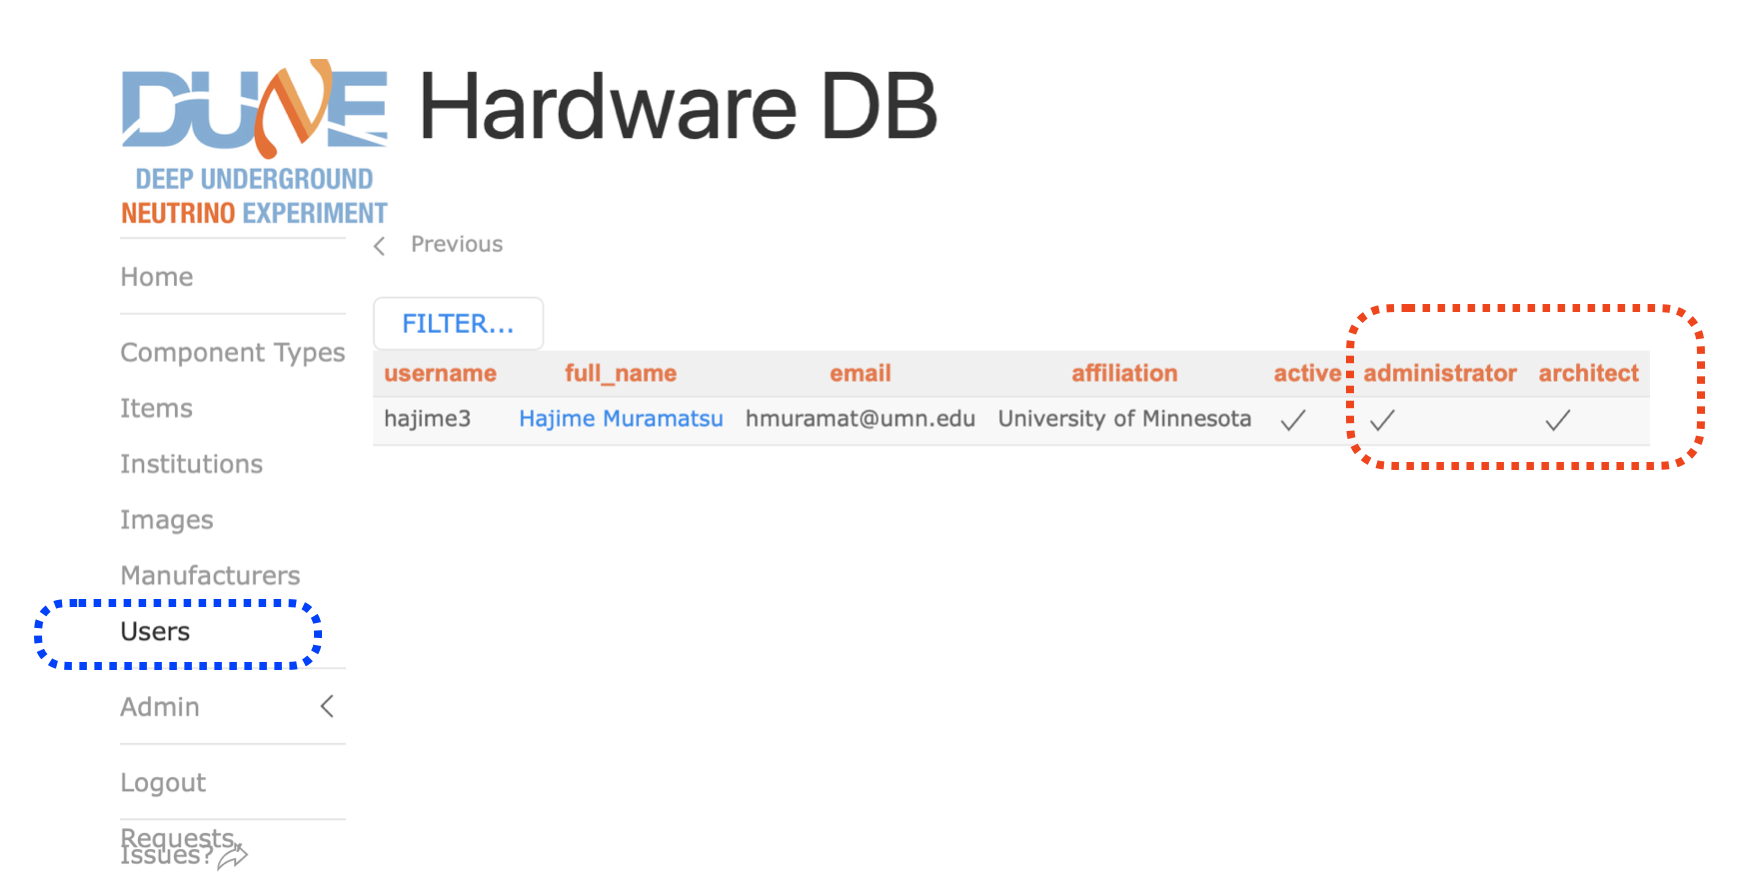
Know what you want to insert!
Just to remind you, the figure below shows the DUNE PID syntax.
Remember that with a combination of Project, System ID, Subsystem ID, Component Type ID, and Item Number,
every DUNE component in the HWDB is uniquely defined. And the Item Number is just a counter.
 Thus, for each of the Component Types you like to like newly create, you should have the followings prepared:
- Project (usually “D”)
- System ID and the corresponding System Name
- Subsystem ID and the corresponding Subsystem Name
- Component Type ID and the corresponding Component Type Name
There are two ways to do this. In either way, you will do these through your web browser.
- Do it manually, one-by-one.
- Do it by providing a prepared spreadsheet.
Inserting manually
As an example, let’s insert the following new Component Type:
- Project = D
- System ID = 005
- System Name = FD1-HD HVS
- Subsystem ID = 998
- Subsystem Name = HWDBUnitTest
- Component Type ID = 00011
- Component Type Name = Test Type 011
This Subsystem (ID = 998, name = HWDBUnitTest) already exists in the HWDB. Let’s find it.
From the side-menu, go to Admin and then click Projects as shown below.
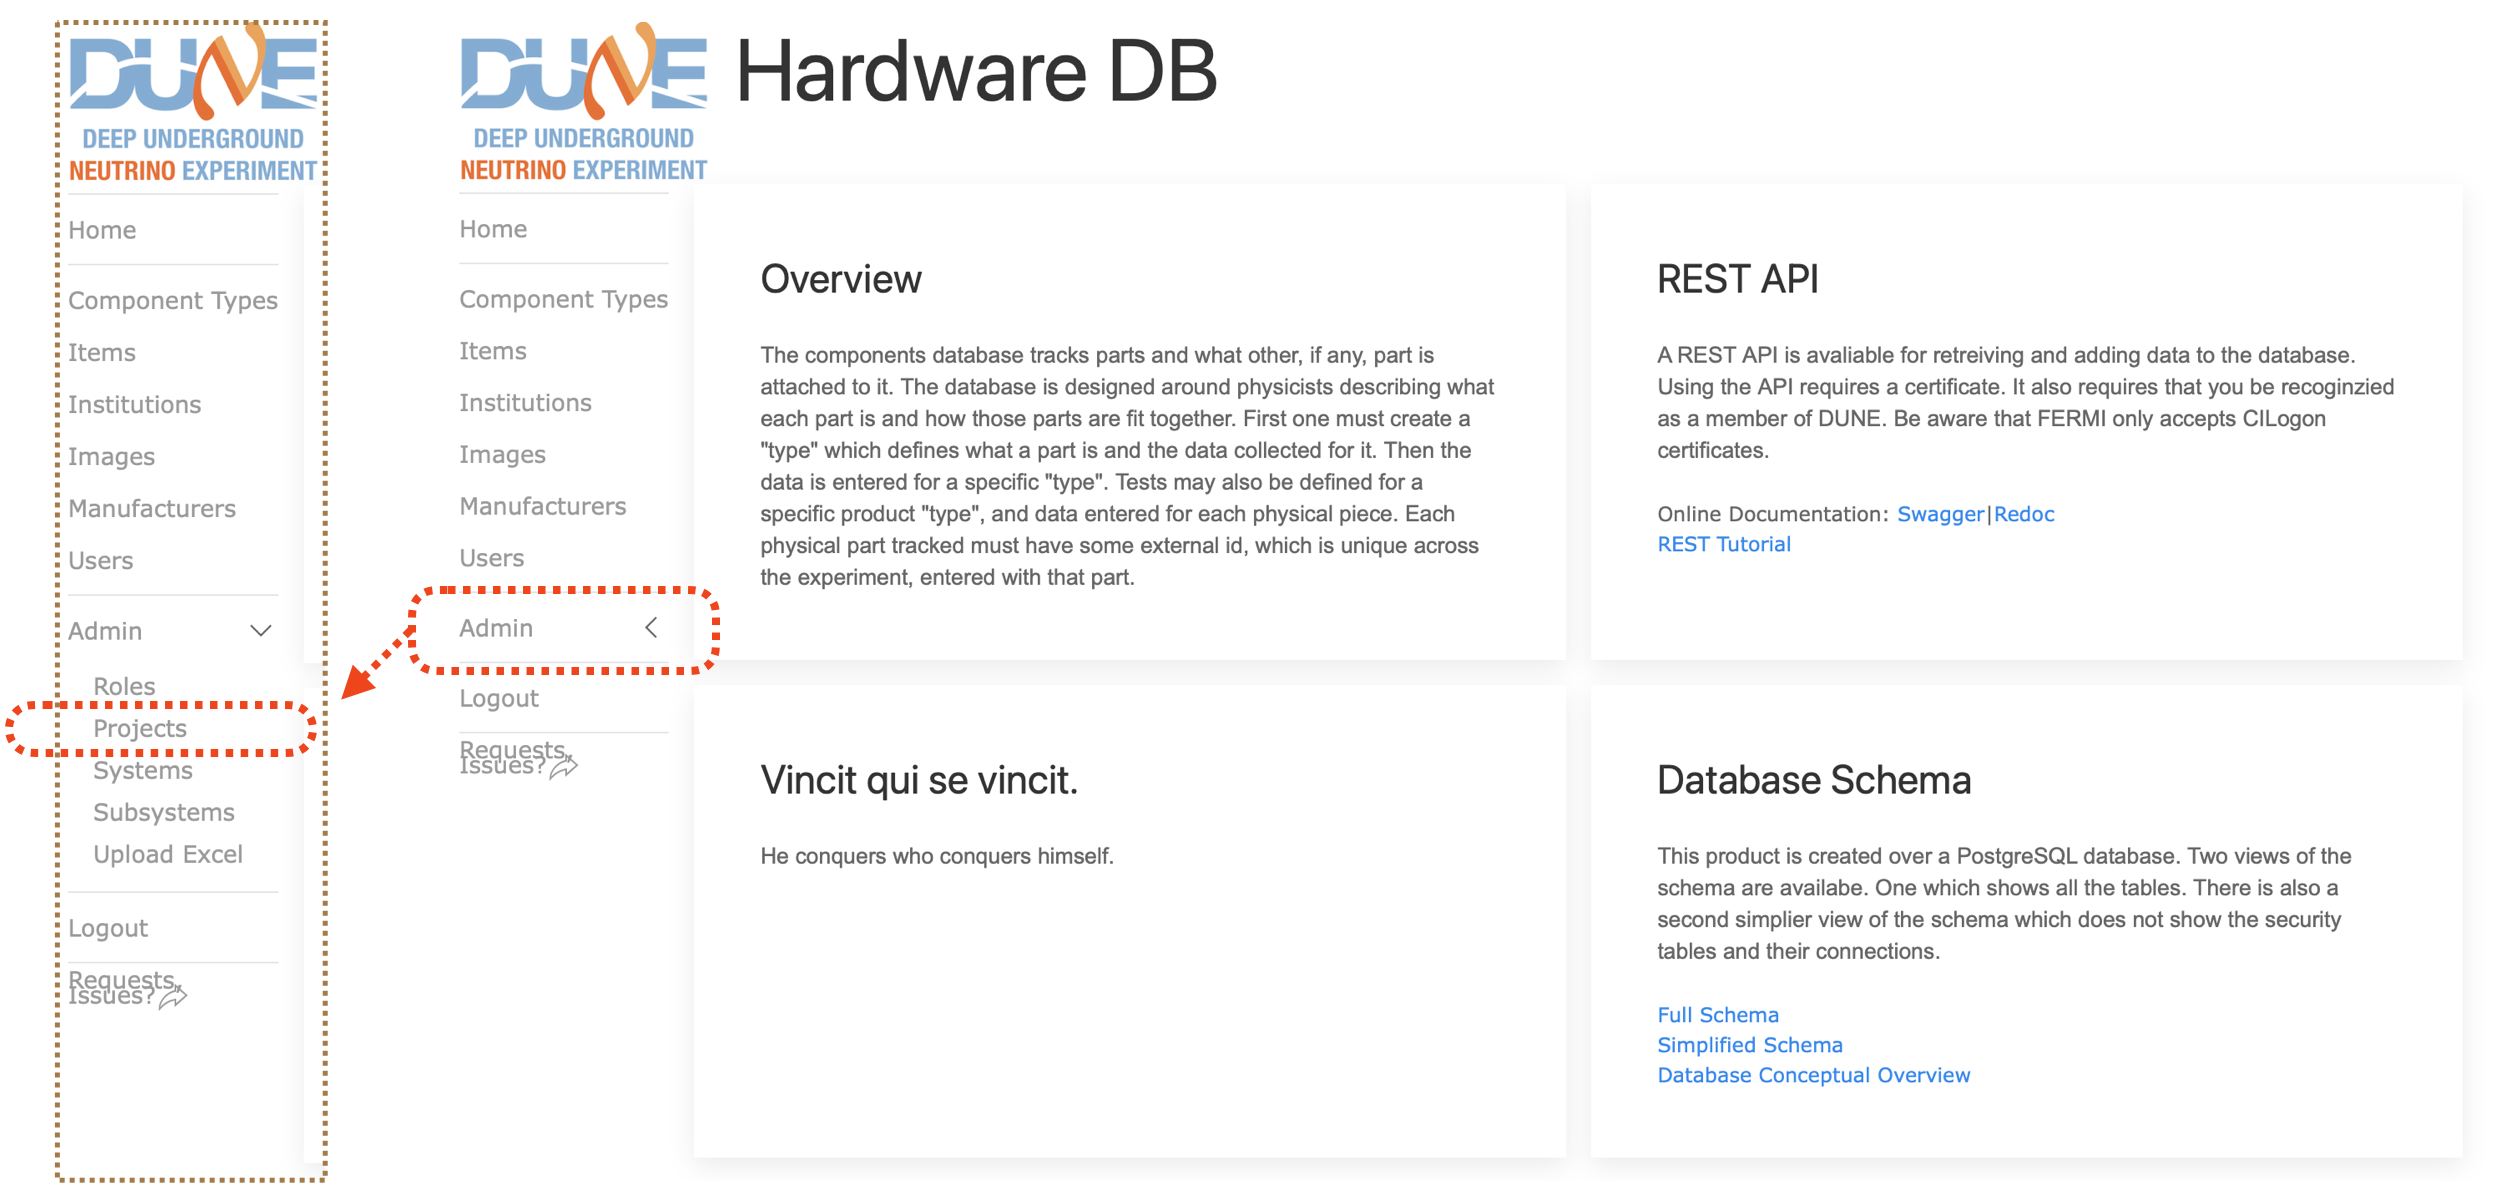
You now should be seeing a list of Project as shown below. Click the Systems folder (DUNE), which takes you to the list of Systems.
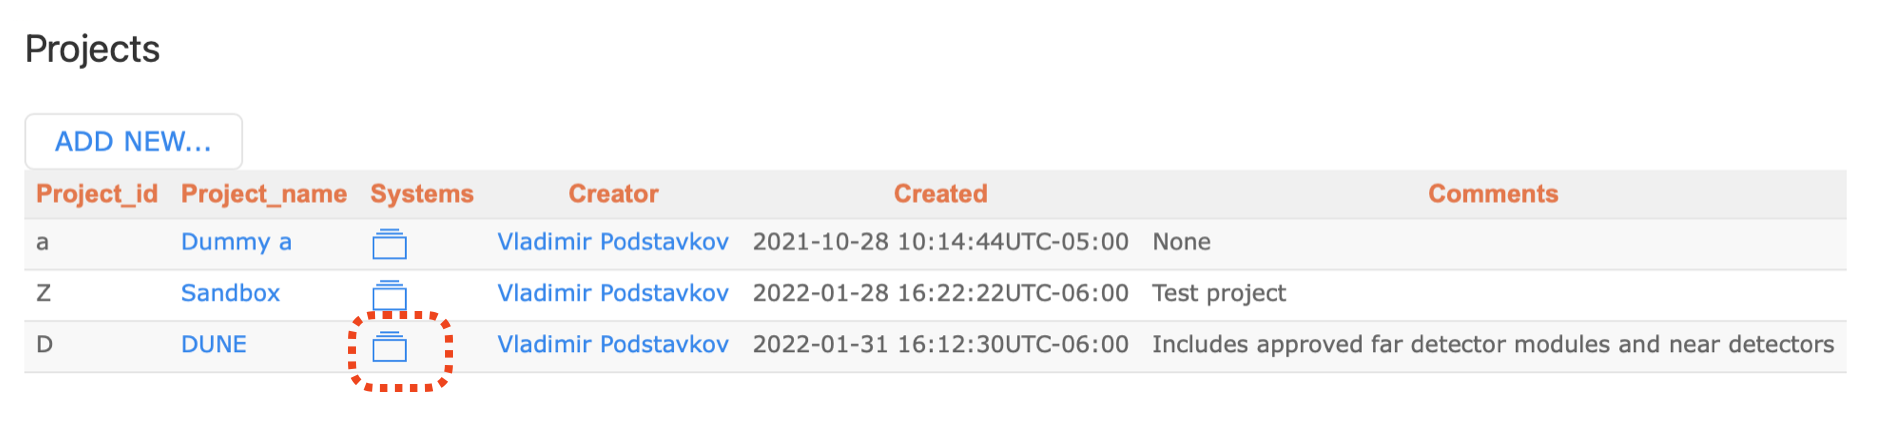
In the list of Systems, click the Subsystems folder (FD1-HD HVS) as shown below.
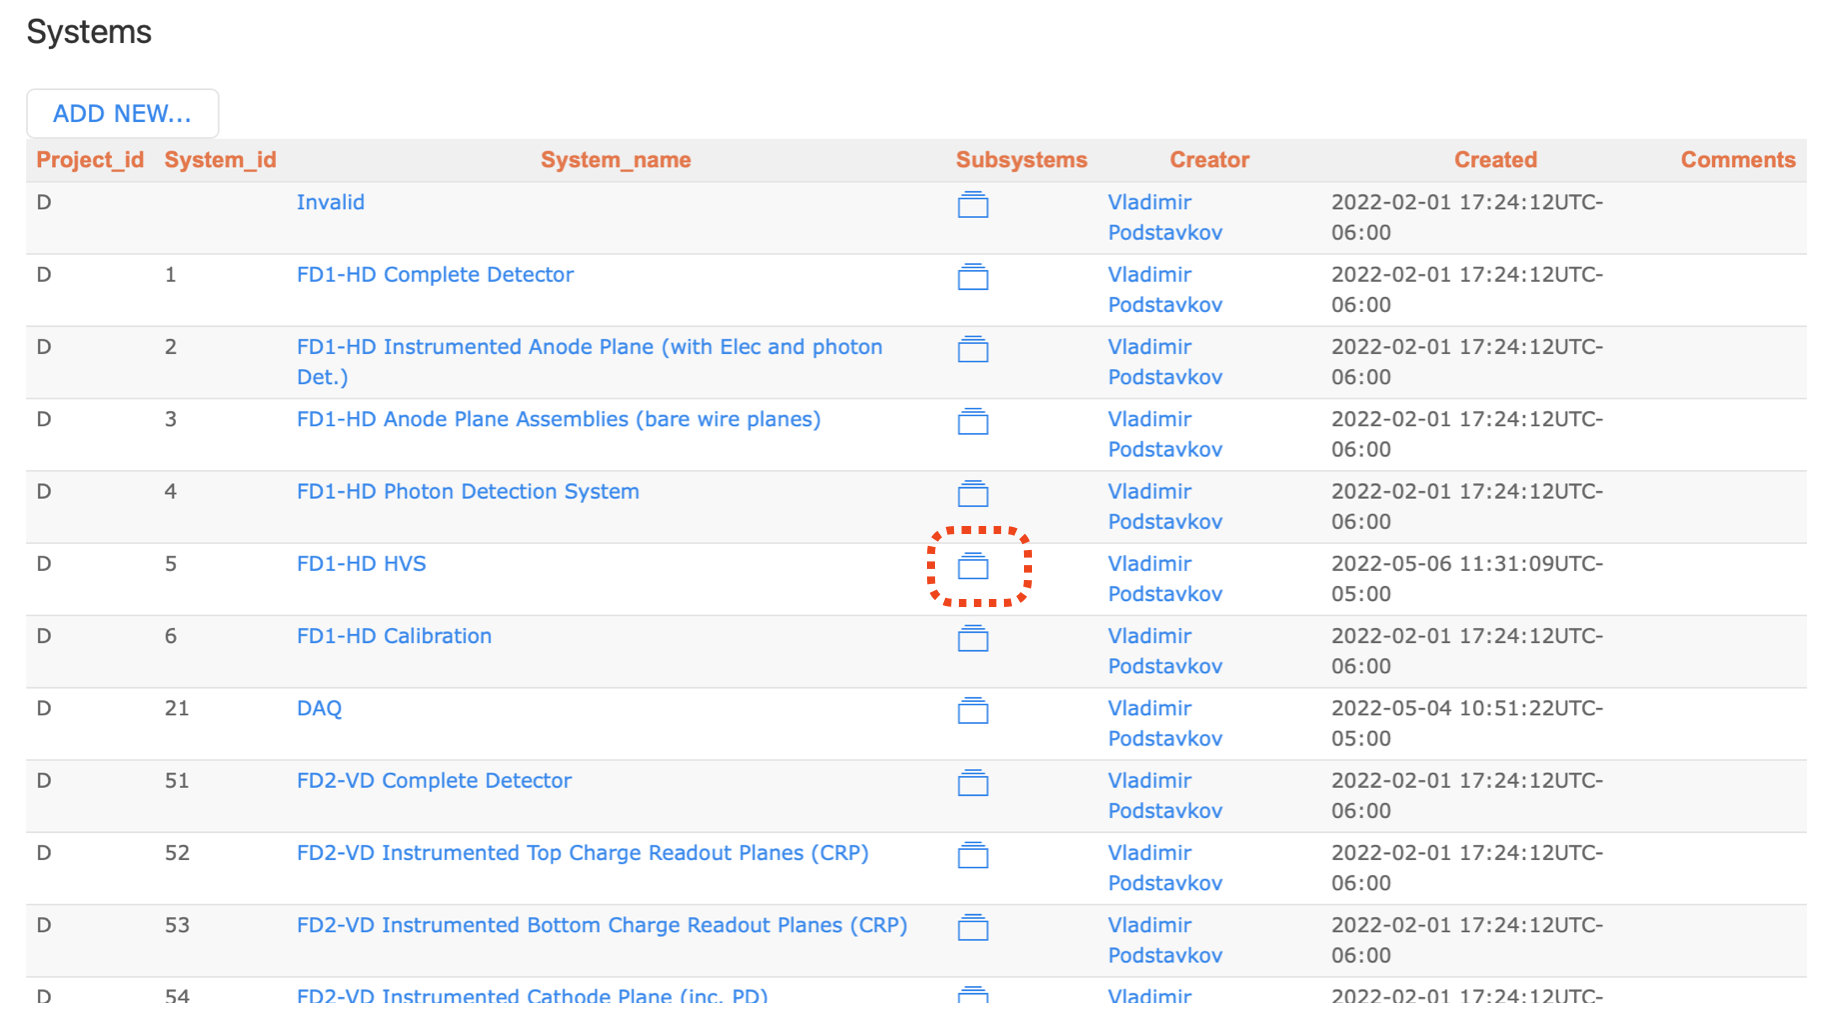
You should be seeing a list of Subsystems as shown below. Select the Subsystems folder (HWDBUnitTest) now.
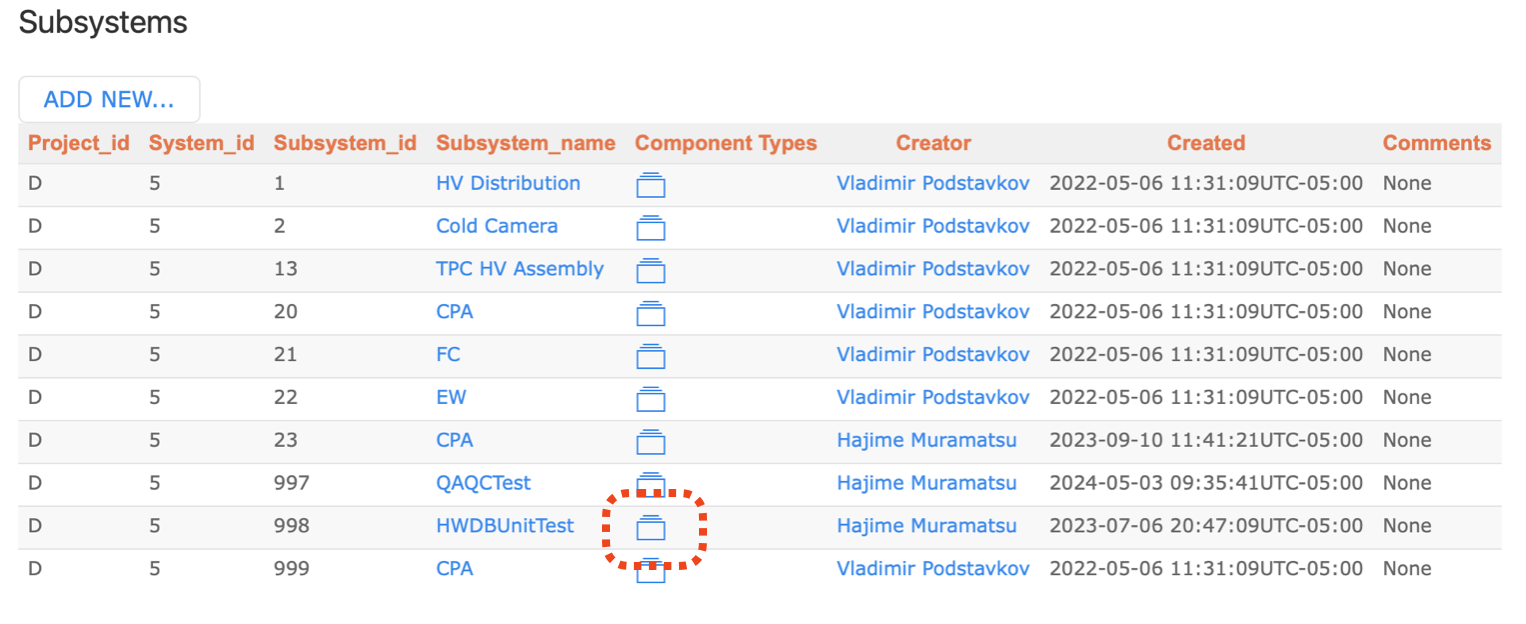
The figure below shows a list of the Component Types that are currently available in the HWDB for the selected Subsystem, HWDBTestUnit.
Click “ADD NEW TYPE…”.
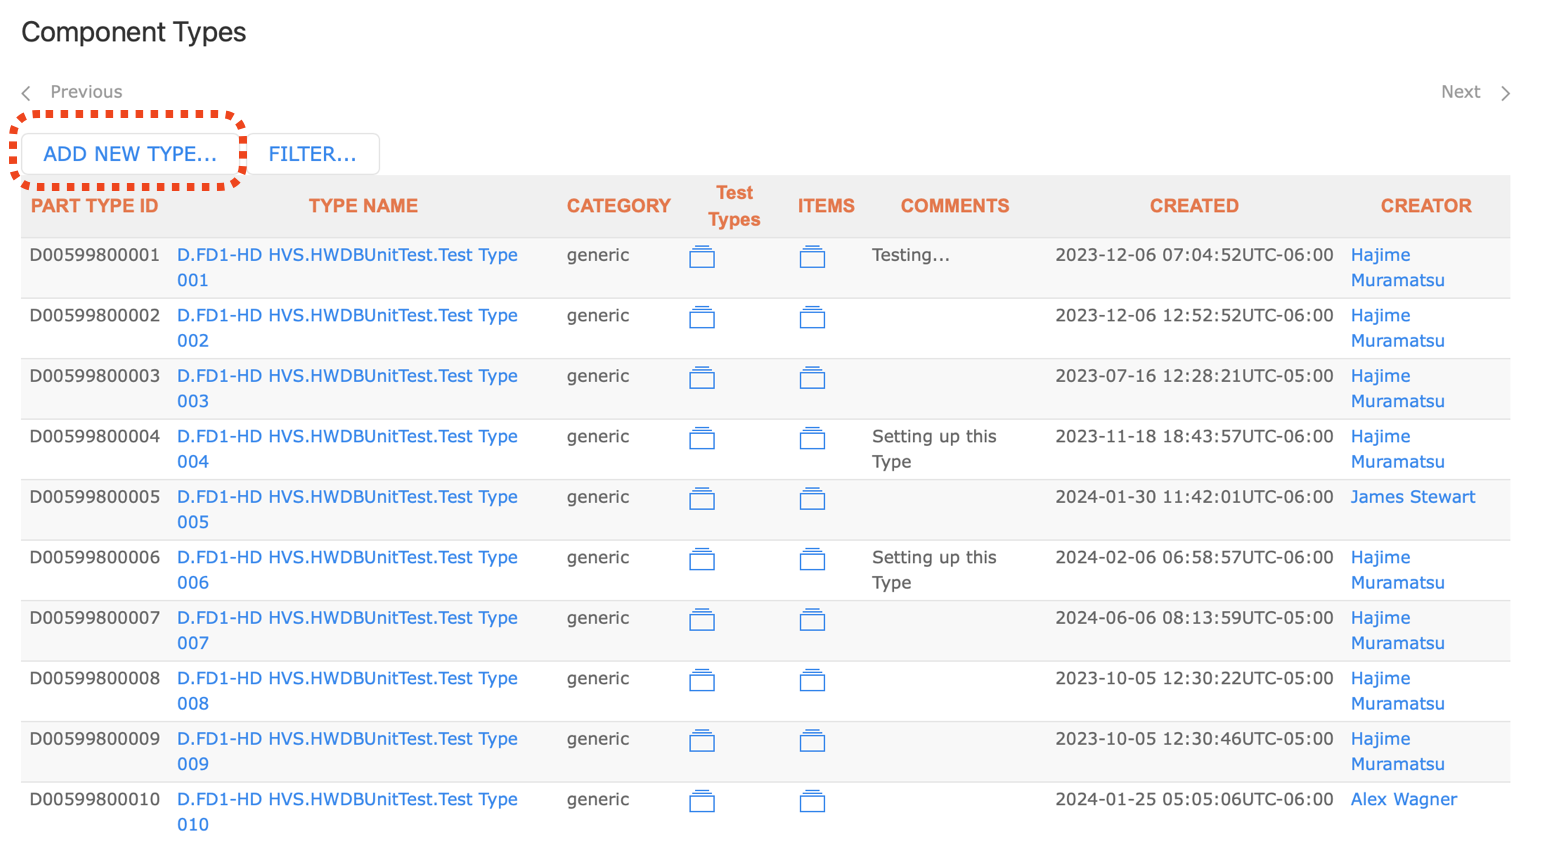
You now should be seeing a figure similar to the one shown below. Enter:
- Type Name
- Type ID
- Comments (optional)
and then click “SAVE”.

After saving, you should be seeing a screen like the one below.
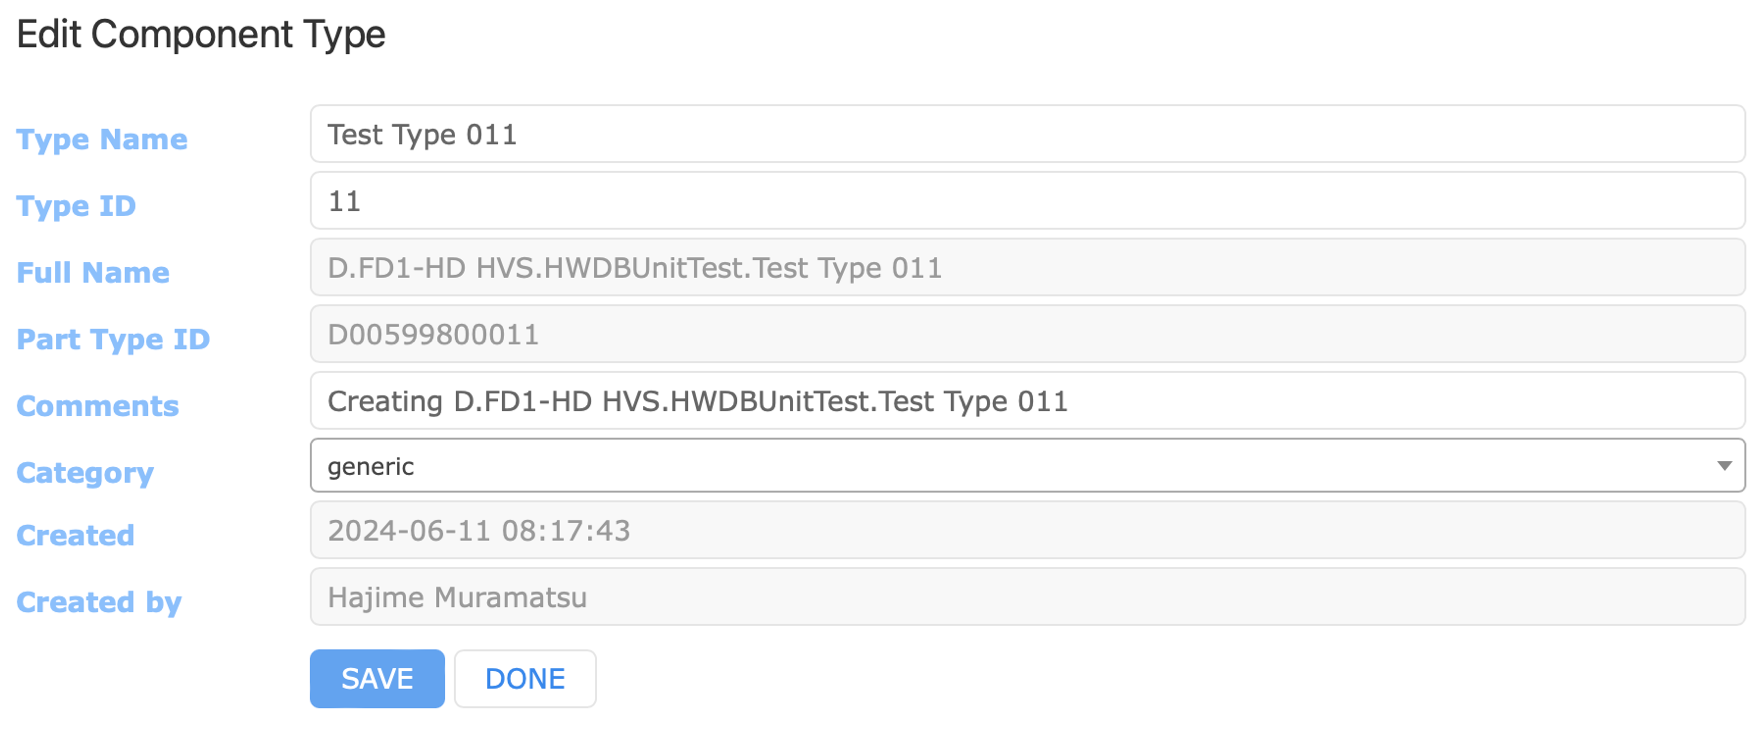
If you now go back to the list of Component Types, you should be seeing a figure like the one shown below.
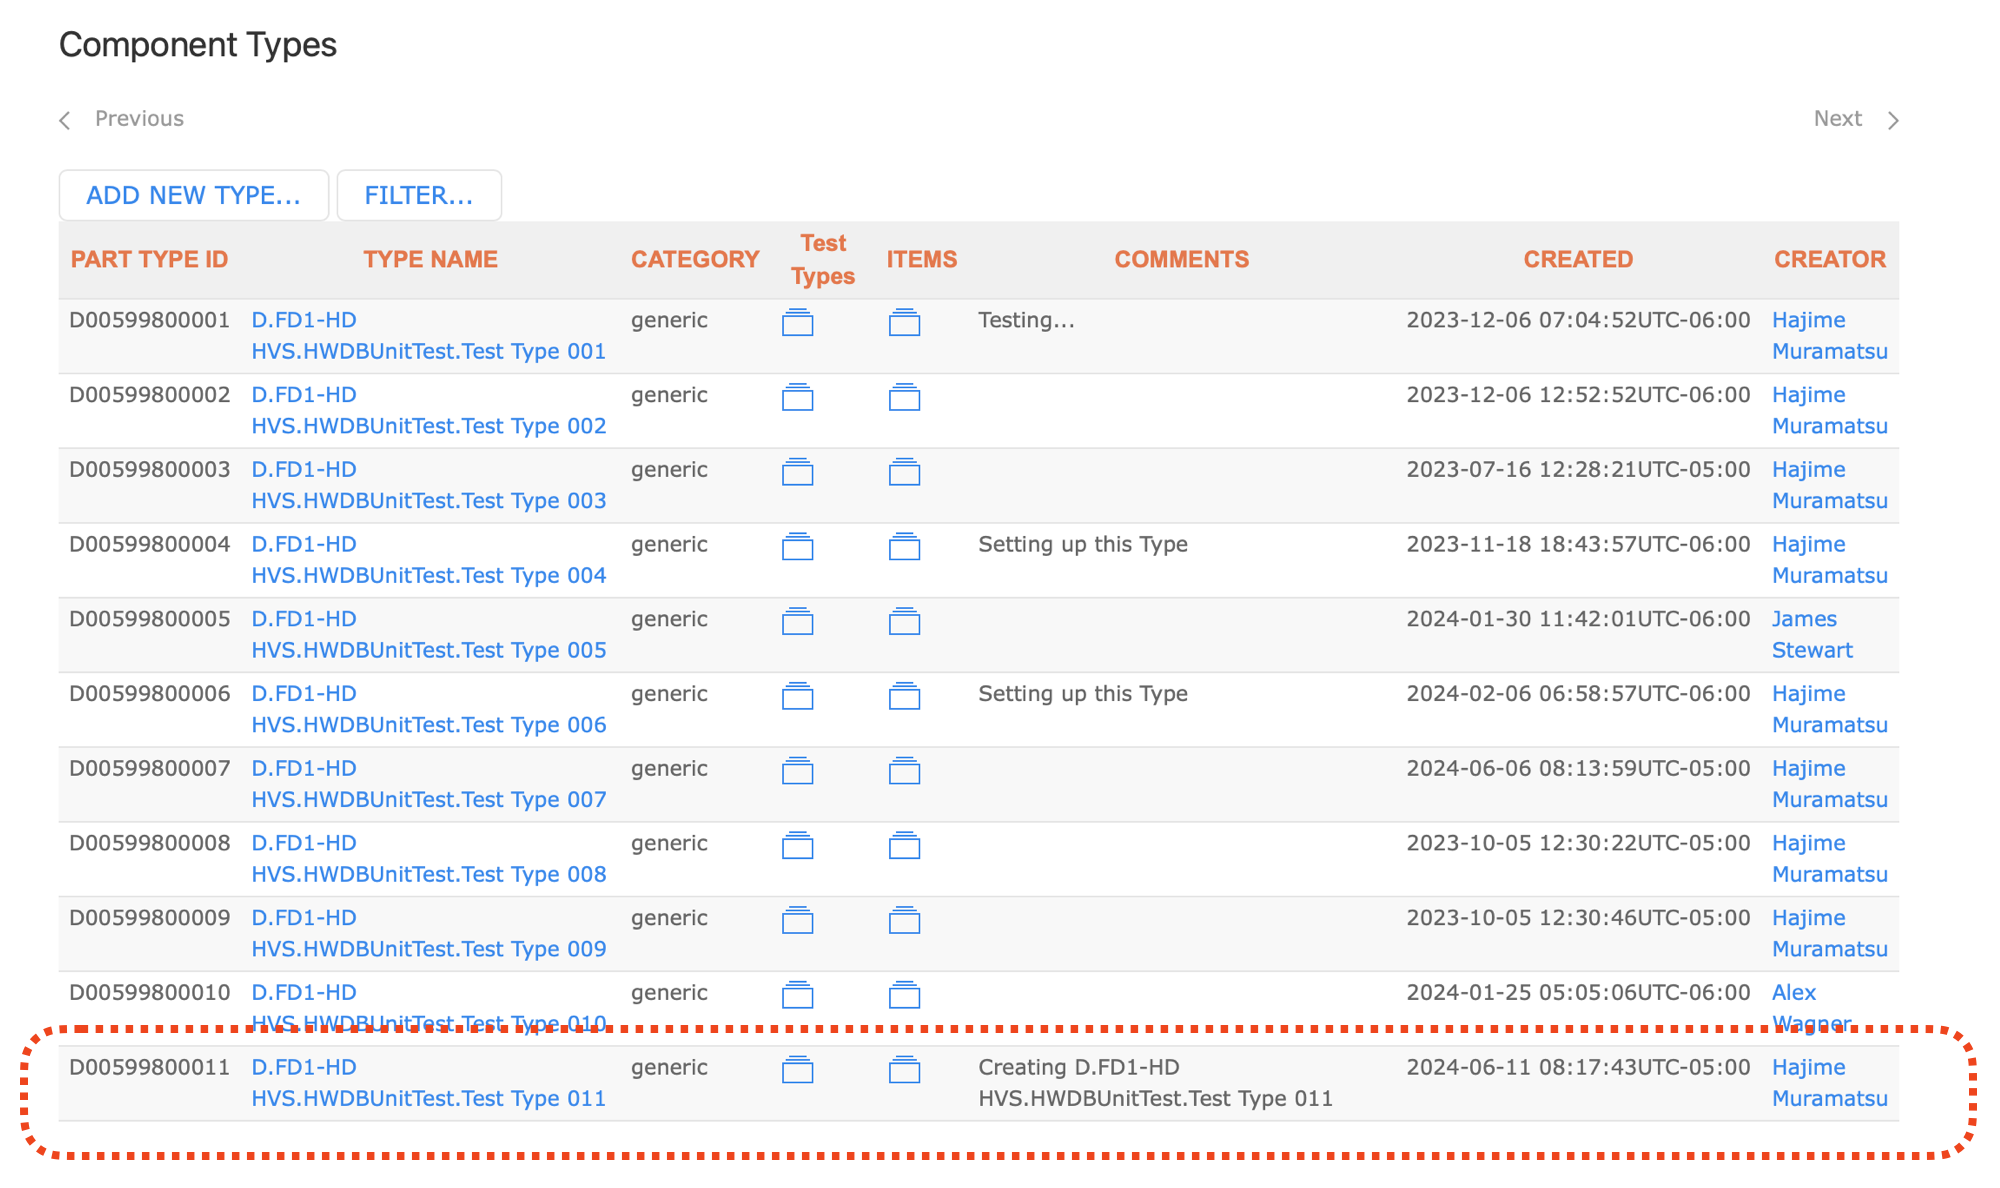
In the above example, our Subsystem ID has been already defined in the HWDB. In general, you could newly defined Subsystem ID as well. The procedure would be entirely identical to what we just described above, except that you ADD new Subsystem ID to a list of Subsystems instead.
Inserting a spreadsheet
Now let’s insert multiple new Component Types at once.
Prepare a spreadsheet similar to the one shown below.
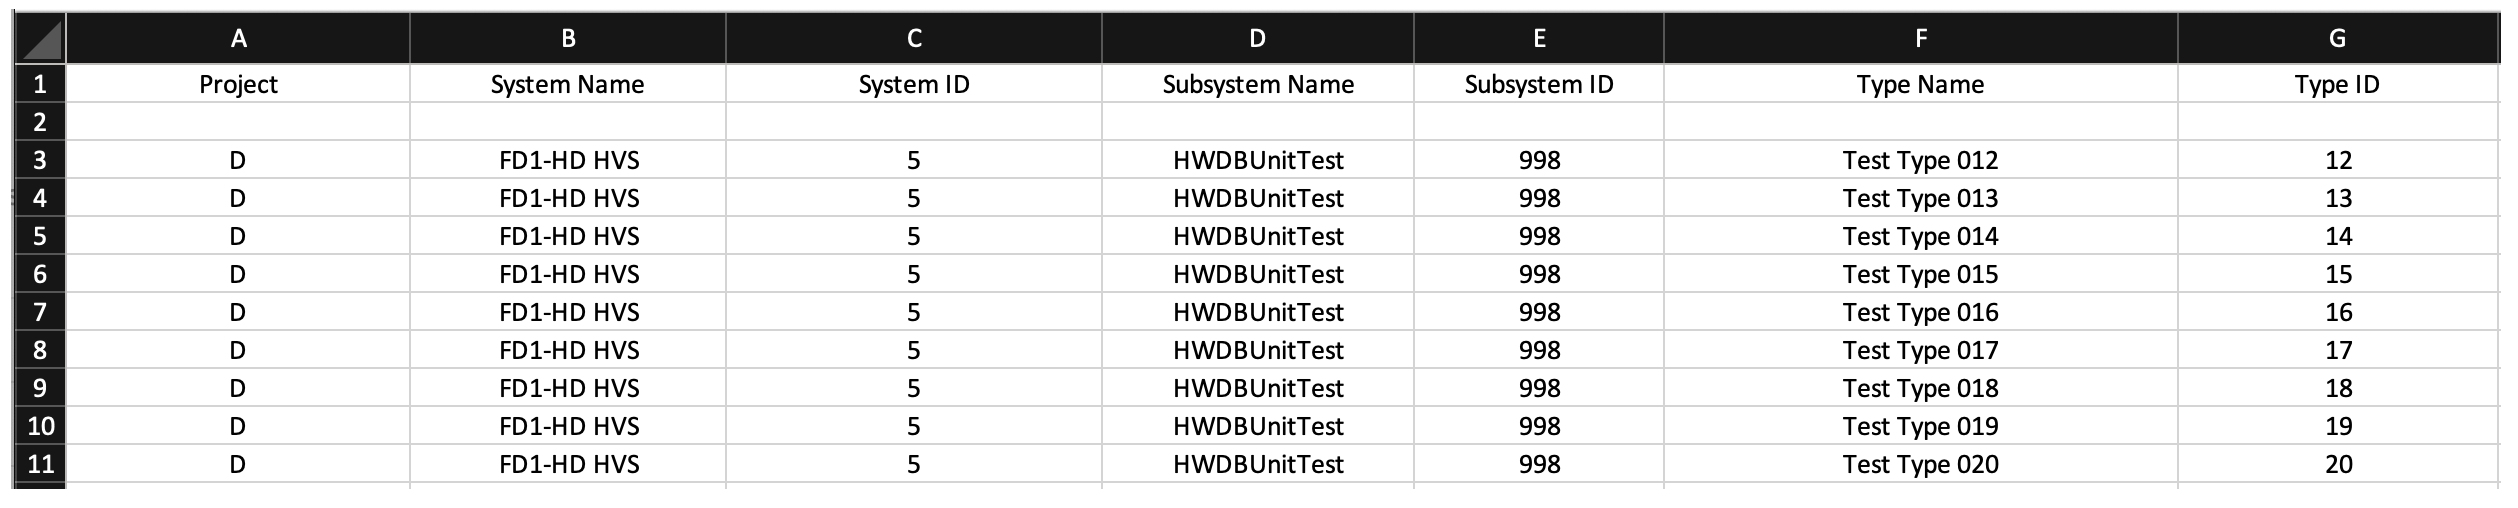
You could have multiple different System IDs and multiple different Subsystem IDs in general. In this example, for simplicity, we stick with the same System ID and Subsystem ID as before.
Cautions: For those names (not IDs) entered in your sheet, you cannot use the following characters: comma, period, quotation marks, underscore or the percent sign.
From the side-menu, go to Admin and then select Upload Excel as shown below.
Drag & drop your prepared Excel sheet there.
Once you drop your sheet there, screen like below should show up. Your requested System ID(s) is checked to see if it is in the accepted format.
If looks OK, click “NEXT”.
Similarly it checks your requested Subsystem ID(s) as shown below.
Again, if it looks OK, click “NEXT” to proceed.
And finally it checks your requested Component Type ID(s).
Make sure they look OK before clicking “SAVE” to finalize the creation process. Once they are saved, you will not
be able to delete them!
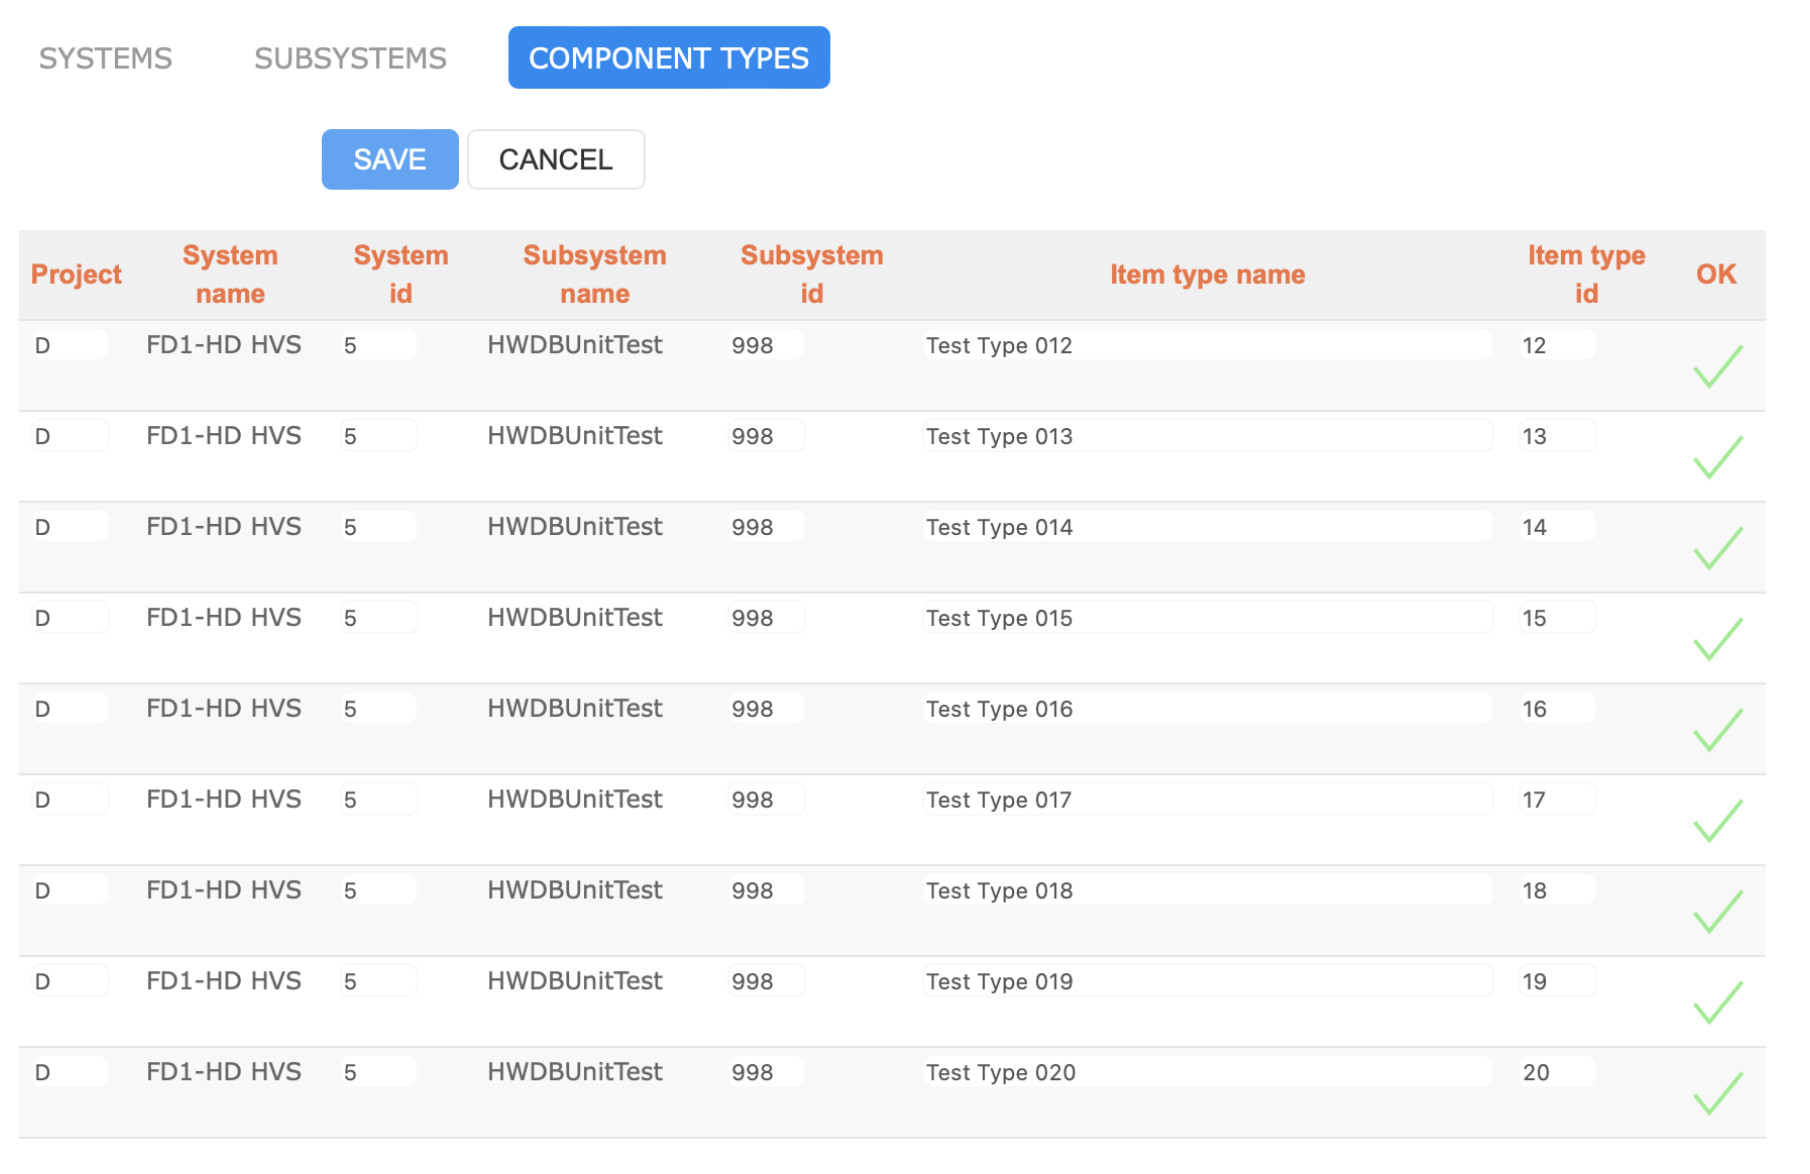
When everything goes well, you should be notified by a message like the one shown below.
Notice that no Systems and Subsystems were newly created, while 9 Component Types have been created.
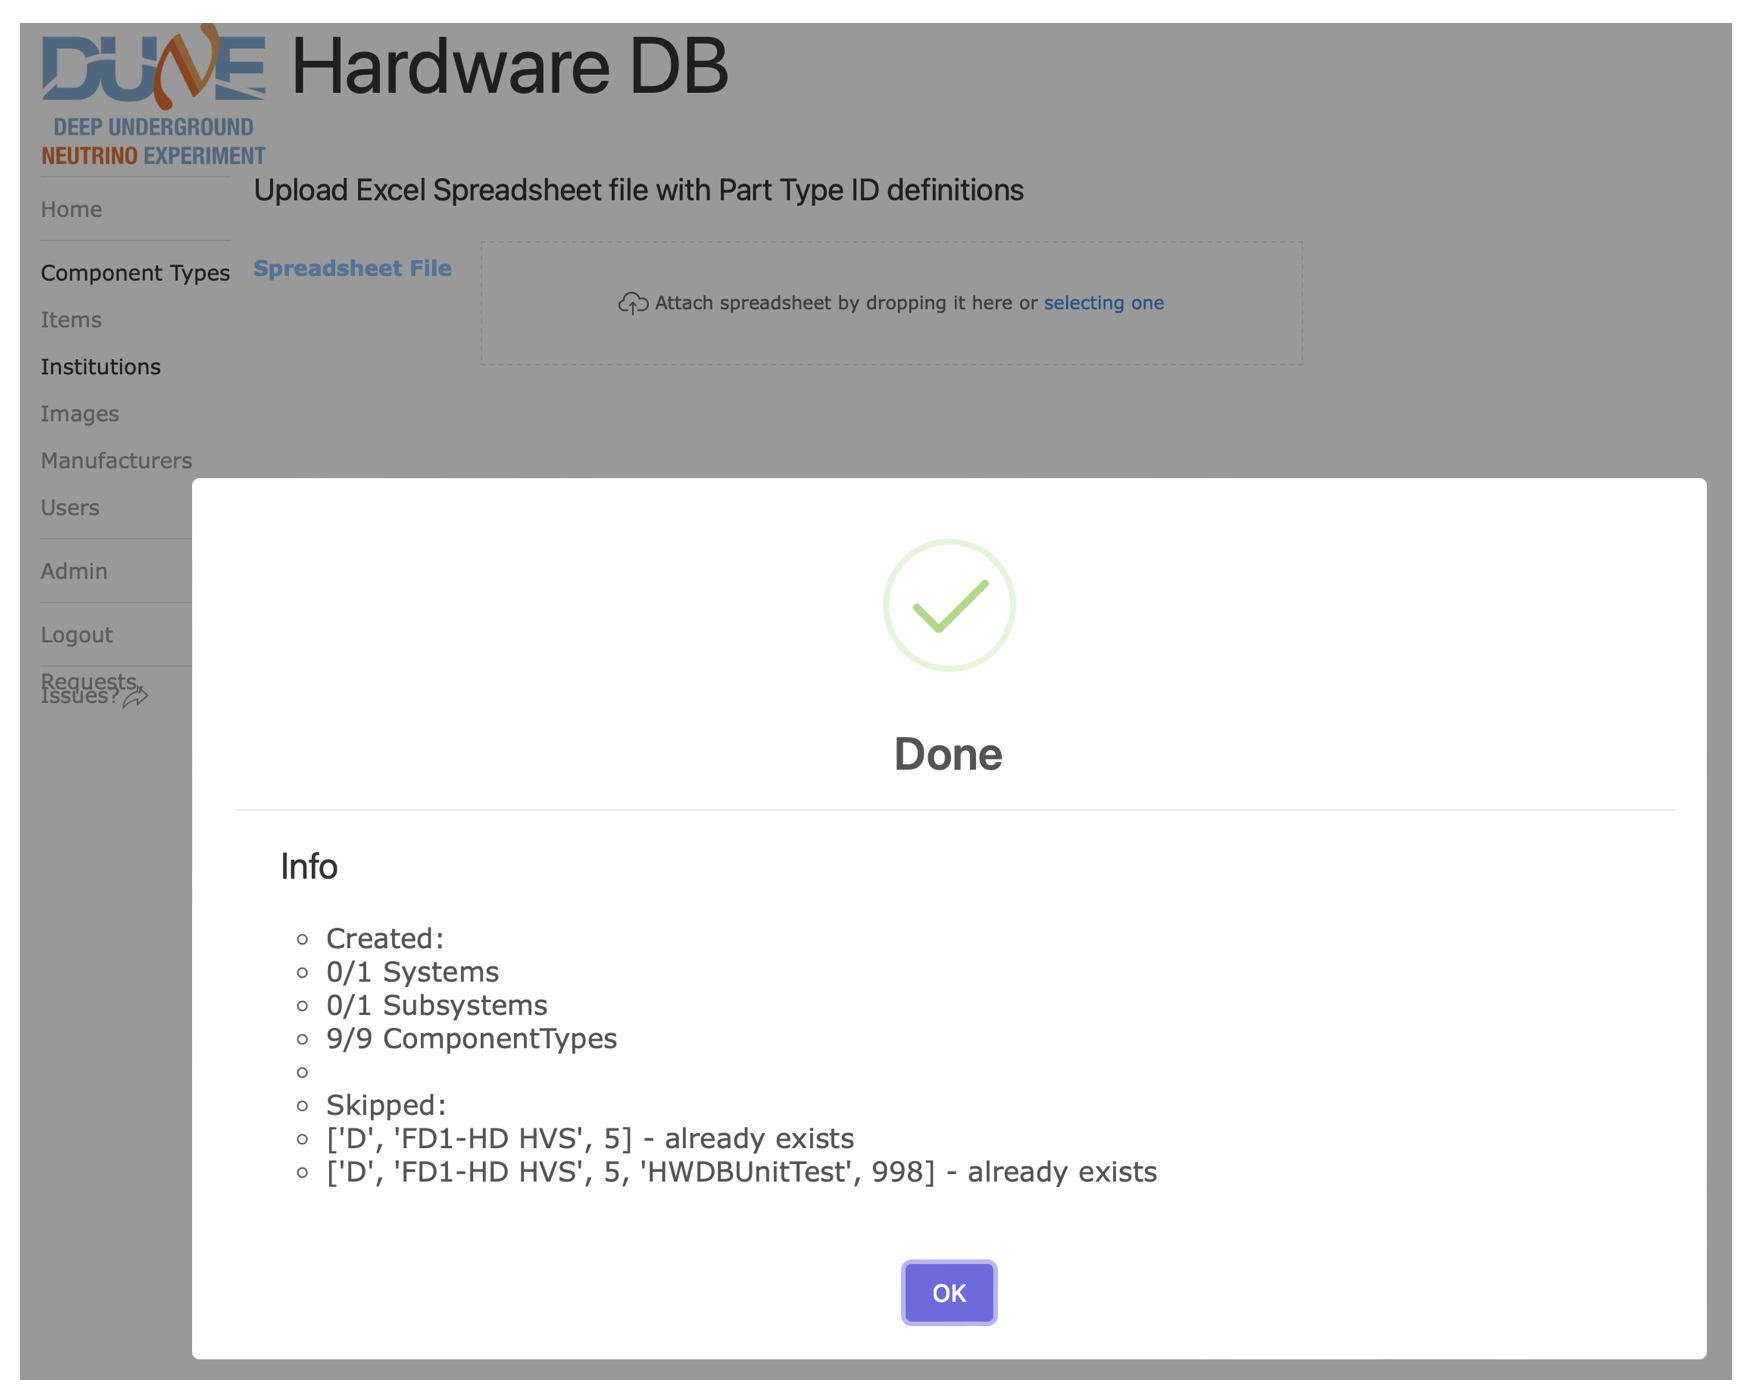
Finally, if you go back to the list of the Component Types like the one shown below, newly created Component Types
should be showing up there.
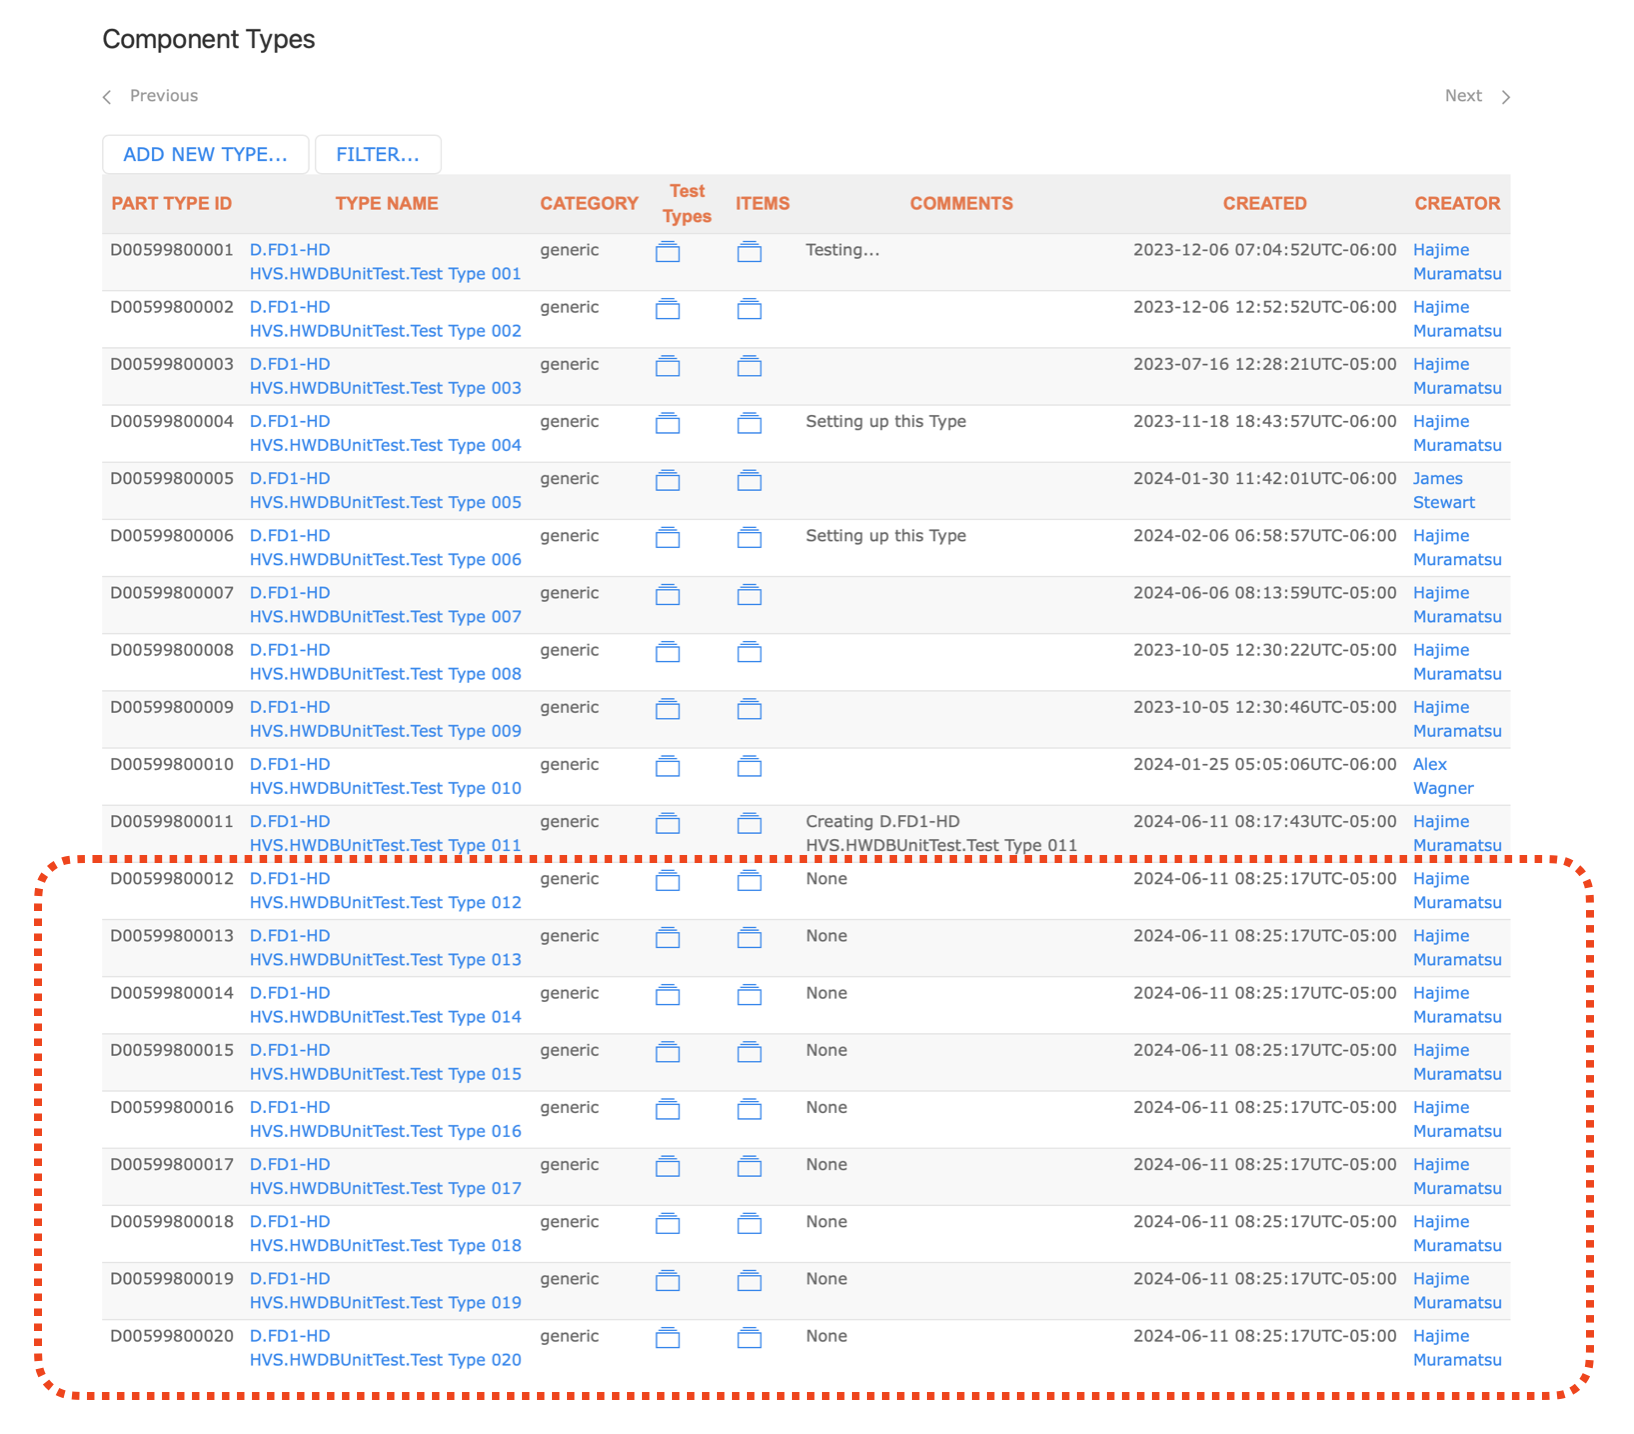
Key Points
Only users with the Architect privilege are allowed to add new Componnet Types.
Two ways to do this, either manually by one-by-one or with a prepared spreadsheet.
Comments (“Sort of” optional) The HWDB will allow you to leave this field blank, but the Web UI uses this field as an anchor for a hyperlink elsewhere in the interface, so it is recommended to enter a short comment. If there are multiple instances of the same test type, it is recommended that the comment is unique for each instance.