Using the Python HWDB Tools
Overview
Teaching: 120 min
Exercises: 0 minQuestions
Active user privilage is required.
How does one upload bulk data with the Python HWDB Tools?
Objectives
upload a component specification (thus, obtain its assigned DUNE PID)
update a component specification (for a given PID)
create and/or update a serial number of the component
create and/or update the component’s location
create links to its sub-components
upload images to the component
create and/or update the component’s tests
Contents
Introduction
The Python HWDB Tools is a package of applications, written in Python that helps users to communicate with the HWDB.
It is consists of multiple applications:
- Uploader : Uploads massive data to the HWDB. User provides data by means of spreadsheets to the app. The app then simply uploads them. The app can also accept a docket file, along with spreadsheets, in which complex database schema can be defined as well. The detail usage is described later in this very page.
- Shipping Tracker : Helps user to follow the official DUNE shipping procedure. It also generates/uploads shipping label, along with the required shipping documentations.
- Label Generator : Generates labels of QR- and bar-codes. Allows user to define label & paper sizes as well as to detail orientations of codes.
- HWDB Dashboard : Helps to provide information stored in the HWDB. Runs within a web-browser with multiple tabs (Type Getter, Plots, Shipment Tracker, Binary/Test Downloader). See the link for more details.
Requirements
This software was developed on Ubuntu 20.04 running under WSL for Windows 11, and was tested for compatibility on macOS 14.7 (Sonoma; M1) as well as on Ubuntu 24.04 with an Intel Linux box. We strongly recommend to employ Anaconda (Python distribution), which should get you most of the needed packages for the Tool. It can be obtained from https://www.anaconda.com/download for free and is available for Windows, Linux, and macOS.
Installation
There are 3 ways to install.
Binaries
Perhaps the easiest way is to obtain standalone binaries. We have a linux version, built under Ubuntu 24.04.4 LTS on a x86_64 machine. We have tested it also within a WSL2 environment. A Mac version is also available, which was built on a ARM64-based machine. These binaries can be obtained from https://github.com/DUNE/DUNE-HWDB-Python/releases/latest. Make sure to access to v1.7.5 or later. And look for HWDBTools_lnx_x8664.tar.gz or HWDBTools_mac_arm64.tar.gz under Assets there.
Once downloaded, you can put it anywhere you like. Extract the contents and make sure to run the attached shell script, setup_path.sh, inside of the HWDBTools folder to setup file permissions correctly. It will also write a line into your login file (e.g., .bashrc) to include <path to your HWDBTools folder> to your $PATH.
For instance,
  cd <path to your downloaded file, HWDBTools_mac_arm64.tar.gz>
  tar -xzf HWDBTools_mac_arm64.tar.gz
  cd HWDBTools_mac_arm64
  ./setup_path.sh
The following commands should be available now:
- hwdb-configure
- hwdb-upload
- hwdb-shipping
- hwdb-labels
- hwdb-dash
- hwdb-list-institutions
- hwdb-list-manufacturers
- hwdb-logs
- hwdb-htgettoken
- setup_path.sh
Source codes
You can download the source codes.
-
Download the Source code(zip) (or Source code (tar.gz), whichever you prefer) of the Tool from https://github.com/DUNE/DUNE-HWDB-Python/releases/latest.
-
Extract the source code to a directory of your choosing. For the purposes of this document, we will assume this directory is $HOME/DUNE-HWDB-Python.
- To have the necessary paths available in your Bash shell, add the following lines to your
.bashrc file. (If you are using a different shell, modify accordingly.)
export HWDB=~/DUNE-HWDB-Python export PATH=$HWDB:$HWDB/bin:$HWDB/devtools:$PATH export PYTHONPATH=$HWDB/lib:$PYTHONPATH - Although we have attempted to have the executable flag set in GitHub on the appropriate files,
it appears to be inconsistent, so you may need to set these manually.
- In your Bash shell, go to your installation directory ($HOME/DUNE-HWDB-Python)
- Enter the following to set executable permissions:
chmod +x hwdb-*
- If you don’t have reportlab on your devide, which doesn’t come with the Anaconda distro unfortunately,
the Tool will suggest you to install it. The Tool itself will run fine without this extra library, but it will not generate bar/QR-code labels in that case.
To install this, simple execute the following command:
pip install reportlabor
conda install conda-forge::reportlab - And as described in these steps, make sure you have htgettoken installed.
Again, you could install it via;
pip install htgettokenor
conda install conda-forge::htgettoken
Auto ENV Setup
You can download the source codes as described above. But once extracted the downloaded archived file, you can find the shell script, setup_hwdbtools_env.sh inside. Executing the script there would crete a new virtual environment, auto-download the required additional modules, and set up the needed environmental variables for you.
Configuration
Try to execute the following command:
hwdb-configure
If everything is setup correctly, you should see a screen similar to the one below.

This will check to see if your two tokens (Bearer and Vault) are still valid. If your Vault token is expired or if you are running the Tool for the first time, you will be prompted to provide your FNAL SSO credential in your web browser session. Once you are done with the authentication process there, you should see the above screen. The obtained two tokens are saved in $HOME/.sisyphus/.
When your Bearer token is expired, which happens every 3 hours, the token is refreshed automatically in background. Whereas when your Vault token is expired (its lifetime is 7days), you will be prompted again to provide your credential in a browser session.
Notice that the REST API base path points to the development version of the HWDB, which is the default setup. When you are ready to work with the official Production server, enter:
hwdb-configure --prod
Likewise, to set it back to Development, enter:
hwdb-configure --dev
Note that the –prod and –dev switches may also be added to the initial configuration command, $HOME/.sisyphus/config.json instead of being run separately.
Configuring a Component Type and a Test Type in the HWDB:
-
If your Component Type is already setup, skip this step. Otherwise your Component Type needs to be setup as described in the 03-Setting-up-Types.
- In the Datasheet of your Component Specifications, insert the following (notice that you must have the Administrator privilege in order to modify Component Type definitions):
DATA: {} _meta: {} - If you are planning to store data in Tests, create and define a new Test Type as described in the 03-Setting-up-Types. And then in the Datasheet of the newly created Test Type,
insert the following:
DATA: {} _meta: {} -
All contents uploaded by the Tool are stored within “DATA: {}”.
- “_meta: {}” is used by the Tool only and users should just ignore it.
Lesson 1: Some Simple Examples
The examples in this lesson demonstrate how to upload simple spreadsheets that do not require an additional “docket” file that describes their contents. Typically, if the component type has no specifications, or the specifications are simple key/value pairs, it is possible to upload item sheets directly, as demonstated in these examples.
HWDB Setup
The examples below assume that the following configuration has been set up in the HWDB. These should already be available on the Development server, but since they are not protected from modification, it is possible that they may be edited by others. If the examples appear not to work, check the following:
• A component type named “Z.Sandbox.HWDBUnitTest.doodad” has been created, which has a type ID of Z00100300012.
• The component is managed by (at least) the group “tester,” and the user running the examples is a member of this group.
• The component has “Acme Corporation” listed as one of its available manufacturers.
• The component’s specifications are: { “DATA”: {}, “_meta”: {} }
For the first several examples, we will only be uploading Item information with no tests attached, but most of the principles involved with uploading tests is the same as uploading items, so it is worthwhile to follow all the item examples before moving on to tests.
Example 1.1: A very simple example
The simplest way to upload hardware items to the HWDB is to create a spreadsheet where the top several rows form a “header” that indicates, at minimum, that the “Record Type” being uploaded is “Item,” and either the “Part Type ID” or the “Part Type Name.” (Both may be given, but they must indicate the exact same component type. There must be an empty row between the header and the section containing the actual data.
| A | B | C | |
|---|---|---|---|
| 1 | Record Type | Item | |
| 2 | Part Type ID | Z00100300012 | |
| 3 | Part Type Name | Z.Sandbox.HWDBUnitTest.doodad | |
| 4 | |||
| 5 | Serial Number | Institution | Manufacturer |
| 6 | SN000001 | (186) University of Minnesota Twin Cities | (50) Acme Corporation |
| 7 | SN000002 | (186) University of Minnesota Twin Cities | (50) Acme Corporation |
| 8 | SN000003 | (186) University of Minnesota Twin Cities | (50) Acme Corporation |
| 9 | SN000004 | (186) University of Minnesota Twin Cities | (50) Acme Corporation |
| 10 | SN000005 | (186) University of Minnesota Twin Cities | (50) Acme Corporation |
| Ex_1-1.xlsx | |||
This sheet is available here; Ex_1-1.xlsx.
To do a mock test of uploading this spreadsheet, enter the following. This will not actually commit the changes to the HWDB. It will only do a trial run to test for errors.
hwdb-upload Ex_1-1.xlsx
If this appears to run without errors, you may commit the update by using “–submit”
hwdb-upload Ex_1-1.xlsx --submit
Reconstructed Excel file
When the above command is executed, the Tool also generates an Excel file locally inside of folder with a timestamp being its folder name. This Excel file contains the contents of Items just uploaded, including the newly assigned PIDs in External ID column.
About label names in spreadsheet
In spreadsheet(s), user provides contents with specific labels. There are specific label names that are reserved for the Tool. We list those special labels below. These special labels have specific meanings and we’ll go through them in the following examples.
- External ID
- Serial Number
- Comments
- Manufacturer
- Manufacturer ID
- Manufacturer Name
- Institution
- Institution ID
- Institution Name
- Location
- Location ID
- Location Name
- Arrived
- Location Comments
- Image File
Example 1.2: Providing default values
In the above example, every item had the exact same Institution and Manufacturer. A shortcut is available for this case. Additional fields may be provided in the header indicating default values for a column. The column itself may be omitted if there are no exceptions to the default values.
| A | B | |
|---|---|---|
| 1 | Record Type | Item |
| 2 | Part Type ID | Z00100300012 |
| 3 | Part Type Name | Z.Sandbox.HWDBUnitTest.doodad |
| 4 | Institution | (186) University of Minnesota Twin Cities |
| 5 | Manufacturer | (50) Acme Corporation |
| 6 | ||
| 7 | Serial Number | |
| 8 | SN000001 | |
| 9 | SN000002 | |
| 10 | SN000003 | |
| 11 | SN000004 | |
| 12 | SN000005 | |
| Items.xlsx | ||
This sheet is available here; Ex_1-2.xlsx.
Example 1.3: Editing Items
Once a sheet has been uploaded to the HWDB, any subsequent attempts to upload the sheet will only result in the HWDB attempting to edit the items instead of adding new ones. But, if you explicity want to edit an item, you may use an “External ID” column instead of or in addition to the “Serial Number” column. You may even change the existing serial numbers this way!
Note that you may not change the Institution for an item after it was initially set.
| A | B | C | |
|---|---|---|---|
| 1 | Record Type | Item | |
| 2 | Part Type ID | Z00100300012 | |
| 3 | Part Type Name | Z.Sandbox.HWDBUnitTest.doodad | |
| 4 | Institution | (186) University of Minnesota Twin Cities | |
| 5 | Manufacturer | (50) Acme Corporation | |
| 6 | |||
| 7 | External ID | Serial Number | Comments |
| 8 | Z00100300012-00001 | AAA000001 | first |
| 9 | Z00100300012-00002 | AAA000002 | second |
| 10 | Z00100300012-00003 | AAA000003 | third |
| 11 | Z00100300012-00004 | AAA000004 | fourth |
| 12 | Z00100300012-00005 | AAA000005 | fifth |
| Ex_1-3.xlsx | |||
This sheet is available here; Ex_1-3.xlsx.
Example 1.4: Providing values on the command line
If you do not wish to provide a header inside a spreadsheet, you may provide values on the command line.
| A | |
|---|---|
| 1 | Serial Number |
| 2 | SN000001 |
| 3 | SN000002 |
| 4 | SN000003 |
| 5 | SN000004 |
| 6 | SN000005 |
| Ex_1-4.xlsx | |
This sheet is available here; Ex_1-4.xlsx.
To upload this example:
hwdb-upload \
    --part-type-id=Z00100300012 \
    --record-type=Item \
    --value "Manufacturer ID" 50 \
    --value "Institution ID" 186 \
    Items.xlsx \
    --submit
Example 1.5: Providing values via a docket file
Another alternative way to provide external values is by using a docket file.
| A | |
|---|---|
| 1 | Serial Number |
| 2 | SN000001 |
| 3 | SN000002 |
| 4 | SN000003 |
| 5 | SN000004 |
| 6 | SN000005 |
| Ex_1-5.xlsx | |
This sheet is available here; Ex_1-5.xlsx.
{
    "Sources": [
        {
            "Source Name": "Item Source",
            "Files": "Ex_1-5.xlsx"
        }
    ],
    "Values": {
        "Record Type": "Item",
        "Part Type ID": "Z00100300012",
        "Part Type Name": "Z.Sandbox.HWDBUnitTest.doodad",
        "Institution": "(186) University of Minnesota Twin Cities",
        "Manufacturer": "(50) Acme Corporation"
    }
}
|
|
| Ex_1-5_docket.json | |
This sheet is available here; Ex_1-5_docket.json.
To upload this example:
hwdb-upload Ex_1-5_docket.json --submit
Example 1.6: Specification fields
The type “doodad” has a specification field named “DATA.” (Ignore the “_meta” field. It is for internal use by the application.) Top-level specification fields such as “DATA” can be provided the same way as Institution or Manufacturer.
| A | B | |
|---|---|---|
| 1 | Record Type | Item |
| 2 | Part Type ID | Z00100300012 |
| 3 | Part Type Name | Z.Sandbox.HWDBUnitTest.doodad |
| 4 | Institution | (186) University of Minnesota Twin Cities |
| 5 | Manufacturer | (50) Acme Corporation |
| 6 | ||
| 7 | Serial Number | DATA |
| 8 | SN000001 | ABC |
| 9 | SN000002 | 123 |
| 10 | SN000003 | {"A":1,"B":2} |
| 11 | SN000004 | [2,3,5,7,11] |
| 12 | SN000005 | <null> |
| Ex_1-6.xlsx | ||
This sheet is available here; Ex_1-6.xlsx.
Lesson 2: Subcomponents
HWDB Setup
For this lesson, we want to create a hierarchy of components. We will therefore need a second component type. The examples below assume that the following configuration has been set up in the HWDB, in addition to the configuration from Lesson 1:
• A component type named “Z.Sandbox.HWDBUnitTest.doohickey” has been created, which has a type ID of Z00100300013.
• The component is managed by (at least) the group “tester,” and the user running the examples is a member of this group.
• The component has “Acme Corporation” listed as one of its available manufacturers.
• The component’s specifications are: { “DATA”: {}, “_meta”: {} }
• The component type has a single subcomponent slot named “Doodad” of type “Z.Sandbox.HWDBUnitTest.doodad”
Example 2.1: Linking a subcomponent
For this example, we need to upload items of two different component types. We can do this by adding multiple worksheets to our Excel file.
| A | B | |
|---|---|---|
| 1 | Record Type | Item |
| 2 | Part Type ID | Z00100300012 |
| 3 | Part Type Name | Z.Sandbox.HWDBUnitTest.doodad |
| 4 | Institution | (186) University of Minnesota Twin Cities |
| 5 | Manufacturer | (50) Acme Corporation |
| 6 | ||
| 7 | Serial Number | Comments |
| 8 | SN000001 | first |
| 9 | SN000002 | second |
| Ex_2-1_doodad.xlsx | ||
This sheet is available here; Ex_2-1_doodad.xlsx.
| A | B | C | |
|---|---|---|---|
| 1 | Record Type | Item | |
| 2 | Part Type ID | Z00100300013 | |
| 3 | Part Type Name | Z.Sandbox.HWDBUnitTest.doohickey | |
| 4 | Institution | (186) University of Minnesota Twin Cities | |
| 5 | Manufacturer | (50) Acme Corporation | |
| 6 | |||
| 7 | Serial Number | Comments | Doodad |
| 8 | SN900001 | by serial number | SN000001 |
| 9 | SN900002 | by part id | Z00100300012-00010 |
| 10 | SN900003 | keep as it is | |
| 10 | SN900004 | void it out | <null> |
| Ex_2-1_doohickey.xlsx | |||
This sheet is available here; Ex_2-1_doohickey.xlsx.
To upload this example, first make the two items newly:
hwdb-upload Ex_2-1_doodad.xlsx --submit
then to make links to those two;
hwdb-upload Ex_2-1_doohickey.xlsx --submit
Some notes on linking subcomponents:
• The “Doodad” column may contain the serial number of the item to be connected, or the Part ID if the item already exists in the database.
• If the subcomponent item is already in the database, it is not strictly necessary to include a sheet defining the item.
• The subcomponent to be linked must not have its “status” set to anything besides “available.” (“Available” is the default status for an item, so an item will not have a different status unless deliberately changed.)
Some notes on linking subcomponents:
- The “Doodad” column may contain the serial number of the item to be connected, or the Part ID if the item already exists in the database.
- If the subcomponent item is already in the database, it is not strictly necessary to include a sheet defining the item.
- The subcomponent to be linked must not have its “status” set to anything besides “available.” (“Available” is the default status for an item, so an item will not have a different status unless deliberately changed.)
Lesson 3: Item Images
Example 3.1: Uploading images
To individual item
This example demonstrates how to upload image files for items.
| A | B | C | |
|---|---|---|---|
| 1 | Record Type | Item Image | |
| 2 | Part Type ID | Z00100300012 | |
| 3 | |||
| 4 | External ID | Comments | Image File |
| 5 | Z00100300012-00001 | This is fine. | this_is_fine.jpg |
| 6 | Z00100300012-00002 | This is fine. | this_is_fine.jpg |
| 7 | Z00100300012-00003 | This is fine. | this_is_fine.jpg |
| Ex_3-1.xlsx | |||
This sheet is available here; Ex_3-1.xlsx.
To individual test entry
We can also upload images to individual test entry, to even older test entries if wish. Let’s do this with a docket file and a spreadsheet as an example. Take a look at the spreadsheet below.
| A | B | C | D | |
|---|---|---|---|---|
| 1 | External ID | Comments | Image File | History Order |
| 2 | Z00100300012-00001 | This is fine. | this_is_fine.jpg | 0 |
| 3 | Z00100300012-00002 | This is fine. | this_is_fine.jpg | 0 |
The History Order column is optional. It take a positive integer and its default value is 0.
It tells the app which test entry it uploads images to.
History Order = 0 corresponds to the latest entry, 1 corresponds to its next latest entry, and so on.
The corresponding docket file could look like below:
{
    "Values": {
        "Part Type ID": "Z00100200040",
        "Institution": "(186) University of Minnesota Twin Cities",
        "Manufacturer": "(7) Hajime Inc"
    },
    "Sources": [
	{
            "Files": "test_images.xlsx",
	    "Sheet": "My Test Image",
            "Encoder": "My Test Image Encoder",
        }
    ],
    "Encoders": [
	{
	    "Encoder Name": "My Test Image Encoder",
            "Record Type": "Test Image",
	    "Part Type ID": "Z00100200040",
	    "Test Name": "CPA_Parts_FR4_main QC check",
            "Schema": {
		"type": "group",
		"key": "External ID",
		"members": {
		    "External ID": "string",
		    "Comments": "string",
		    "Image File": "string"
                }
	    }
        }
    ]
}
Executing a command line like this;
hwdb-upload test_docket.json --submit
will upload the image file, this_is_fine.jpg, to the latest test entries of Test Type Name = “CPA_Parts_FR4_main QC check” of the 2 PIDs, Z00100300012-00001 and Z00100300012-00002, for instance.
Lesson 4: Tests
Now let’s try to post some in the Test area of the HWDB. As mentioned before, a Test Type must be created and pre-defined as described in the 03-Setting-up-Types.
Example 4.1: Simple Test
This sheet will post “pass” under Test Type, Doodad Test, of Serial Number of SN000001. Notice that the Record Type is Test, instead of Item.
| A | B | C | |
|---|---|---|---|
| 1 | Record Type | Test | |
| 2 | Part Type ID | Z00100300012 | |
| 3 | Part Type Name | Z.Sandbox.HWDBUnitTest.doodad | |
| 4 | Test Name | Doodad Test | |
| 5 | |||
| 6 | Serial Number | DATA | |
| 7 | SN000001 | pass | |
| Ex_4-1.xlsx | |||
This sheet is available here; Ex_4-1.xlsx.
Example 4.2: Complex Structures
Now let’s try with more complex scheme. The docket file below will post the contents of the sheet to the corresponding serial number entries under Test Type, Doodad Test.
| A | B | C | D | E | F | G | H | I | |
|---|---|---|---|---|---|---|---|---|---|
| 1 | Record Type | Test | |||||||
| 2 | Part Type ID | Z00100300012 | |||||||
| 3 | Part Type Name | Z.Sandbox.HWDBUnitTest.doodad | |||||||
| 4 | Test Name | Doodad Test | |||||||
| 5 | |||||||||
| 6 | Serial Number | Test Date | Test Operator | Operator Note | Overall Status | Subtest Name | Trial Number | Trial Description | Trial Result |
| 7 | SN000001 | 2024-03-22 08:45:00 | Alex | heavy snow | pass | bounce | 1 | drop from 1 meter | pass |
| 8 | SN000001 | 2024-03-22 08:45:00 | Alex | heavy snow | pass | bounce | 2 | drop from 2 meter | pass |
| 9 | SN000001 | 2024-03-22 08:45:00 | Alex | heavy snow | pass | smash | 1 | smash with 5# hammer | pass |
| 10 | SN000001 | 2024-03-22 08:45:00 | Alex | heavy snow | pass | smash | 2 | smash with 9# hammer | pass |
| 11 | SN000001 | 2024-03-29 14:00:00 | Bill | cold, windy | pass | bounce | 1 | drop from 1 meter | pass |
| 12 | SN000001 | 2024-03-29 14:00:00 | Bill | cold, windy | pass | bounce | 2 | drop from 2 meter | pass |
| Ex_4-2.xlsx | |||||||||
This sheet is available here; Ex_4-2.xlsx.
{
    "Sources": [
        {
            "Source Name": "Doodad Tests",
            "Files": "Ex_4-2.xlsx",
            "Encoder": "Doodad Test Encoder"
        }
    ],
    "Encoders": [
        {
            "Encoder Name": "Doodad Test Encoder",
            "Record Type": "Test",
            "Part Type Name": "Z.Sandbox.HWDBUnitTest.doodad",
            "Part Type ID": "Z00100300012",
            "Test Name": "Doodad Test",
            "Schema": {
                "Test Results": {
                    "DATA": {
                        "type": "group",
                        "key": [
                            "Test Date",
                            "Test Operator"
                        ],
                        "members": {
                            "Test Date": "string",
                            "Test Operator": "string",
                            "Overall Status": "string",
                            "Operator Note": "null,string",
                            "Subtest": {
                                "type": "group",
                                "key": "Subtest Name",
                                "members": {
                                    "Subtest Name": "string",
                                    "Trial": {
                                        "type": "group",
                                        "key": "Trial Number",
                                        "members": {
                                            "Trial Number": "integer",
                                            "Trial Description": "null,string",
                                            "Trial Result": "any"
                                        }
                                    }
                                }
                            }
                        }
                    }
                }
            }
        }
    ]
}
|
|
| Ex_4-2_docket.json | |
This sheet is available here; Ex_4-2_docket.json.
Notice that the Tool sort out rows based on column labels specified by “key”. For instance, with the above docket file, it sorts out based on two columns “Test Date” and “Test Operator”, forst. And then there will be a sub-structure “Subtest”, sub-sub-structure “Subtest Name” and “Trial” and so on. In each of structures, things are sorted by the specified “key”.
Lesson 5: Item Locations
Example 5.1: Uploading location info
This example demonstrates how to upload location information for two items.
| A | B | C | D | |
|---|---|---|---|---|
| 1 | Record Type | Item | ||
| 2 | Part Type ID | D00599800015 | ||
| 3 | Institution | (186) University of Minnesota Twin Cities | ||
| 4 | Manufacturer | (7) Hajime Inc | ||
| 5 | ||||
| 6 | Serial Number | Location | Arrived | Location Comments | </td>
| 7 | HA-MURAMATSU-00003 | (186) University of Minnesota Twin Cities | 10/15/2024 10:12:13 AM | comments for 1st item |
| 8 | HA-MURAMATSU-00004 | (186) University of Minnesota Twin Cities | 10/14/2024 9:38:59 PM | comments for 2nd item |
| Ex_5-1.xlsx | ||||
This sheet is available here; Ex_5-1.xlsx.
Lesson 6: Do them all at once!
Now let’s try to upload Item specifications, Test specifications, some images, make links to a few sub-components, and upload locations of Items, all at once.
The spreadsheet file can be obtained from here: QuickStartExample.xlsx. It has 3 tabs, “My Items”, “My Images”, and “My Tests”.
The corresponding docket file can be obtained from here: QE-docket.json.
We’ll start to look at the example spreadsheet file first and understand our contents. We’ll then go through the docket file to see how it works, including setting up the database schema for Specifications.
QuickStartExample.xlsx: “My Items” sheet:
The example spreadsheet file includes 3 sheets. One of them, “My Items” sheet, looks like the below:
| A | B | C | D | E | |
|---|---|---|---|---|---|
| 1 | Serial Number | Comments | Drawing Number | MySubComp 1 | MySubComp 2 |
| 2 | HA-MURAMATSU-00003 | here is my item | DFD-XX-FF00 | HA-MURAMATSU-00001 | HA-MURAMATSU-00002 |
| 3 | HA-MURAMATSU-00004 | another item | DFD-XX-FF01 | ||
| the first half of My Items sheet | |||||
| F | G | H | |
|---|---|---|---|
| 1 | Location | Arrived | Location Comments |
| 2 | (186) University of Minnesota Twin Cities | 10/14/2024 10:12:13 AM | comments for 1st item |
| 3 | (186) University of Minnesota Twin Cities | 10/13/2024 9:38:58 PM | comments for 2nd item |
| the second half of My Items sheet | |||
| Column | Description |
| A | It defines a specific Item, and thus acts as a PID. There is no specific scheme to define serial numbers, but each of them must be unique for a given Component Type. One could use External ID as its label name here, instead. In that case, you would have to specify existing PIDs. The Tool then overwrite the contents of the specified PIDs. |
| B | This column represents comments for each of the Items. |
| C | Drawing numbers, to be stored in each of the Item’s Specifications in the HWDB. |
| D & E | The label names here need to coincide with those functional position names that are defined in its Component Type definition. Notice that the Item, HA-MURAMATSU-00003, will have 2 sub-component links, one to HA-MURAMATSU-00001 and another to HA-MURAMATSU-00002, while the Item, HA-MURAMATSU-00004, will not have any sub-component link. |
| F | The column specifies a location of the Item. It expects both Institution ID and Institution name. If you like, you could only specify ID (name) with a label name, Institution ID (Institution Name), instead. |
| G | Represents arriving date&time of the corresponding Item. One can add a time-zone. Without it, by default it takes it in the North American Central Time Zone. |
| H | Represents comments for each locations. |
-
If you don’t have any sub-component to be linked, you could just remove the columns D & E altogether.
-
Similarly, if you don’t need to enter locations of your Items, go ahead to remove columns F, G, and H.
QuickStartExample.xlsx: “My Images” sheet:
“My Images” sheet should look like the below:
| A | B | C | |
|---|---|---|---|
| 1 | Serial Number | Image File | Comments |
| 2 | HA-MURAMATSU-00003 | images/apple.jpeg | image 1 |
| 3 | HA-MURAMATSU-00003 | images/banana.jpeg | image 2 |
| 4 | HA-MURAMATSU-00004 | images/broccoli.jpeg | image 3 |
| 4 | HA-MURAMATSU-00004 | images/apple.jpeg | image 4 |
| My Images sheet | |||
| Column | Description |
| A | Represents the same Serial Numbers that are found in the My Items sheet. |
| B | Specifies the locations and file names of the images to be uploaded. |
| C | Comments for each image files. |
- Again, if you don’t have any image to be uploaded, you could delete the entire “My Images” sheet.
QuickStartExample.xlsx: “My Tests” sheet:
“My Tests” sheet should look like the below:
| A | B | C | D | E | F | G | H | I | |
|---|---|---|---|---|---|---|---|---|---|
| 1 | Serial Number | Comments | Operator | Test Location | PSU Serial Number | Visual Inspection | PSU Manufacturer | PSU Test 1 | PSU Test 2 |
| 2 | HA-MURAMATSU-00003 | Looks good | Hajime | Minneapolis | 2PH30-230 | Passed | TOSHIBA | Failed | Passed |
| 3 | HA-MURAMATSU-00004 | Looks ok | Andy | Tucson | 2PH30-231 | Passed | TOSHIBA | Passed | Failed |
| the first half of My Tests sheet | |||||||||
| J | K | L | M | |
|---|---|---|---|---|
| 1 | Fan Serial Number | Fan Manufacturer | Fan Test 1 | Fan Test 2 |
| 2 | W0909101451 | Champion Lab | Passed | Failed |
| 3 | W0909101452 | Champion Lab | Failed | Passed |
| the second half of My Tests sheet | ||||
| Column | Description |
| A | Represents the same Serial Numbers that are found in the My Items and My Images sheets. |
| B | Comments on each of the Tests. |
| C-M | These columns represent my test data. We’ll describe how exactly we like to format them below. |
- Again, if you don’t need to upload any test data, but only Items, you could just delete this “My Tests” sheet.
QE-docket.json: “Values” blob:
“Values” blob in QE-docket.json should look like the below:
 "Values": {
        "Part Type ID": "D00599800015",
        "Institution": "(186) University of Minnesota Twin Cities",
        "Manufacturer": "(7) Hajime Inc"
    }
Here, you provide Component Type ID of the Items you like to upload (in this case, D00599800015), your Institution, and Manufacturer.
QE-docket.json: “Sources”:
“Sources” in QE-docket.json should look like the below:
 "Sources": [
        {
            "Files": "QuickStartExample.xlsx",
	        "Sheet Name": "My Items",
            "Encoder": "My Item Encoder"
        },
	    {
            "Files": "QuickStartExample.xlsx",
	        "Sheet Name": "My Images",
            "Encoder": "My Image Encoder"
        },
	    {
            "Files": "QuickStartExample.xlsx",
	        "Sheet Name": "My Tests",
            "Encoder": "My Test Encoder"
        }
    ]
-
Here you specify the 3 spreadsheet file names, the 3 sheet names, and the 3 Encoder names.
-
We have only one single spreadsheet file in our example. But we could have those 3 sheets in 3 different files separately.
-
We’ll describe each of the Encoders in the next sub-sections.
QE-docket.json: Encoders: “My Item Encoder”:
“My Item Encoder” in QE-docket.json should look like the below:
            "Encoder Name": "My Item Encoder",
            "Record Type": "Item",
            "Part Type ID": "D00599800015",
            "Schema": {
                "Specifications": {
                    "DATA": {
                        "type": "group",
                        "key": "Serial Number",
                        "members": {
                            "Serial Number": "string",
                            "Drawing Number": "string",
			                "My Doc": {
				               "value": "https://edms.cern.ch/document/2505353/"
			                },
			                "Serial Number": "string",
			                "Location": "string",
			                "Arrived": "string",
			                "Location Comments": "string"
                        }
                    }
                },
		        "Subcomponents": {
		            "MySubComp 1": {
			            "column": "MySubComp 1"
		            },
		            "MySubComp 2": {
			           "column": "MySubComp 2"
		            }
		        }
            }
-
Within the Specifications blob, its database scheme is defined.
-
“key” tells the Tool that “Serial Number” defines an Item (one-to-one correspondance between a “Serial Number” and an Item).
- The “members” blob defines the scheme. In the database, we like to store them like the one shown below:
"Drawing Number": "DFD-XX-FF00", "My Doc" : "https ://edms.cern.ch/document/2505353/" -
For “My Doc”, since we know the documentation link is the same for this Component Type, instead of specifying it in every row of “My Items” sheet, we provide the constant value here. Notice that we don’t need to specify the label name, “My Doc” in our sheet either.
- The “Subcomponents” blob just specifies label names for sub-component PIDs (or Serial Numbers).
QE-docket.json: Encoders: “My Image Encoder”:
“My Image Encoder” in QE-docket.json should look like the below:
            "Encoder Name": "My Image Encoder",
            "Record Type": "Item Image",
            "Part Type ID": "D00599800015",
            "Schema": {
                "type": "group",
                "key": "Serial Number",
                "members": {
                    "Serial Number": "string",
                    "Image File": "string",
		            "Comments": "string"
                }
            }
- Similar to “My Item Encoder” typesets of the labels are defined.
QE-docket.json: Encoders: “My Test Encoder”:
“My Test Encoder” in QE-docket.json should look like the below:
            "Encoder Name": "My Test Encoder",
            "Record Type": "Test",
	        "Part Type ID": "D00599800015",
	        "Test Name": "My Test",
            "Schema": {
                "Test Results": {
                    "DATA": {
                        "type": "group",
                        "key": "Serial Number",
                        "members": {
			                "Serial Number": "string",
                            "Operator": "string",
			                "Location": "string",
			                "PSU": {
				                "type": "group",
				                "key": "PSU Serial Number",
				                "members": {
				                     "PSU Serial Number": "string",
				                     "Visual Inspection": "string",
				                     "PSU Manufacturer": "string",
				                     "PSU Test 1": "string",
				                     "PSU Test 2": "string"
				                }
			                },
			                "Fans": {
				                "type": "group",
				                "key": "Fan Serial Number",
				                "members": {
				                     "Fan Serial Number": "string",
				                     "Fan Manufacturer": "string",
				                     "Fan Test 1": "string",
				                     "Fan Test 2": "string"
				                }
			                }
                        }
                    }
                }
            }
-
Again, it has a very similar form to what we have seen in Item and Image Encoders.
-
This time, however, it has a nested structure in its scheme. E.g., this scheme would store the contents in “My Tests” sheet as shown below:
"Serial Number": "HA-MURAMATSU-00003",
"Operator"     : "Hajime",
"Location"     : "Minneapolis",
"PSU"          : [
                     "PSU Serial Number": "2PH30-230",
                     "Visual Inspection": "Passed",
                     "PSU Manufacturer" : "TOSHIBA",
                     "PSU Test 1"       : "Failed",
                     "PSU Test 2"       : "Passed"
				   ],
"Fans"         : [
                     "Fan Serial Number": "W0909101451",
                     "Fan Manufacturer" : "Champion Lab",
                     "Fan Test 1"       : "Passed",
                     "Fan Test 2"       : "Failed"
				   ]
Let’s upload them:
- If you have modified your sheet(s) and docket file according to your needs, you should be ready to upload them. Execute the following command. Don’t worry. It will not upload, yet. It will only check the contents of the provided files.
hwdb-upload QE-docket.json - If you don’t see any error message from the above command-line, let’s upload them for real:
hwdb-upload QE-docket.json --submit - If everything goes well, you should see a screen similar to the one shown below:
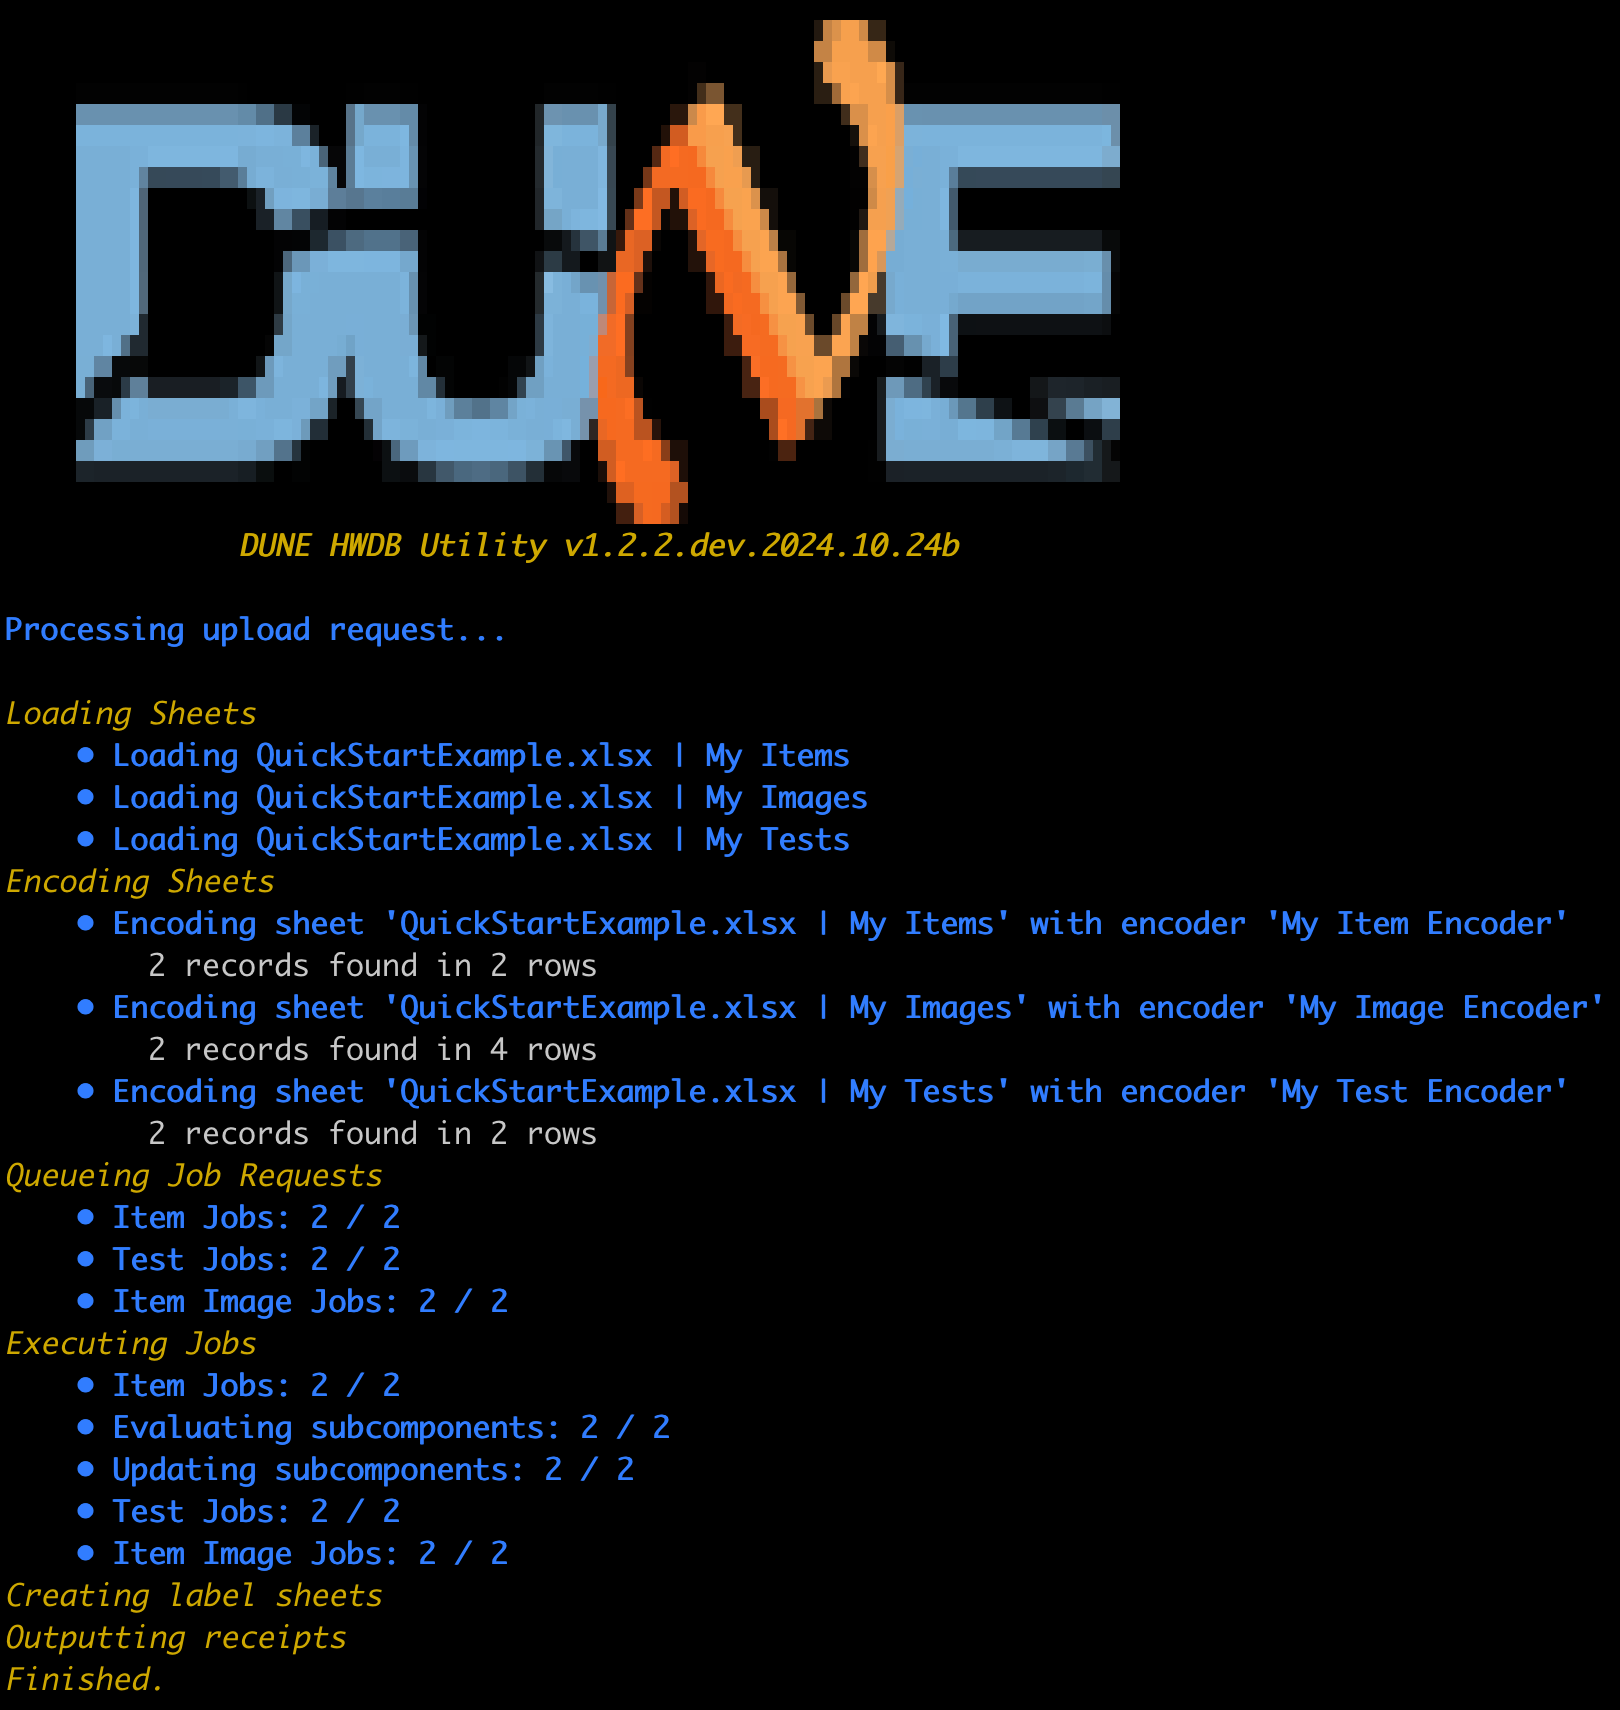 and new PIDs are assigned to each of the newly uploaded Items (i.e., the corresponding Serial Numbers).
-
Again, if you don’t need to upload Tests, you can remove the Test sheet from the spreadsheet file and the Tests portion from “Sources” and “Endoder” of the docket file.
-
Likewise, if you don’t plan to upload images, remove the corresponding parts from the spreadsheet and docket files.
with External IDs (or Serial Numbers) that already exist in the HWDB
- If you upload with Serial Numbers (or External IDs) that already exist in the HWDB, it will overwrite the existing Item Specifications and Tests (don’t worry, their histories are kept in the HWDB). This is actually a useful feature when you need to update contents in the HWDB.
Lesson 7: Generating bar/QR-code labels with the Tool
One can produce massive numbers of labels with the Tool.
Please refer to our Generating bar/QR-code labels section.
Lesson 8: Filling out the DUNE Shipping checklists with the GUI-based Tool
A link to this new section is coming soon.
Key Points
keypoint 1