Data Management using WEB UI
Overview
Teaching: 60 min
Exercises: 0 minQuestions
Active user privilage is required.
How do I enter and retrieve Items with the WEB UI?
How do I perform searches over Items/Tests with the WEB UI?
Objectives
To understand how one can POST and GET information of Item(s).
To understand how sub-component links could be made.
To understand how one can POST and GET information of Tests and images.
To be able to perform searches over Items and Tests.
Contents
Description Component Types Items Preparing Items to be Added Adding Item(s) Adding Single Item Bulk Adding Items Adding Subcomponents Adding Tests Adding Images More Item Operations Item Filtering Searching for Items based on chosen Filters Syntax Syntax in Filter fields Filtering with Specifications Filtering via the Specifications field Filtering with Test Data Filtering via the Test Data field
This tutorial will walk you through using the Web UI for the Hardware Database.
The development version of the HWDB can be accessed via https://dbweb0.fnal.gov/cdbdev/login/sso.
The production version of the HWDB can be accessed via https://dbweb0.fnal.gov/cdb/login/sso.
Accessing Component Types
Note: Adding component types requires the user to have “Architect” priveleges for the HWDB. This is covered by the previous tutorial, “Setting up Component Types and Test Types.” This tutorial assumes that component types being managed already exist in the HWDB, and the user has been added to the appropriate Roles defined for that component type.
Let’s try accessing a component type from the previous tutorial: “Z.Sandbox.Tutorials.Front Axle”:
- Open the Web UI in your browser and log in.
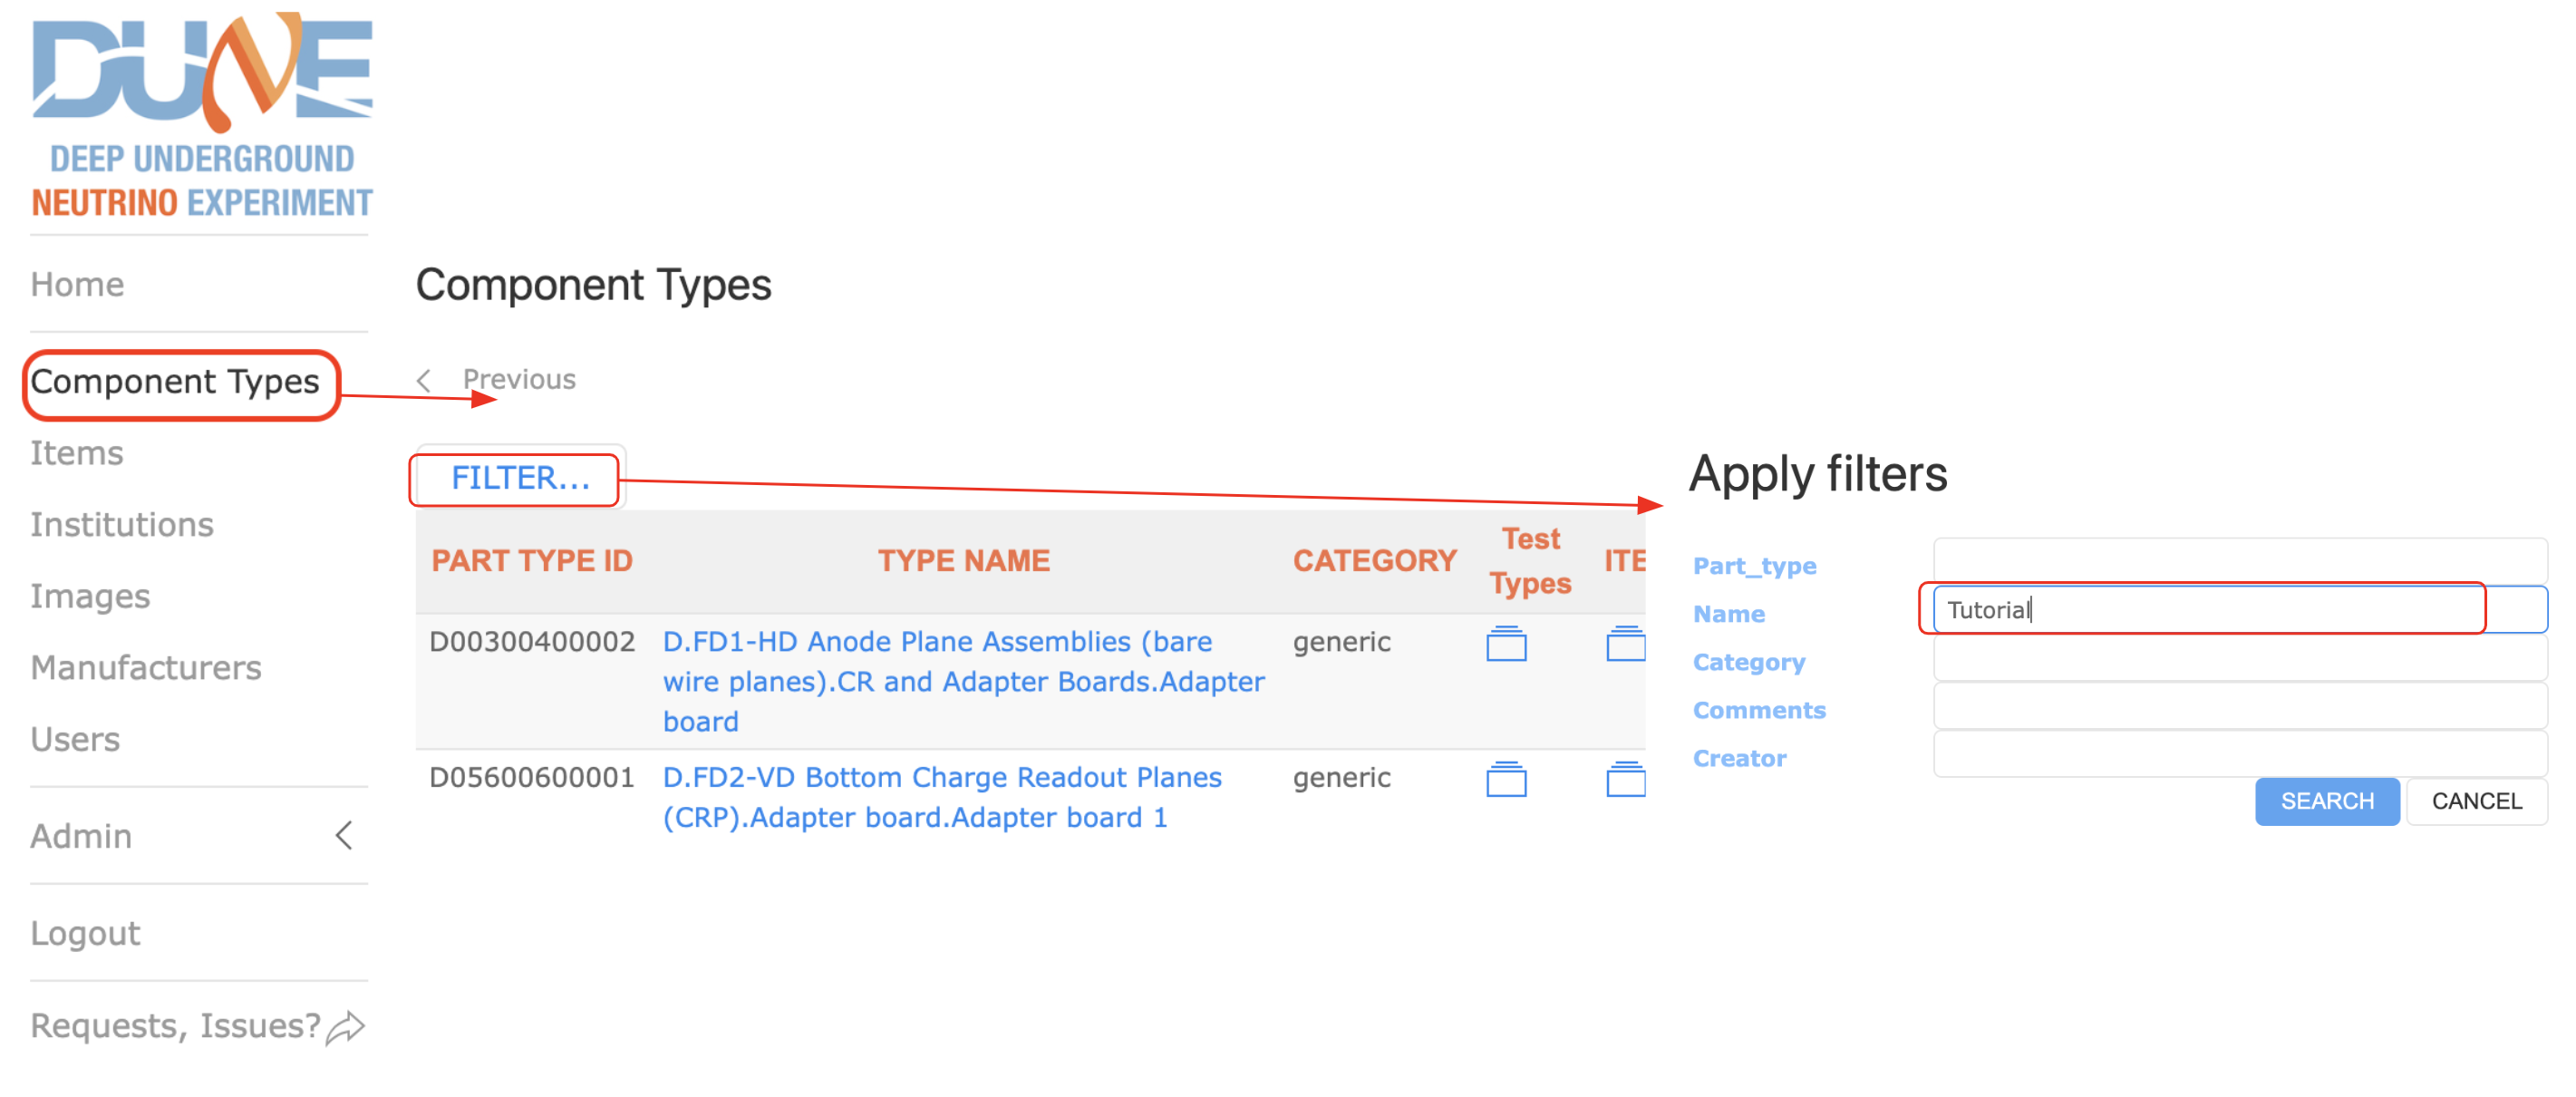
- Select “Component Types” from the left menu. The UI will display a list of all component types in the HWDB. This list will be many pages long.
- We should filter this list so that we can find our component type more easily. Find the “Filter…” button towards the top of the page and click on it. The UI should display a pop-up box titled “Apply filters.”
- In the “Name” field, type part or all of the component type’s name and click “Search.” For this example, let’s type “Tutorial,” although you could also try variations like “Sandbox.Tutorial” or “Front Axle”. You may use wildcards to omit a middle portion, e.g. “Sand%.Tut%.Front”. (Wildcards are already assumed at the beginning and end.) The UI will respond with a list of component types that only match the filter criteria.
The component types are displayed in list view. This provides a variety of options as seen below. In particular you may access the Component Type definition, the Test Types, and the list of Items of that component type.
Click on the red boxes in the image below for more information.
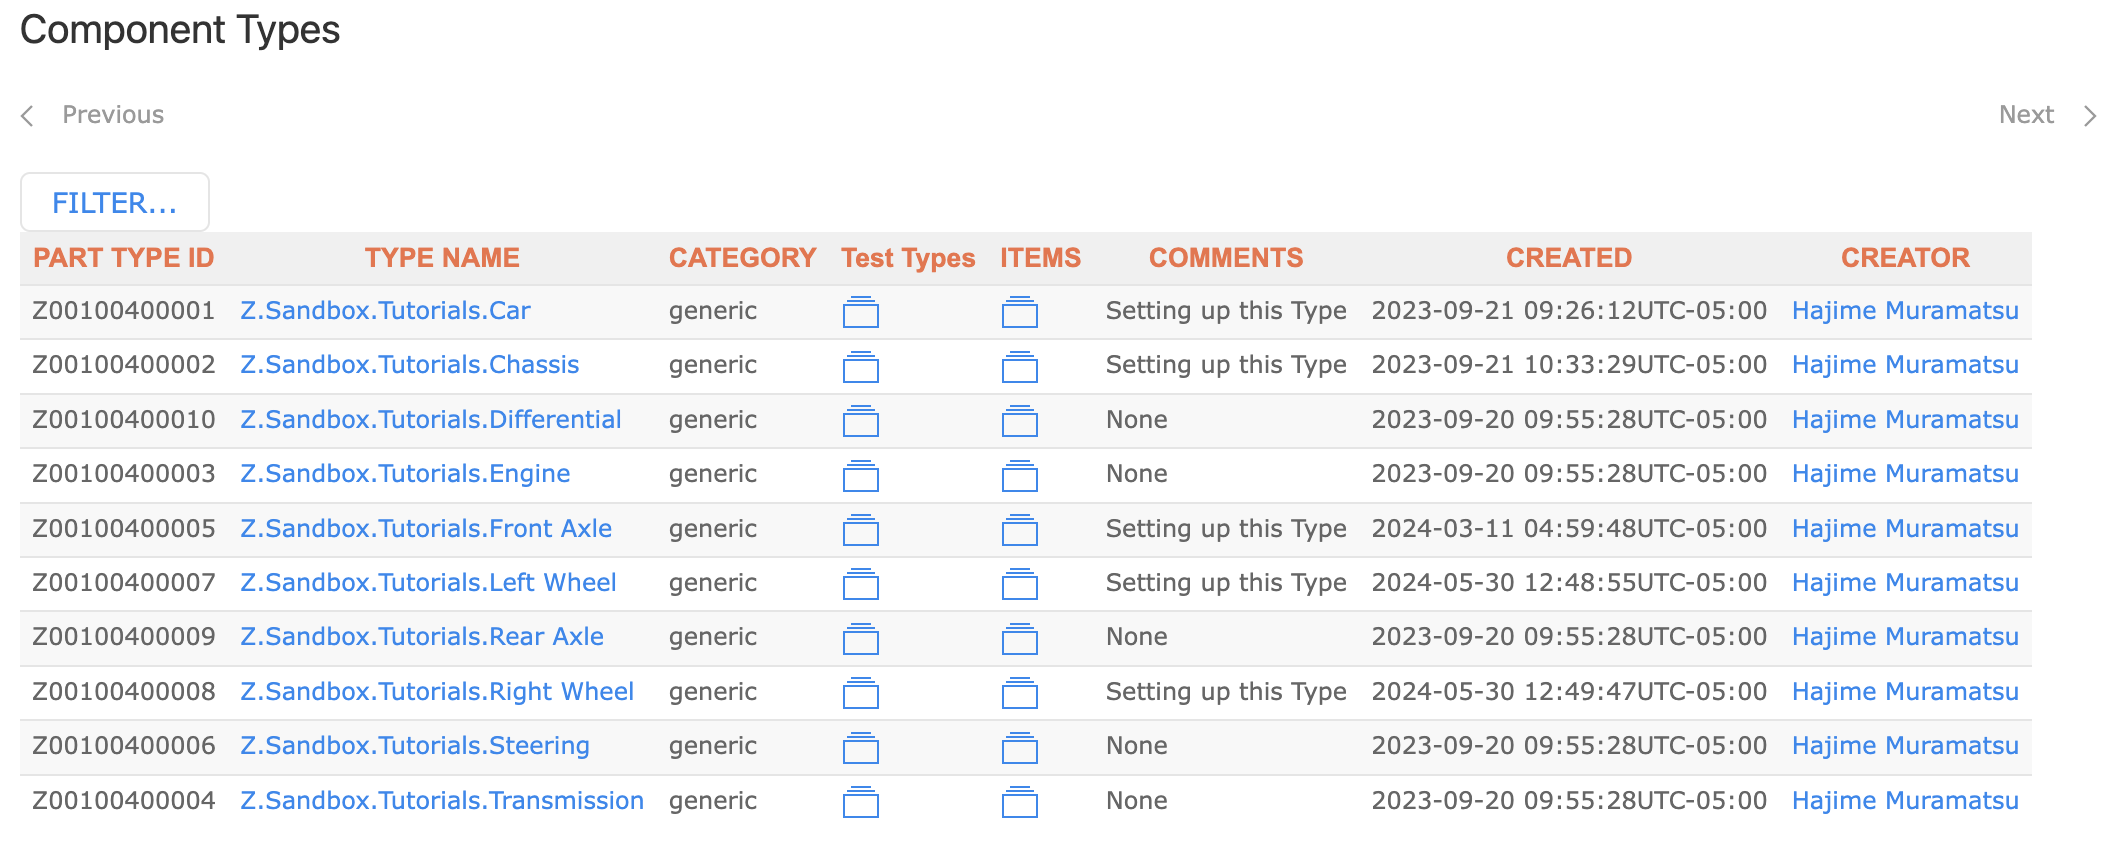
Click here for details about the Component Type, including the Specifications Definition and Subcomponents.
Click here for Test Type definitions for this Component Type.
Click here for a list of Items for this Component Type.
Let’s take a look at “Front Axle.”
- Click on the “Z.Sandbox.Tutorials.Front Axle” link.
We can see in the image below that the Specifications Datasheet contains two fields: “Last Name” and “First Name”. These have been given default values of “Muramatsu” and “Hajime”. (If you wish to have no default values, you may use the value “null”.
We also see that the component type has two subcomponents (“connectors”): “My L Wheel” and “My R Wheel”, each of which has been assigned a Part Type ID.

Datasheet: When we add a new “Front Axle,” we will need to have a “Last Name” and “First Name” to assign to it.
Connectors: We can see here that we will need two other Items of a different Component Type to complete the Front Axle. (Note that we don't necessarily need to have sub-components "My L Wheel" and "My R Wheel" right away. We can create the Front Axle and add the two subcomponents later.)
Adding Item(s)
Now that we’ve examined the component type, let’s add some items!
- Use the back button on your browser to return to the filtered list of component types.
- Click on the folder icon in the “ITEMS” column in the row for “Front Axle.” The UI will respond with a list of items for this component type.
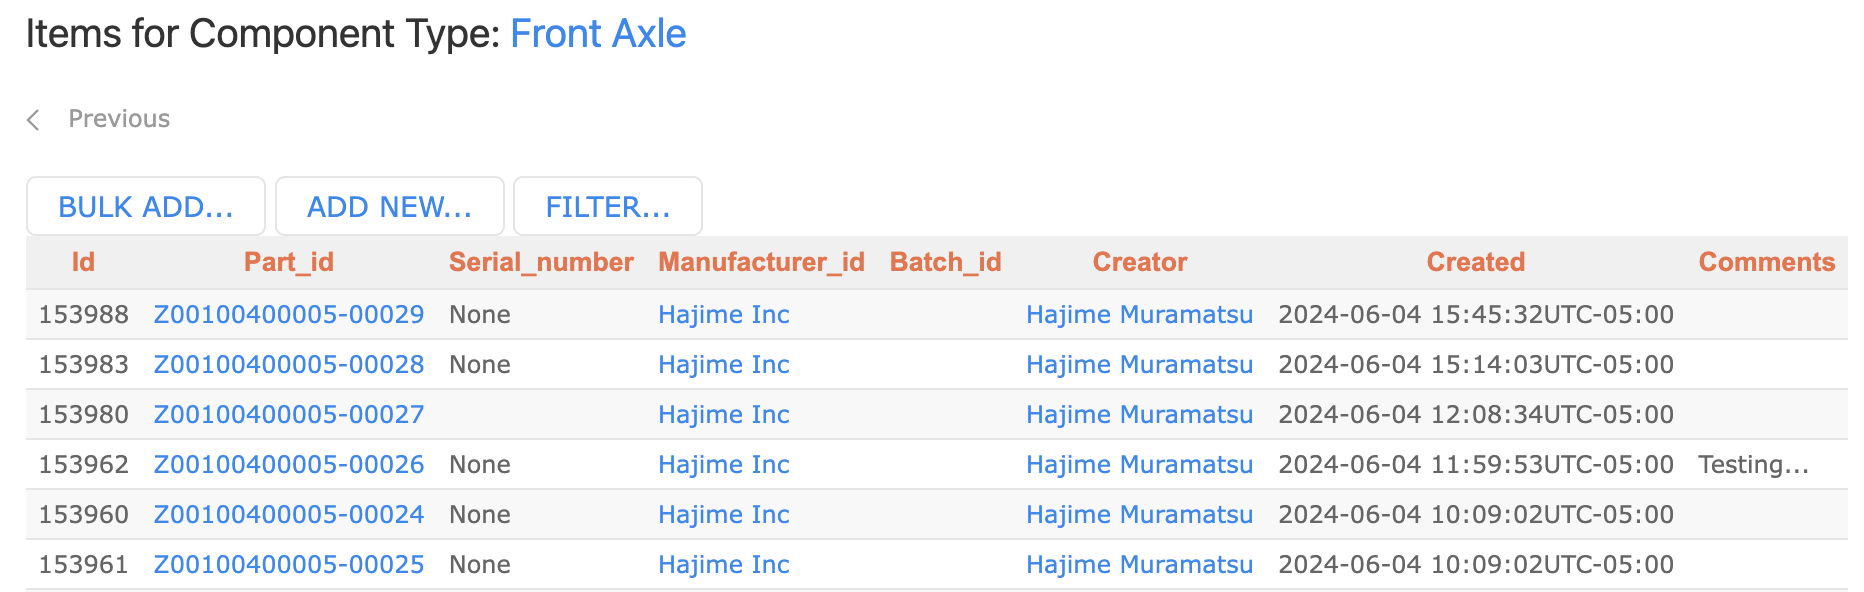
Click here to add multiple Items at the same time. These new items will have the default Specifications and will have no subcomponents. You will have to come back and edit them individually.
Click here to add a single item. You will be able to set Specifications and Subcomponents at creation time.
Use “Filter” to reduce the number of Items shown on this page
Click here to view this specific item
Adding Single Item
To add a single item:
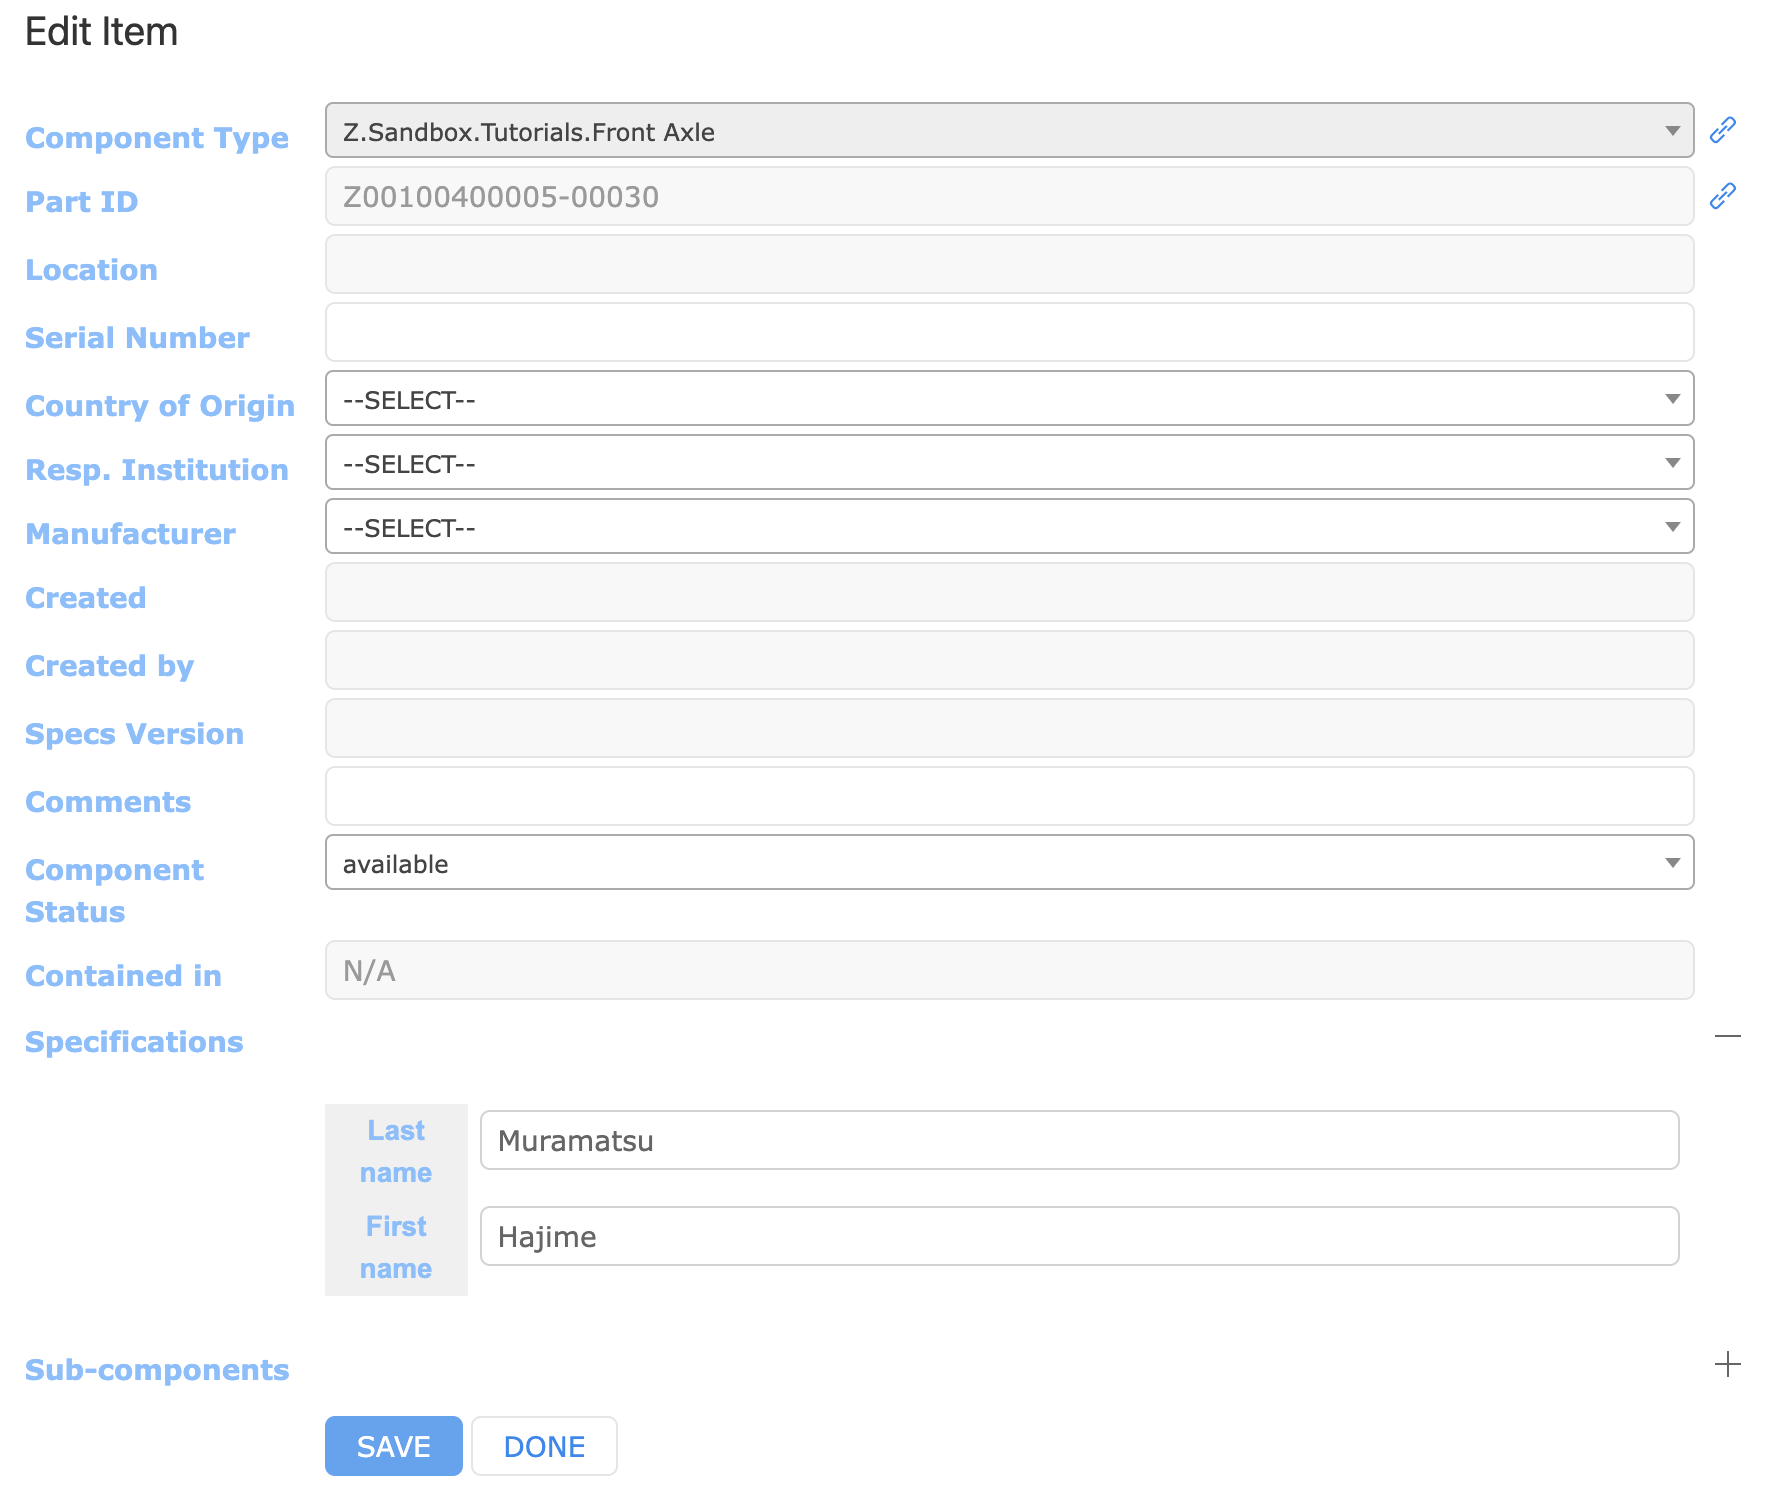
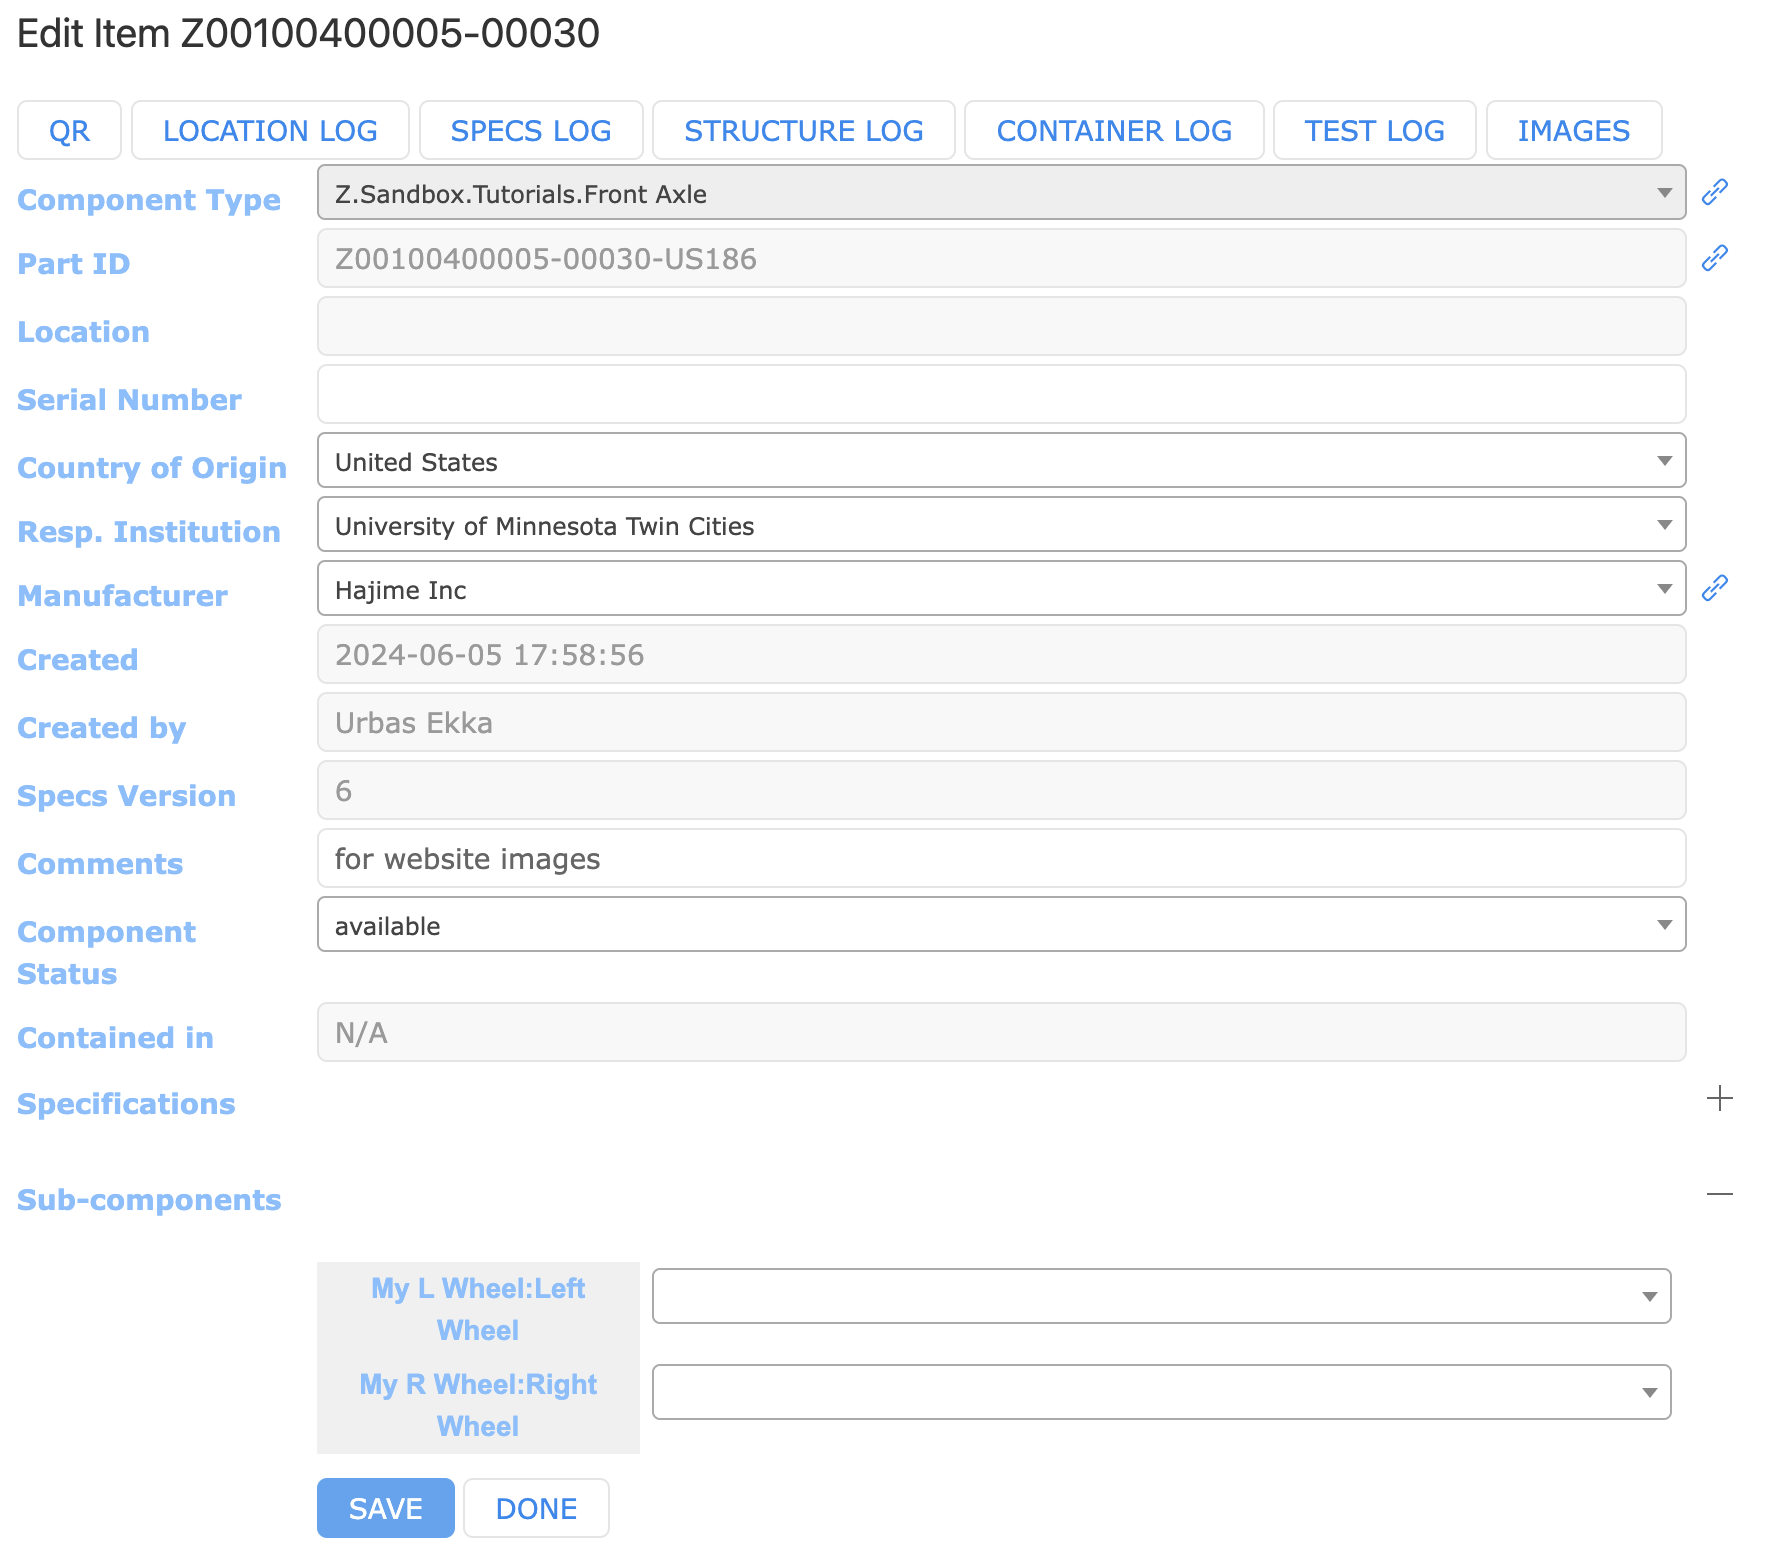
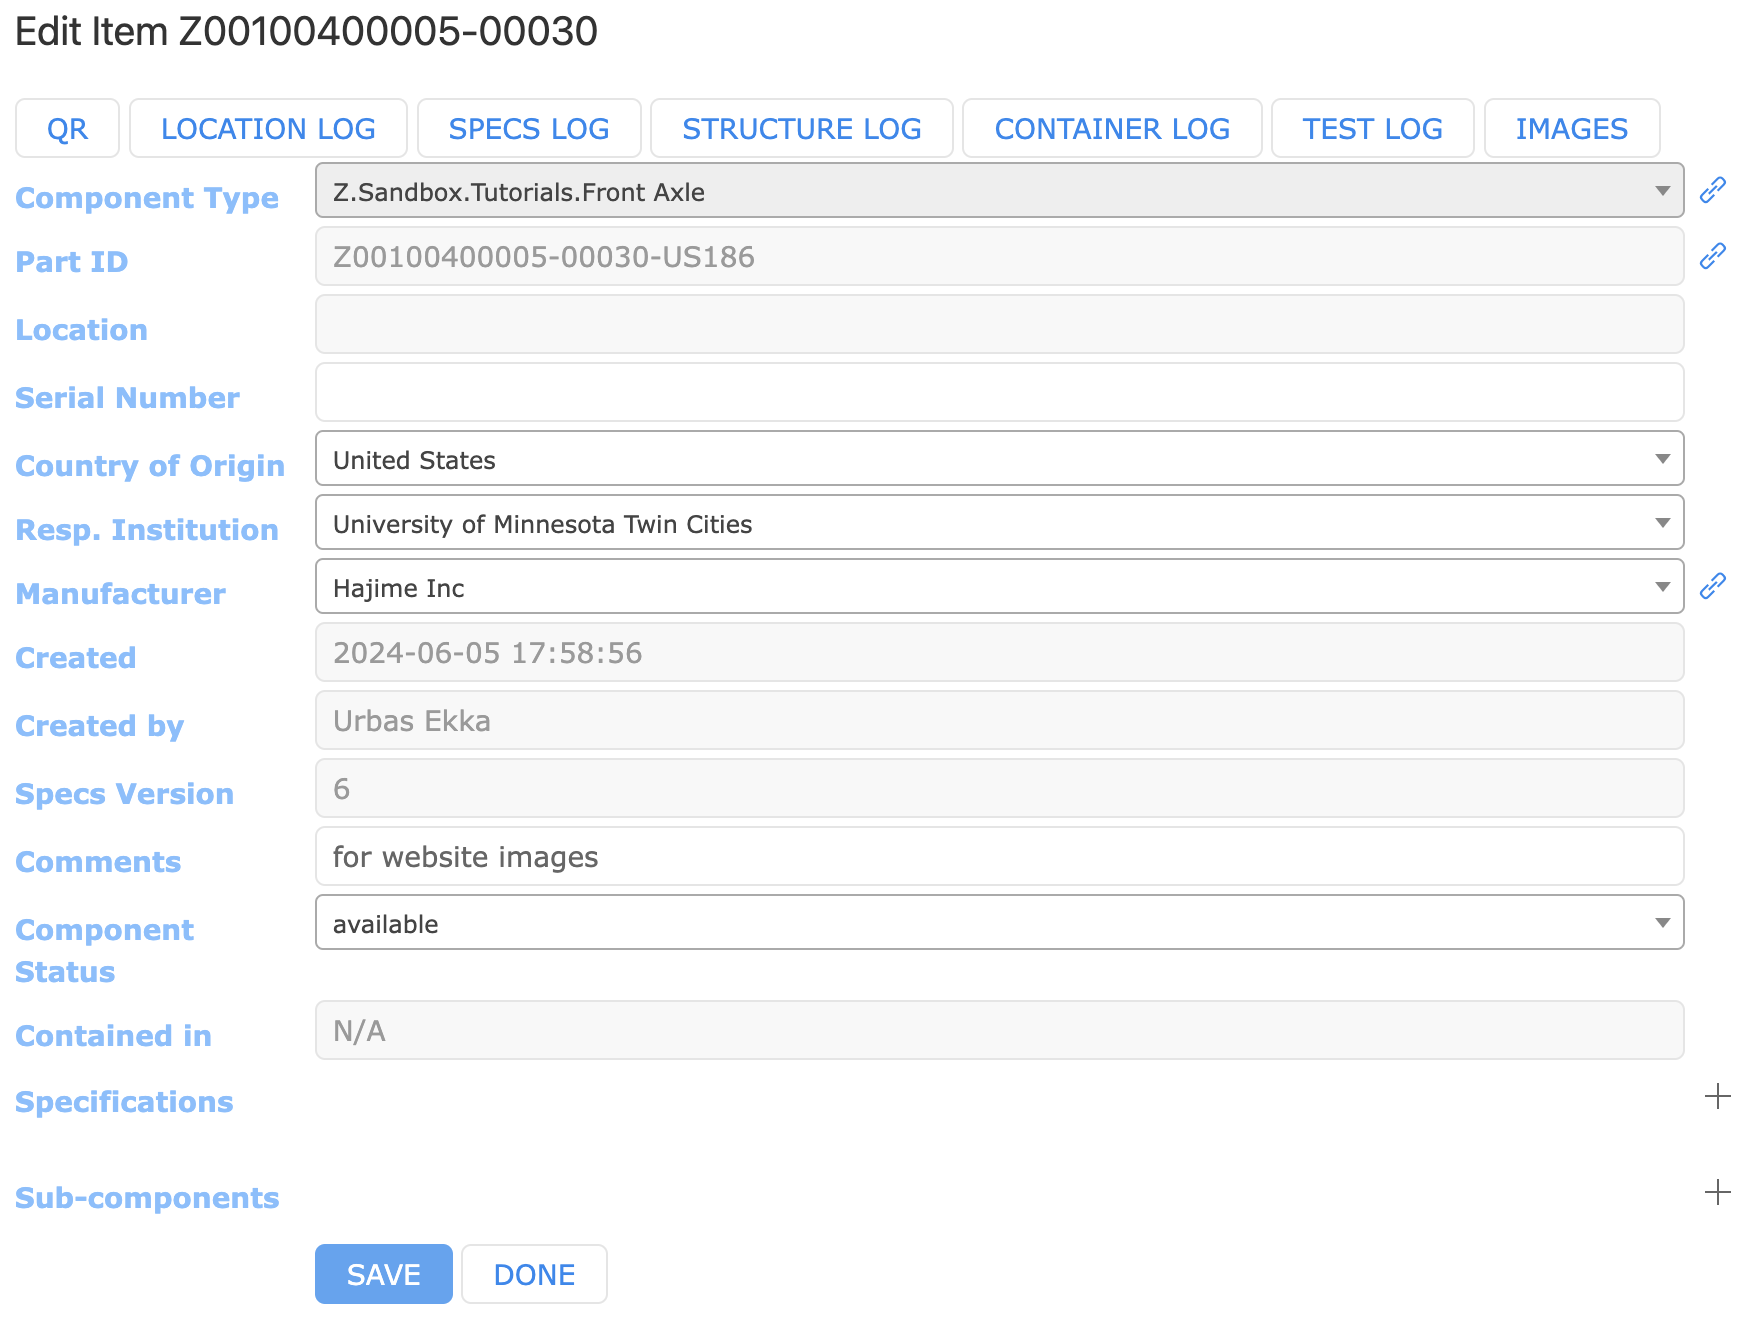
- Click on the “ADD NEW…” button towards the top of the screen. The UI will respond with the “Edit Item” screen. (Note that this screen will show both for adding and editing items. However, when editing an item, there will be more options available on the screen.
- At minimum, you must select a “Country of Origin” and “Resp. Institution.” The remaining fields are optional. IMPORTANT: Once the Country and Institution have been set, they may not be edited!
- The “Part ID” field displays the next available Part ID, which will be assigned to this item when it is added. Note that the Part ID is not reserved until you save the item, so if multiple users are adding items at the same time, that Part ID might get assigned to another user’s item before you finish adding it! If you need to make a note of the Part ID for later use, look for the Part ID that was assigned after saving!
- Location may not be set until after the item has been created.
- Sub-components may not be assigned until after the item has been created.
- Click the “Save” button to add the item.
View the Component Type definition
View the bar code for this Item. (This only works when editing an item. It will not be available when you are initially creating the item.)
Expand/Contract Specification section
Expand/Contract Sub-components section
Serial Number (optional). Use this if an item has an identifiable serial number to record. It is recommended to make this unique (within this Component type) if used, but the HWDB will not enforce uniqueness.
Manufacturer (optional). Select from the list of manufacturers defined for this Component Type
Sub-components. This is empty when initially adding the Item. We have to come back and edit the Item to add sub-components
Gives the latest location the item was at, cannot be edited during creation.
Institution/Country (required). Select the institution responsible for managing this Item.
Component status (required). Marks the Item as being active for use as a subcomponent. There are three possibilities: "available", "temporarily not available", "permanantly not available". The status must be marked as "available" to be used as a subcomponent.
Specifications. These fields are defined in the Component Type for this Item.
Bulk Adding Items
Bulk Adding allows you to add a number of items simultaneously. This is handy if you have a number of Items you wish to reserve Part IDs for, but you’re not ready to enter all the information for those Items yet.
To bulk add items:
- Use the back button on your broser to return to the list of items for “Front Axle”. (You may wish to hit the refresh button on your browser to pick up any items you have added since you were last on that screen.)
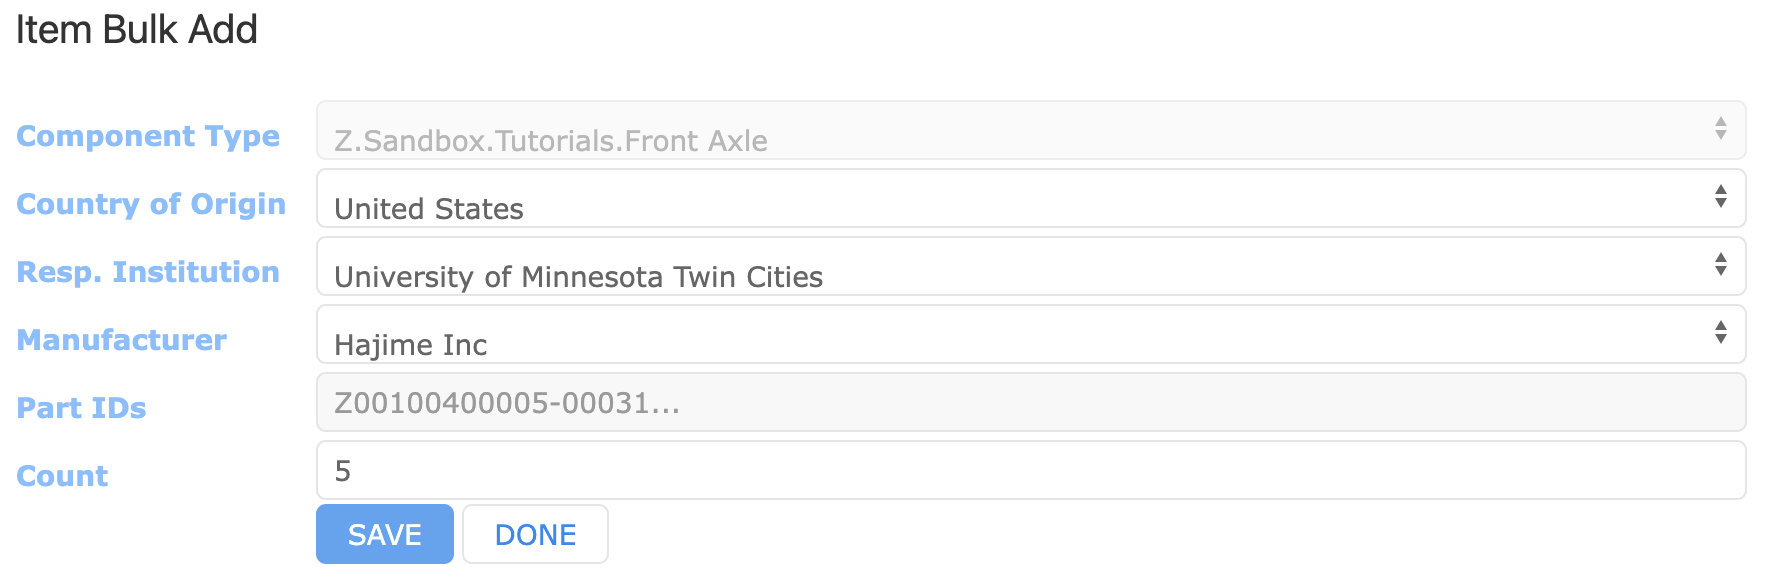
- Click on the “BULK ADD…” button towards the top of the screen. The UI will display the “Item Bulk Add” Screen.
- Select the appropriate values in the “Country of Origin” and “Resp. Institution” fields.
- Manufacturer is optional.
- Enter the number of items you wish to add in the “Count” field.
- Click the “SAVE” button. The UI will respond with a page in a new tab containing bar codes and QR codes for the items you have added. You may print these out and apply them to your physical items.
When you click “Save,” it will take you to a page containing bar codes and QR codes for the Items you have created, an example of which is below.

Adding Subcomponents
Suppose we wish to add subcomponents to the previously added item Z00100400005-00030.
Since this item has component type “Front Axle”, the component type definition requires that the
subcomponents be of component type “Left Wheel” and “Right Wheel”. Suppose we have added items
for both of these types, and their Part IDs are Z00100400007-00013 and Z00100400008-00014.
Both of these items must have their status set to “Available.”
To add these subcomponents:
- Use the back button on your browser to return to the list of items for “Front Axle.” Refresh the page to update the list.
- Click on the link for “Z00100400005-00030”. The UI will display the “Edit Item” screen for this item.
- Under “Sub-components,” click the “+” button to expand. The UI will now show the subcomponent functional positions that need to be filled.
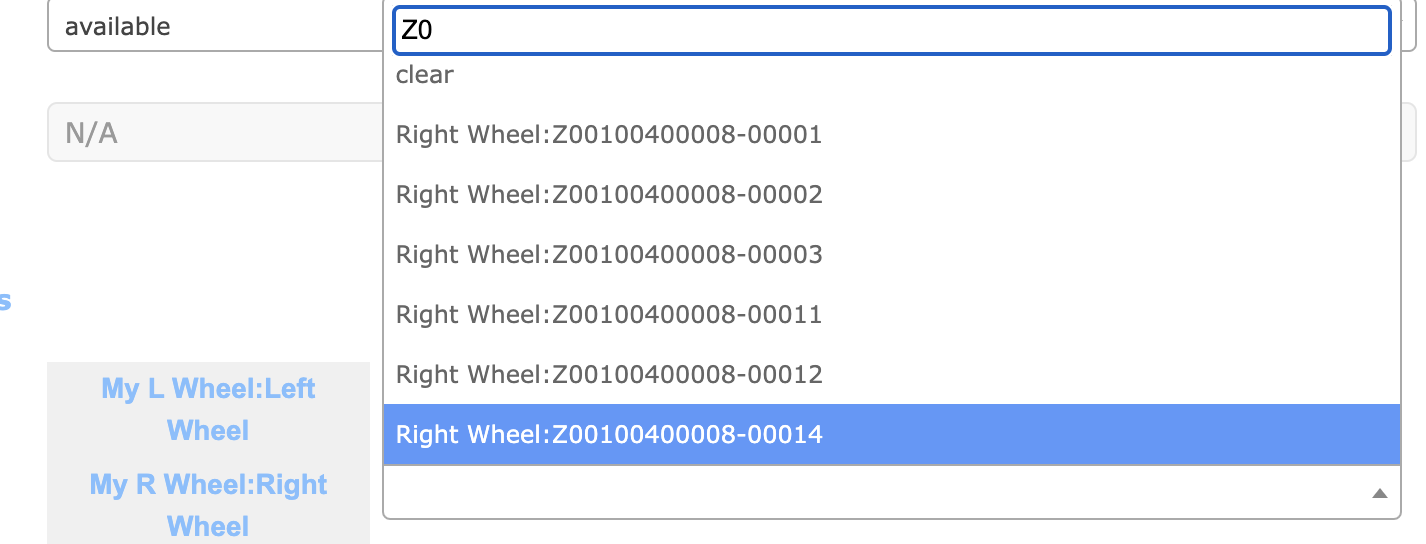
- Click the drop-down box for “My L Wheel: Left Wheel”. The box will expand to show a text field and the message “Please enter 2 or more characters.”
- Enter two or more characters for any substring of the Part ID that you want. In this case, “13” will suffice. The UI will display a list of Part IDs matching this substring.
- Click on “Z00100400007-13” to select it.
- Repeat this process for “My R Wheel:Right Wheel.”
Sub-components is now available. Click on the drop-down list for “My L Wheel: Left Wheel.” It will ask you to “Please enter 2 or more characters. Enter a string of characters to help filter. (The Part Type ID is a good choice.)”

Sub-components is now available. Click on the drop-down list for “My R Wheel: Right Wheel.” It will ask you to “Please enter 2 or more characters. Enter a string of characters to help filter. (The Part Type ID is a good choice.)”
Adding Test Types & Tests
Suppose we want to add a new test type for “Front Axle” named “Bounce Test.” To do this, perform the following steps:
- Use the back button on your browser to return to the “Component Types” page that lists “Front Axle”
- Click on the “Test Types” folder in the “Front Axle” row. The UI will now show “Test Types for Component Type: Front Axle”
- Click on “ADD NEW…”. The UI will now show “Edit Item Test Type”
- Enter the data fields on this screen and click “DONE”. The UI will now show an updated screen “Test Types for Component Type: Front Axle”

You may now add test instances for your new test:
- Find the item you added earlier for the “Front Axle” type.
-
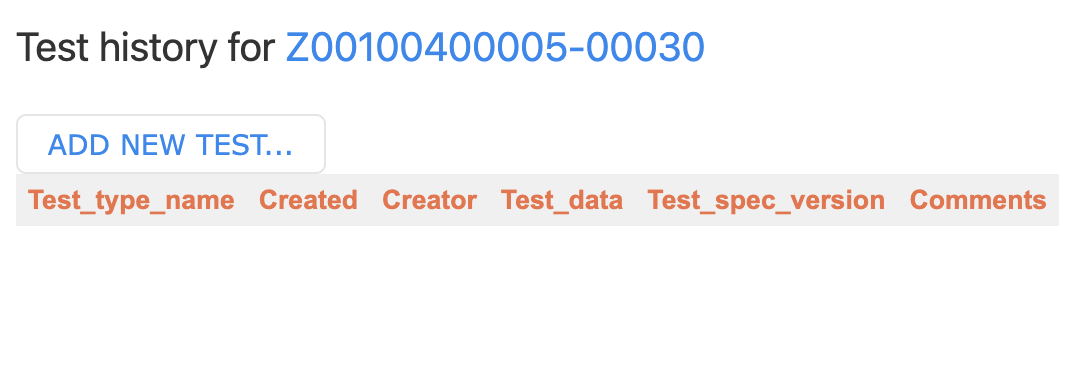
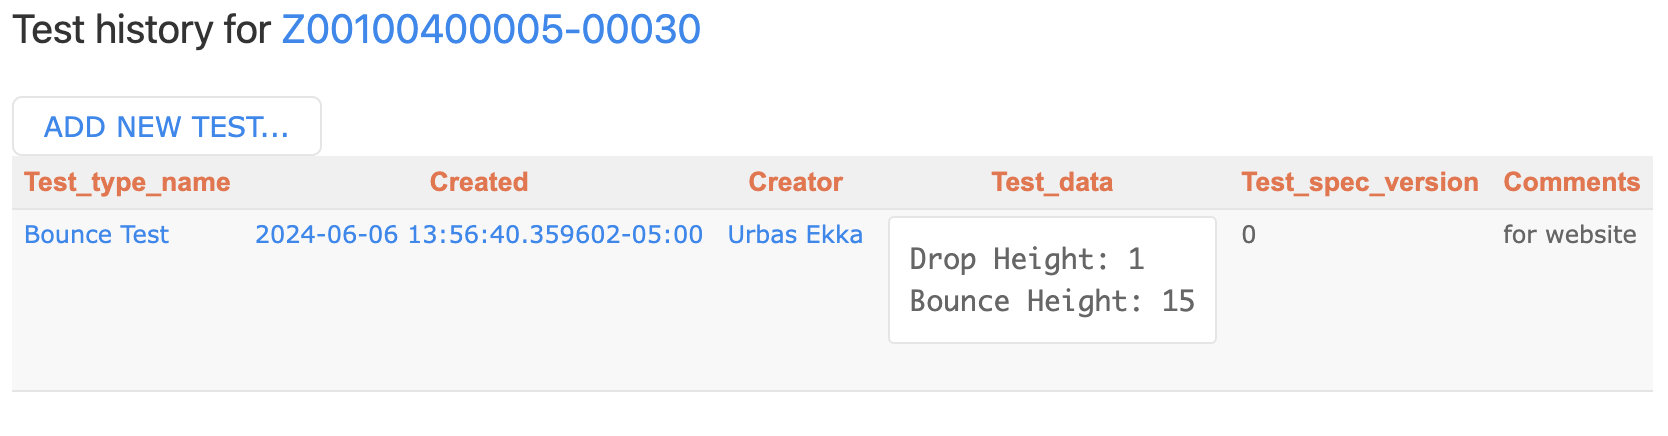
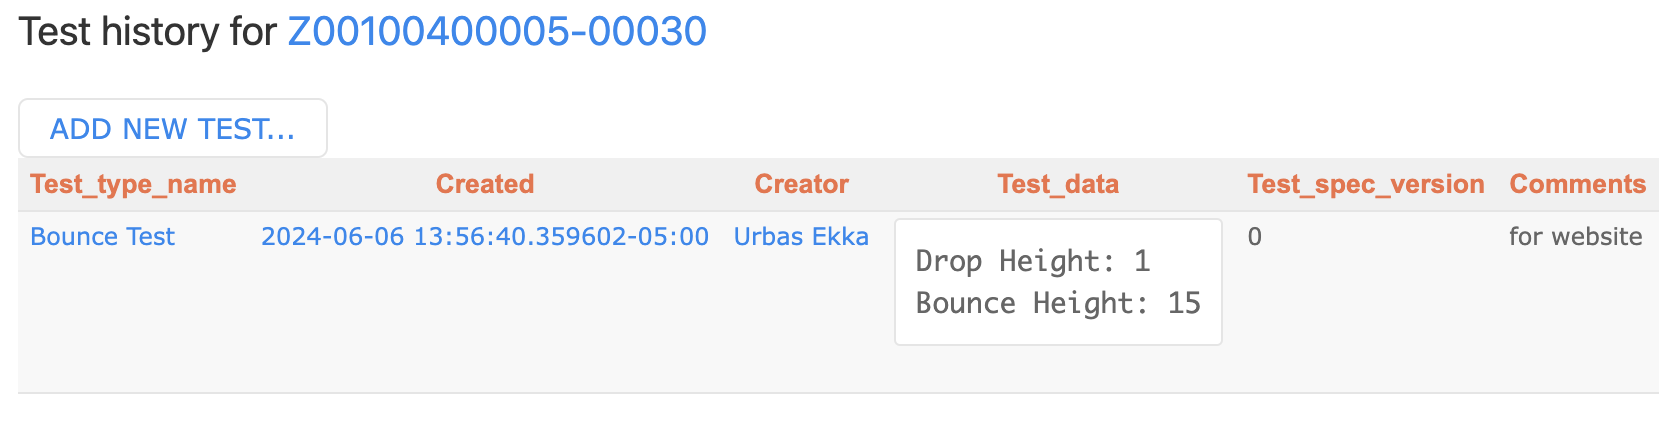
In the Edit Item screen for your item, click on “TEST LOG”. You will see “Test history for <your part id>
- Click “ADD NEW TEST…” The UI will now ask you to choose which test type you are using

- Enter the data for your test
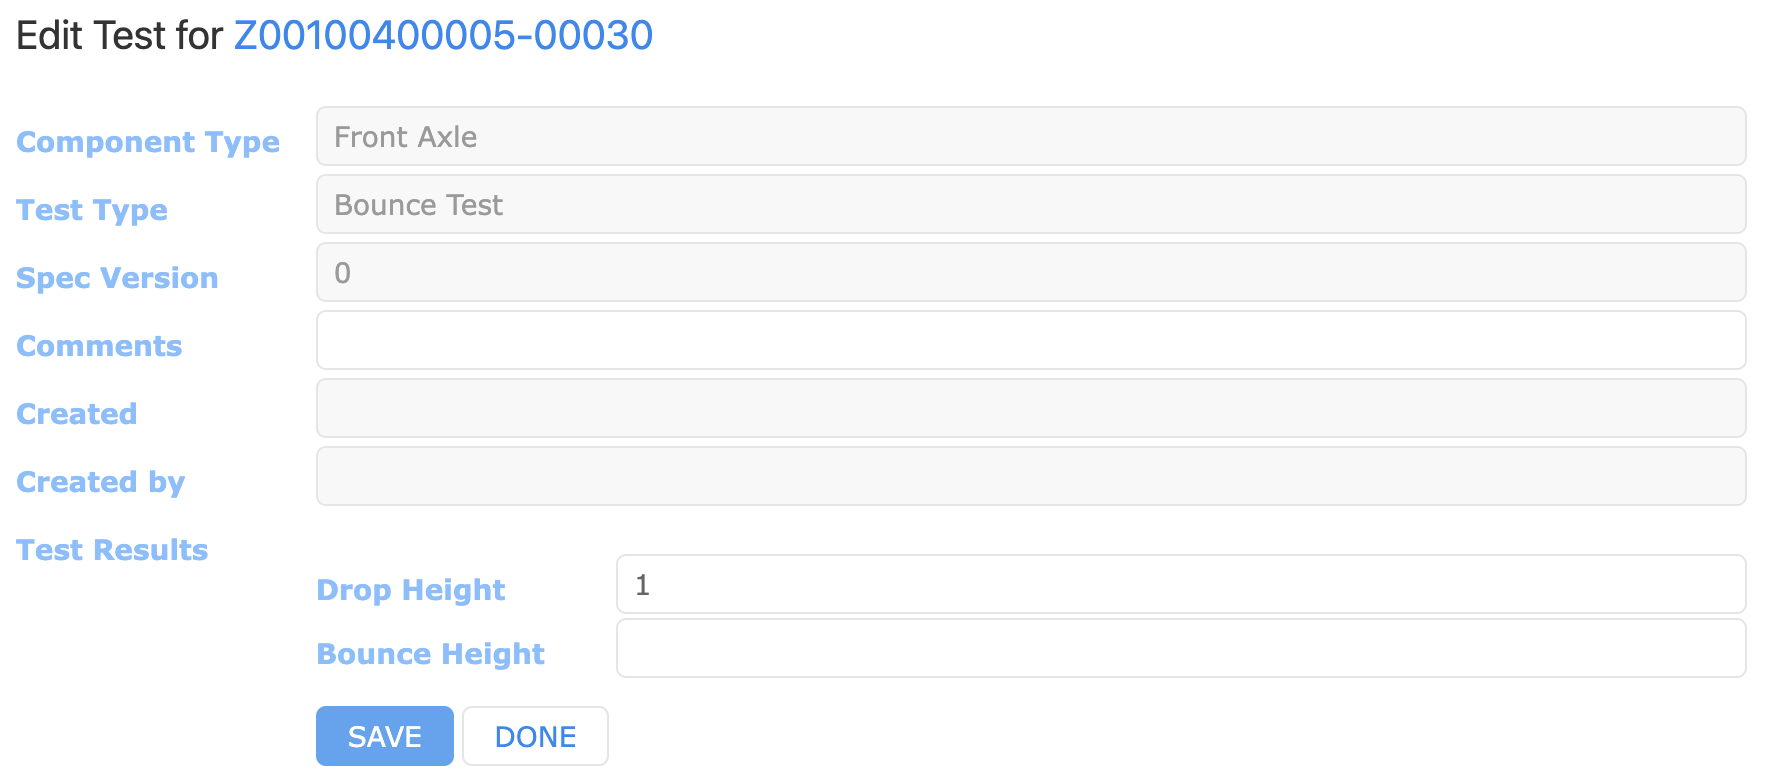
Displays available, pre-defined tests. In this case only the bounce test is defined.
Test Results: These fields are defined by the Test Type for the Component Type
- Click “DONE” when finished.
Adding Images
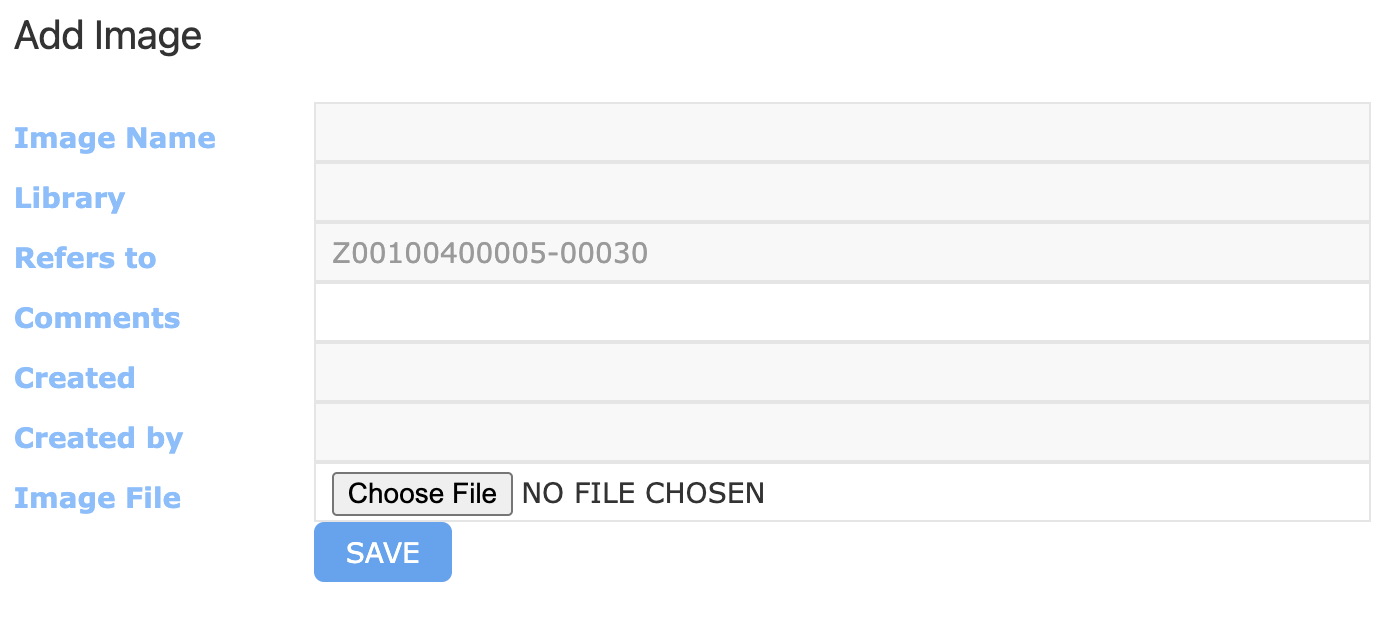
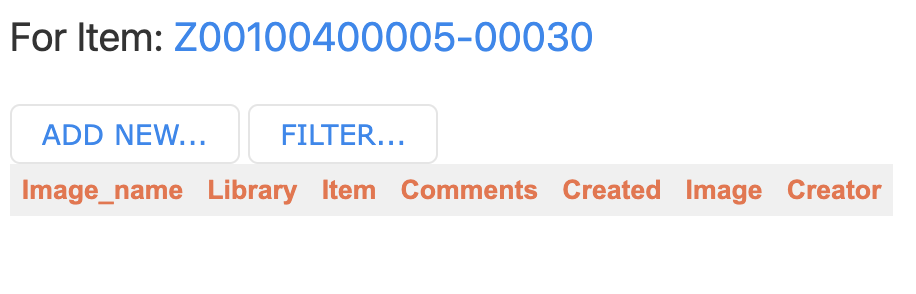
In order to add an image to a selected item, click on “Images” on the top item menu (see More Item Operations for more) which will present you with something that looks like the following.
Gives you the ability to select the image, name it, and add a comment.
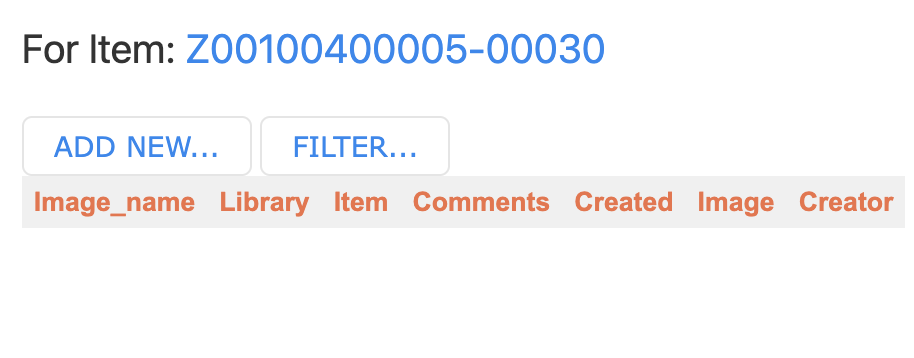
You can also add images to specific tests associated with items. Suppose we wish to add an image to the bounce test we added to Z00100400005-00030. Then navigate to the particular item and go to its “Test Log” which produces the following which allows you to add an image in the same way as shown above.
Clicking on the image button produces a menu identical to that seen in above.

You can also add an image immediately after the additon of a new test, as it gives you the option to do so.
Images are attached to that test result record ONLY. If you “edit” a test, the images you have attached will not carry forward. You will need to decide whether you should re-attach all images every time you update a test record, or regard all images in the historical sequence to be “current.” The author of this presentation has no strong opinion at the time this was written.
More Item Operations
Once an Item has been created, you are provided with more operations as shown below.
View a QR code containing a URL to this Item in the HWDB

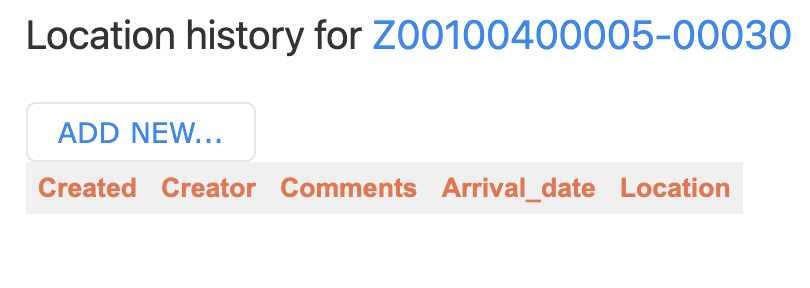
View location history of this Item. Allows you to add to it as well.
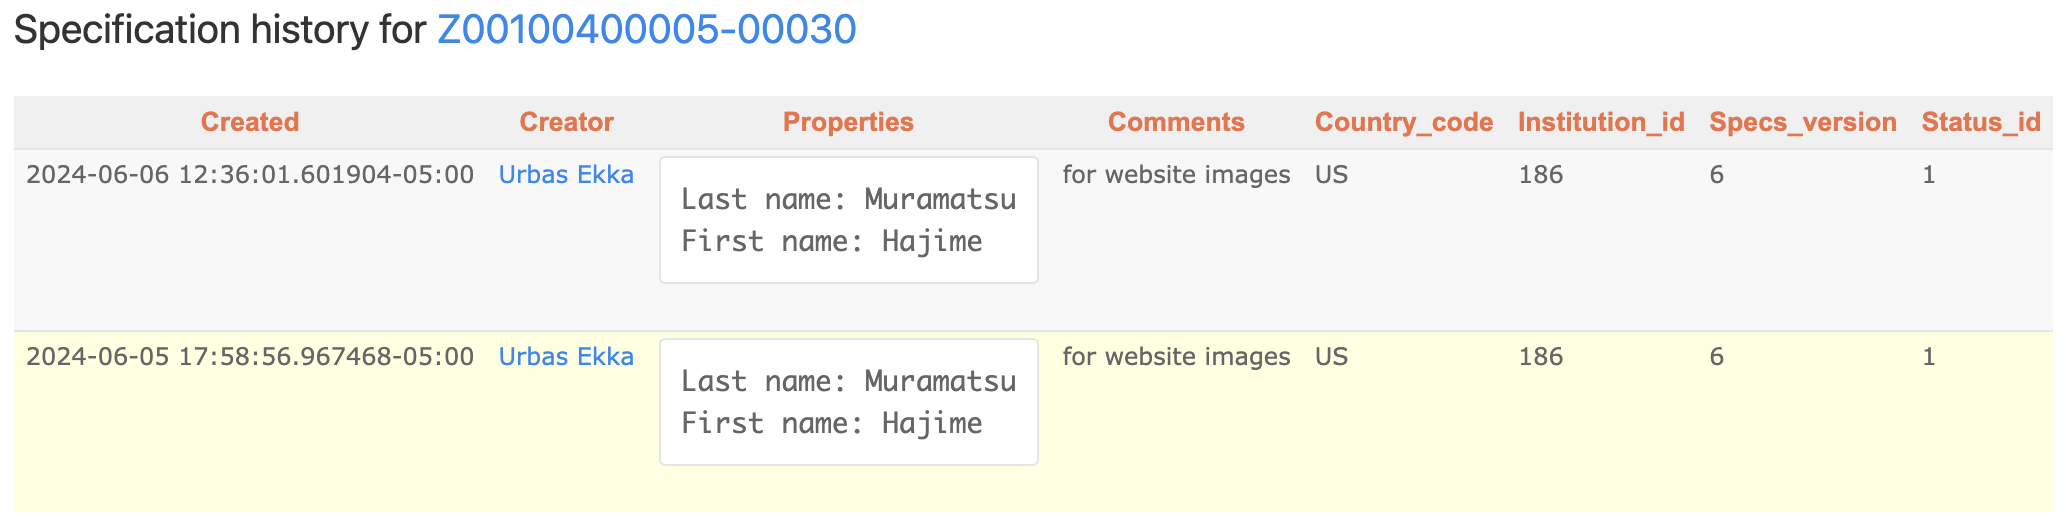
View a historical record of the Specifications for this Item
View a historical record of which Items this Item has been attached to as a sub-component (i.e., “parents” of this item).
View a historical record of the sub-components attached to this item.

View test history of this Item. Allows you to add to it as well.
View image history of this Item. Allows you to add to it as well.
Item Filtering
You can search for Items (Components) based on the usual fields such as Component_type, Part_id, Serial_number, and Creator. In addition, you can filter by the fields as shown below.
You can filter by status: any, available, temporarily not available, permanantly not available.
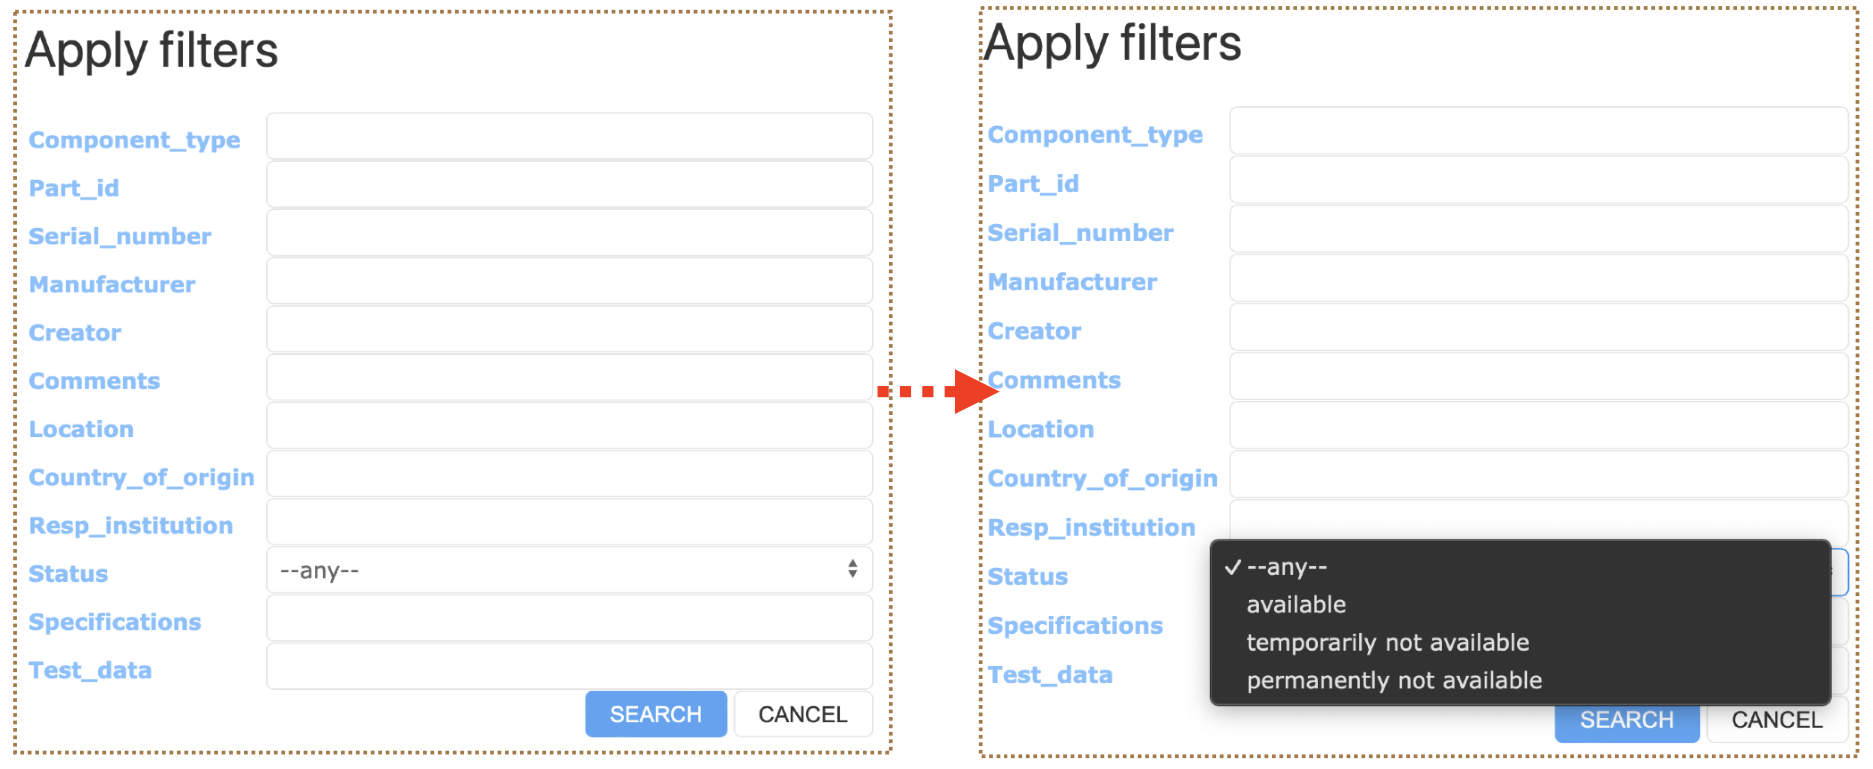
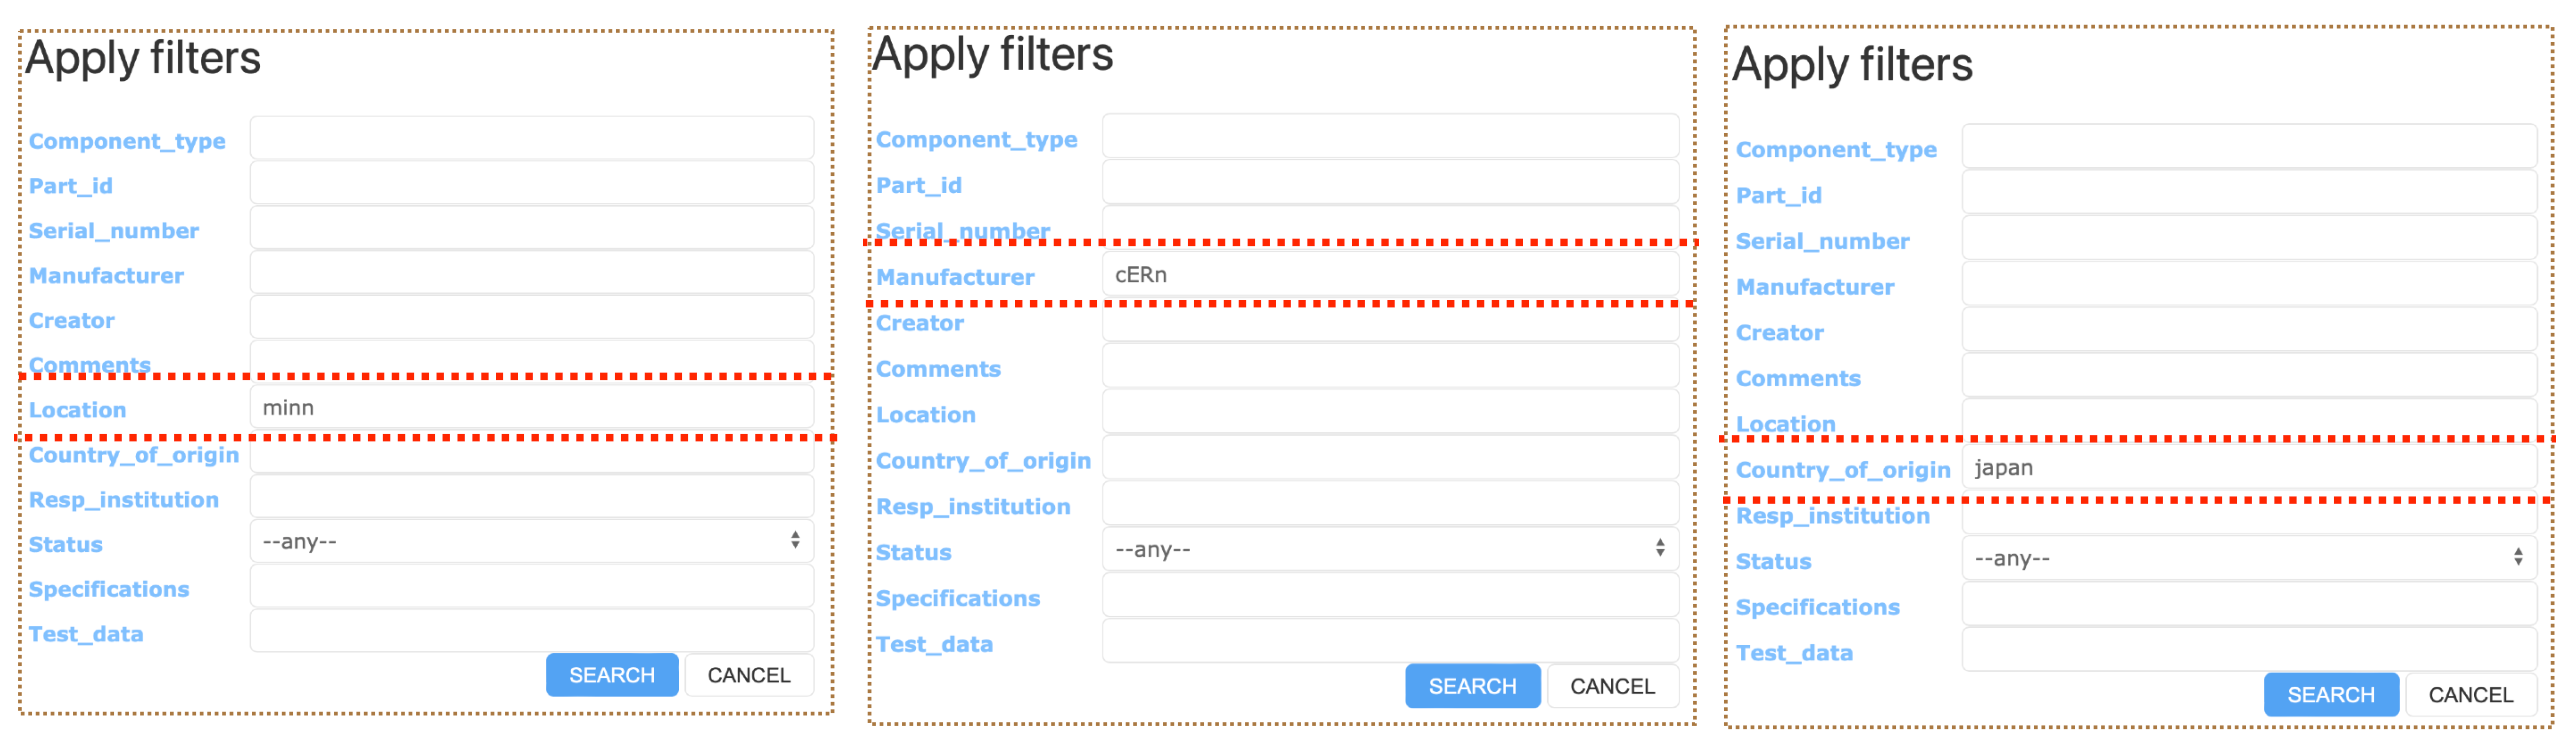
You can also filter by Location, Manufacturer, and Country of Origin. Each of which are case insensitive and need not be completely spelled out.
A more advanced discussion of filtering requires use of specific syntax.
Syntax
There is certain syntax that can be used when you are refining your search using filter fields. The following symbols can be utilized with numbers in filter fields.
symbol definition == equal to != not equal to < less than <= less than or equal to > greater than >= greater than or equal to
The following symbols can be utilized with strings and substrings in filter fields.
symbol definition == equal to != not equal to ~ case sensitive regex search ~* case insensitive regex search
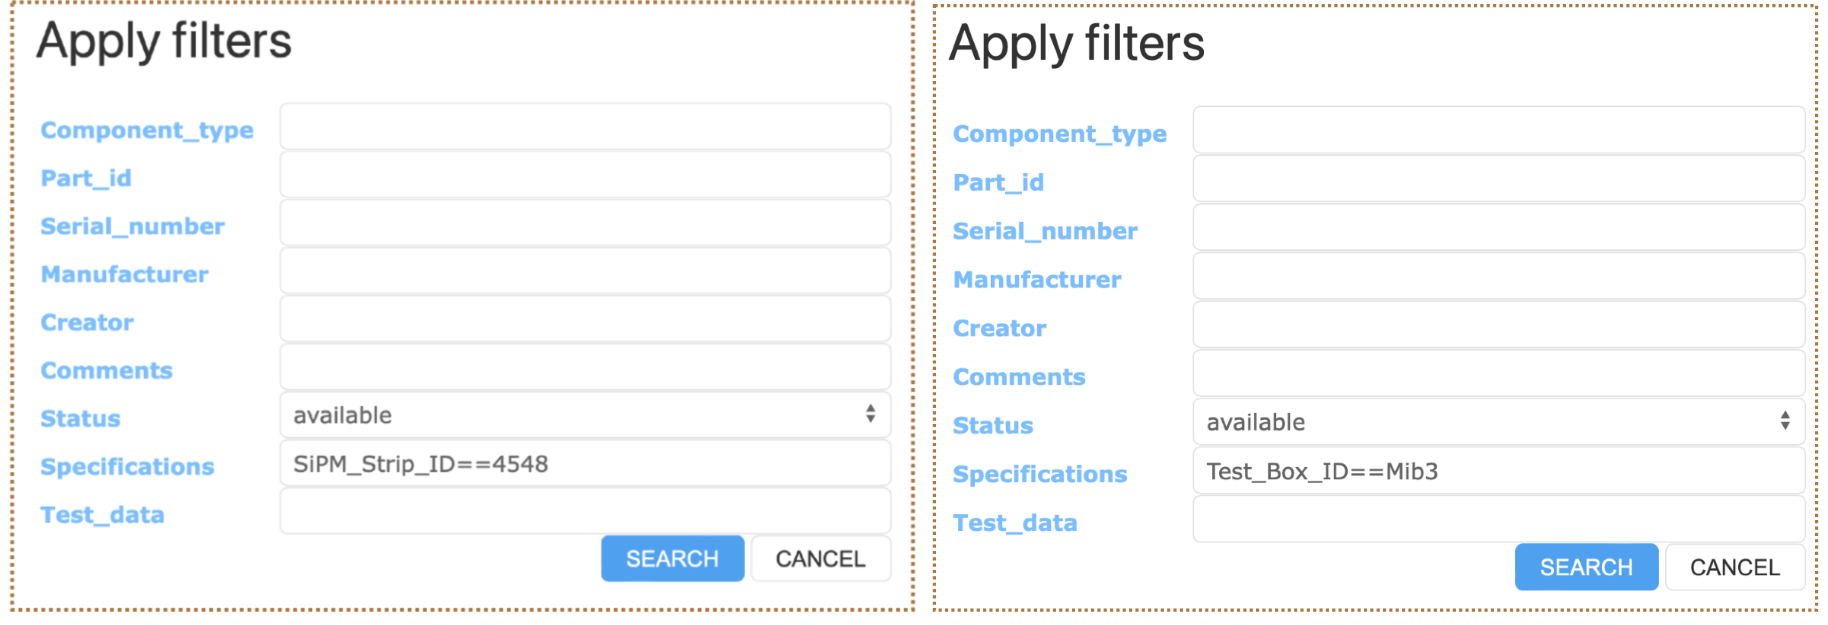
Filtering with Specifications
You can also filter based on item Specifications. Suppose there exists an item with the following specifictations:
"specifications":[
  {
    "Documentation": "https://something.com/something"
    "SiPM_Strip_ID": 4548
    "Test_Box_ID": "Mib3"
    "Tray_Number": 20
    "Vendor_box_Number": 14,
    "Vendor_Delivery_ID": "HPK_Ciemat_03"
    "_meta":{
      "_column_order:[
        "Vendor_Delivery_ID",
        "Vendor_box_Number",
        "SiPM_Strip_ID",
        "Test_Box_ID",
        "Documentation"
      ]
    }
  }
]
Then you can apply the following filters to search the item. The syntax used in the filtering field is explained in depth in the following section.
Consider an item with the following Specifications.
"specifications":[
  {
    "Vendor_Delivery_ID": "HPK_Ciemat_03"
    "DATA": {
      "Drawing Number": "DFD-21-2101",
      "Label Code": "12345",
      "Name": "Main I-Beam"
    }
  }
]
Then,
- Vendor_Delivery_ID~HPK_Ciemat_
- Vendor_Delivery_ID~*HPK_CiemaT_
- Name==Main I-Beam
- Label Code==12345
all return this item (as well as others if possible). However,
- Vendor_Delivery_ID~HPK_CiemaT_
would not return any item as ~ is case sensitive.
Filtering with Test Data
You can also filter using Test_data in the same way as Specifications. Suppose you have an item with the following test data:
"test_data":{
  "Test Results": [
    {
      "Location": "Minnesota",
      "Operator": "Scientist Red"; "Scientist Blue",
      "SiPM":[
        {
          "Comment":"",
          "List1":[
            1.77734e-06
            6.90008e-07
            -2.44907e-06
            5.33429e-06
          ]
          "List2":[
            "H_RED"
            "Z_yellow"
            "U_green"
            "J_BLUE"
          ]
        }
      ]
    }
  ]
}
Then,
- List1[0]==1.77734e-06
- List1[1]>6.9e-07
- List2[3]~*j_blue
- List[*]==H_RED
all return the intended item.
Key Points
Subcomponent links can only be made with Items, whose status = “available”.
Comments (“Sort of” optional) The HWDB will allow you to leave this field blank, but the Web UI uses this field as an anchor for a hyperlink elsewhere in the interface, so it is recommended to enter a short comment. If there are multiple instances of the same test type, it is recommended that the comment is unique for each instance.