Setting up Component Types and Test Types
Overview
Teaching: 60 min
Exercises: 0 minQuestions
Administrator privilage is required.
How do I define a Component Type and a Test Type with the WEB UI?
How about through the REST API?
Objectives
Users should be able to setup both Component Types and Test Types so that they would be ready to enter actual data.
In setting up a Component Type, users should be also able to define lists of Roles, Manufacturers, and Connectors (Type IDs of sub-components).
Contents
Description Tasks for Administrators and very simplified DB schema Sub-components Tests Very simplified DB schema WEB UI Going through the hierarchy of IDs List of Projects, Systems, Subsystems, and Component Types Defining a Component Type Definition of a Component Type Managed by Permissions of editing a Component Type definition Manufacturers List of Manufacturers, creating and editing Specifications DB schema for a Component Type Connectors where sub-Component Types are defined SPEC LOG History of Specifications Defining a Test Type Definition of a Test Type REST API Going through the hierarchy of IDs with the REST API List of Projects, Systems, Subsystems, and Component Types GET a list of Projects GET /projects GET lists of Systems, Subsystems, and Component Types GET /systems, /subsystems, and /component-types Defining a Component Type with the REST API PATCH & GET /component-types/<type_id> Defining a Test Type with the REST API POST & GET /component-types/<type_id>/test-types Some other useful endpoints List of some useful REST API endpoints
Tasks for Administrators and very simplified DB schema
We now know how a PID is formed and there are three types of user privileges. One of the privileges, Administrator, allows to edit Component Types. In this session, we will go through what Administrators need to do before active users can start to enter data.
Sub-components
While editing a Component Type, Administrator can also define sub-component Types. A sub-component is a component (Item) that is linked to another component (Item). This is a very powerful functionality, allowing user to trace various related Items for a given single PID. We will show how this is done later in this session.
Tests
For a given Item, there is a place to store Test results. Actually it doesn’t have to be a Test result.One could store there anything that is associated with that Item. It is Administrator’s job to create/define Test Types for each of your Component Types. And for a given Component Type, one could create multiple Test Types. Again we will go over how this is done later in this session.
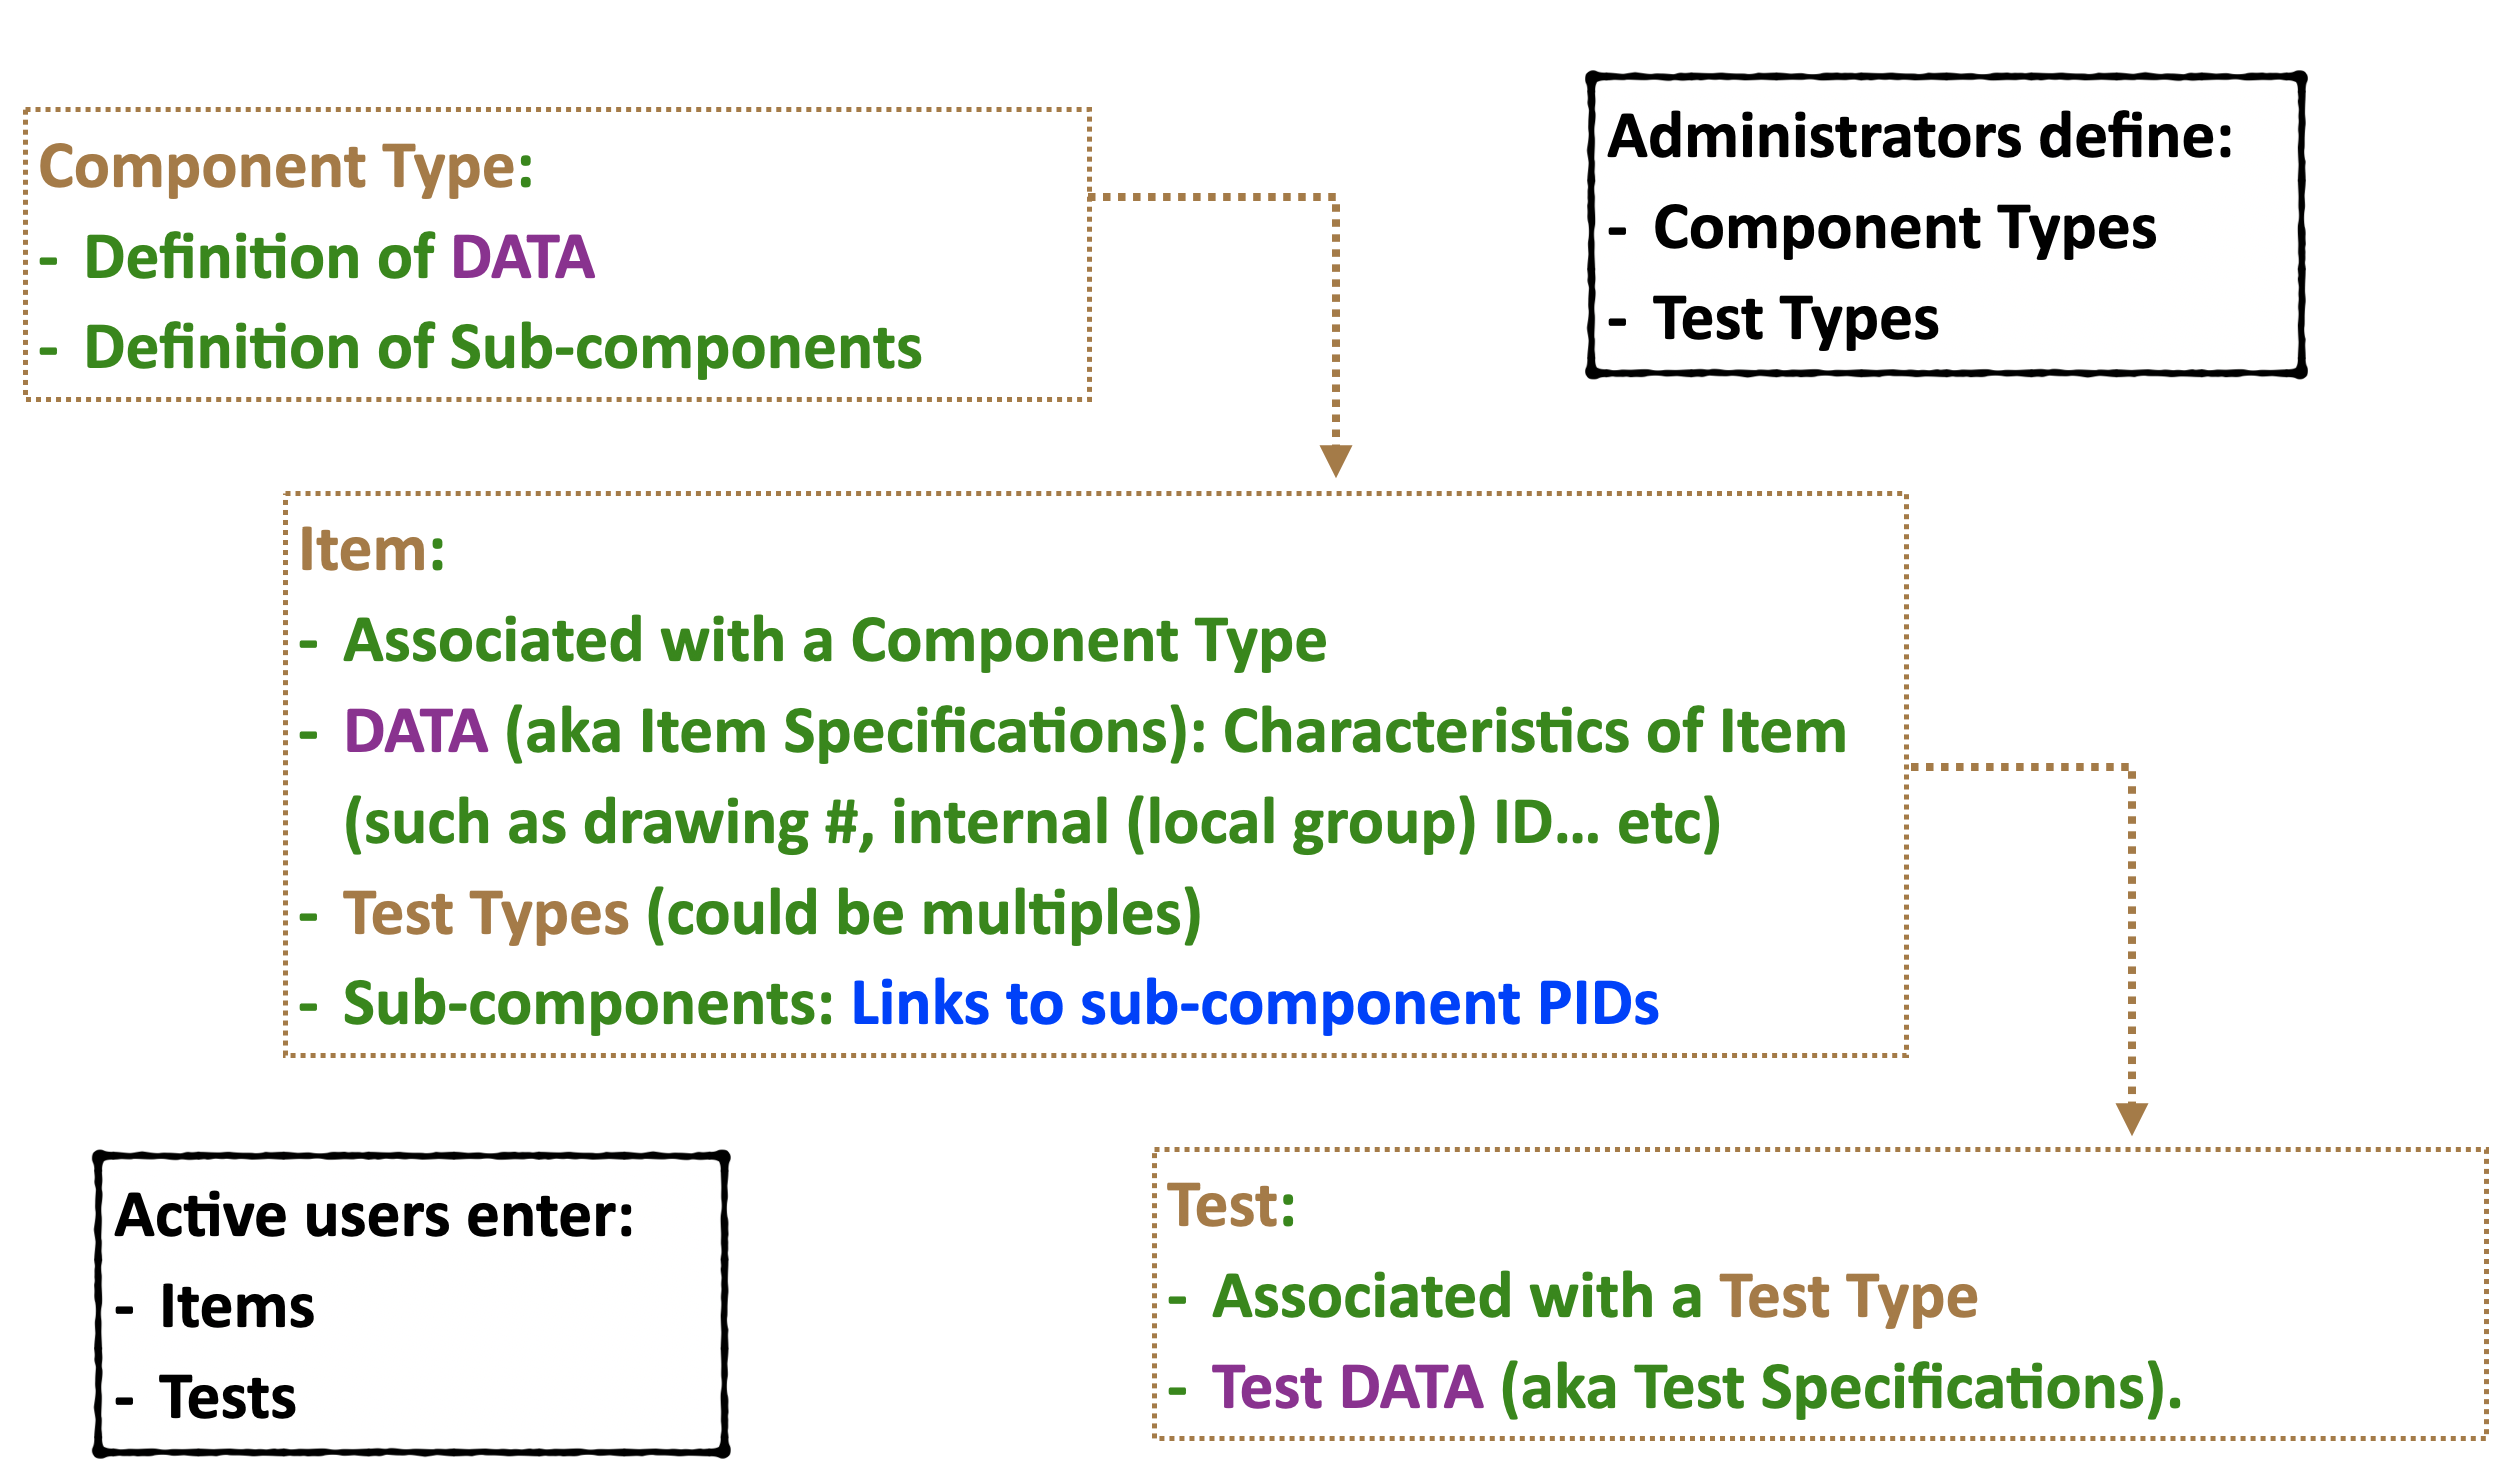
Very simplified DB schema
The picture below shows a very simplified DB schema, in which one can see that Administrators define Component Types, Sub-component Types, and Test Types, while ordinary (active) users enter data and Test data.
For the remaining of this session, we will go through how Administrators achieve these tasks in two different ways:
- WEB UI: user-friendly, intuitive, probably one wouldn’t want touse this method for repetitive tasks.
- REST API: executed from command-line or communicated directly from your preferred programs.
WEB UI
One can access to the two versions of the HWDB from these addresses.We will use the development version in this session.
Production version : https://dbweb0.fnal.gov/cdb/login/sso
Development version: https://dbweb0.fnal.gov/cdbdev/login/sso
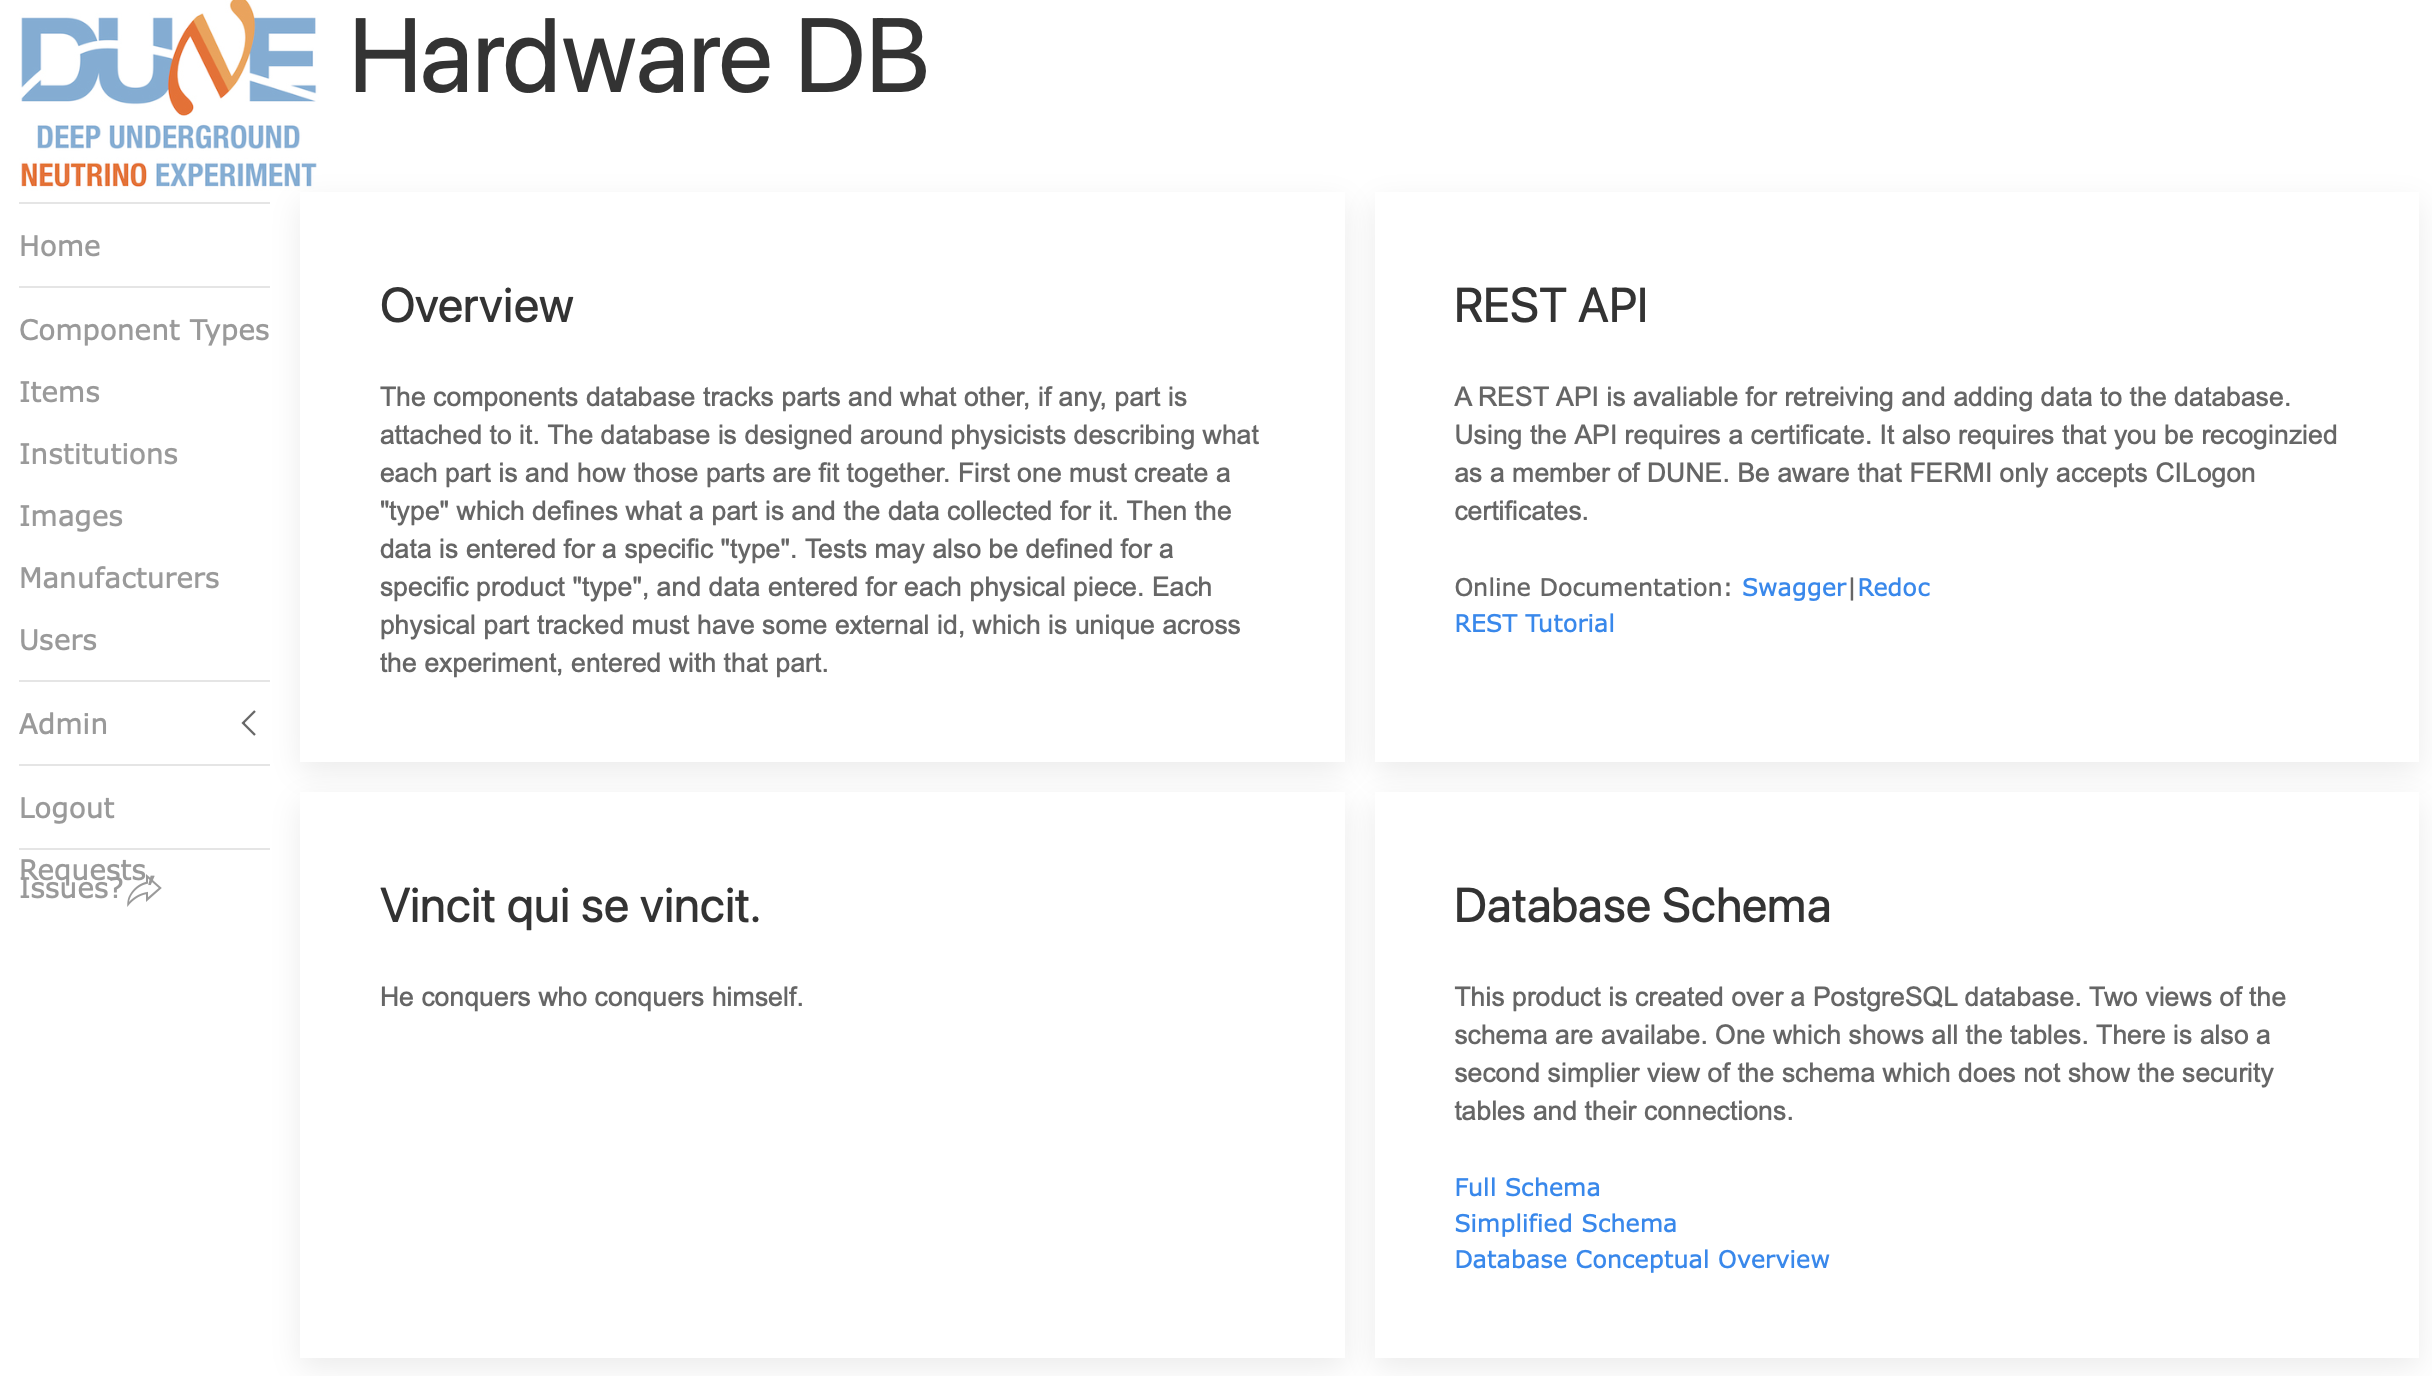
Go ahead to log into the development version. Once logged in, you should be seeing the opening page like below:
Going through the hierarchy of IDs
In the previous session, we introduced a several different types of IDs:
Project, System ID, Subsystem ID, and Component Type ID.
With the WEB UI, one can go down (and up) such hierarchy of IDs easily.
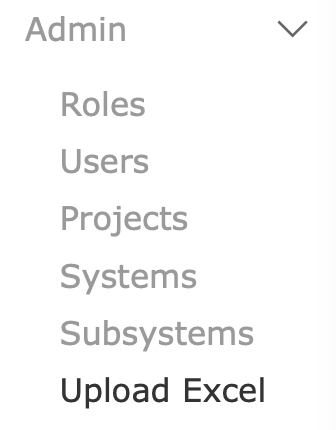
Click Admin in the side-menu. It will show a sub-menu as shown here. One can select any of the three, Projects, Systems, or Subsystems to get into each of these lists.
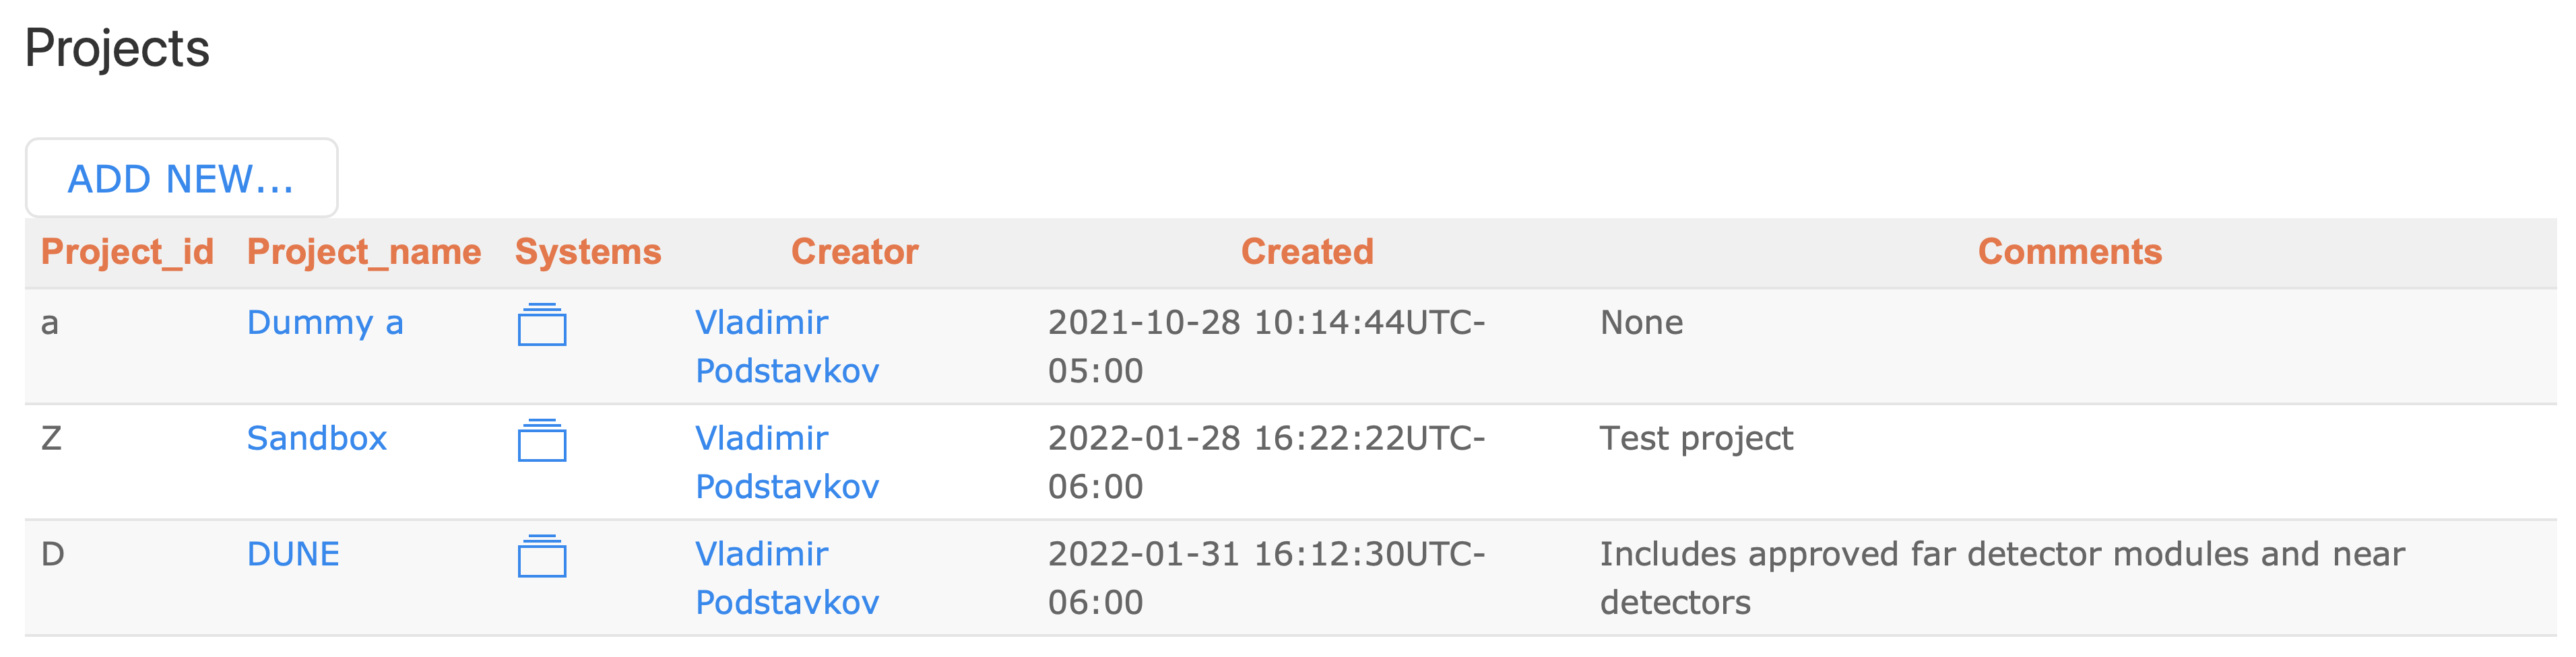
Let’s start with the root by clicking Projects in the above sub-menu. You should be seeing a list of currently available Projects in the HWDB like this:
Now let’s click the folder in the DUNE row & Systems column. This will show a list of Systems (individual System names along with System IDs) that correspond to the DUNE project as shown below:

Similarly let’s display a list of Subsystems of the System, FD2-VD HVS by clicking its folder icon. You should be seeing a Subsystem list like shown below:

By the way, in these lists we have seen so far (currently Subsystems), one can also click individual name (i.e., Subsystem name) to see the corresponding definition. We’ll come back to this shortly.
Now let’s pick a Subsystem, Field Cage Spacer Bar and see a list of its Component Types by clicking its folder. You should be seeing a list of Component Types shown below:
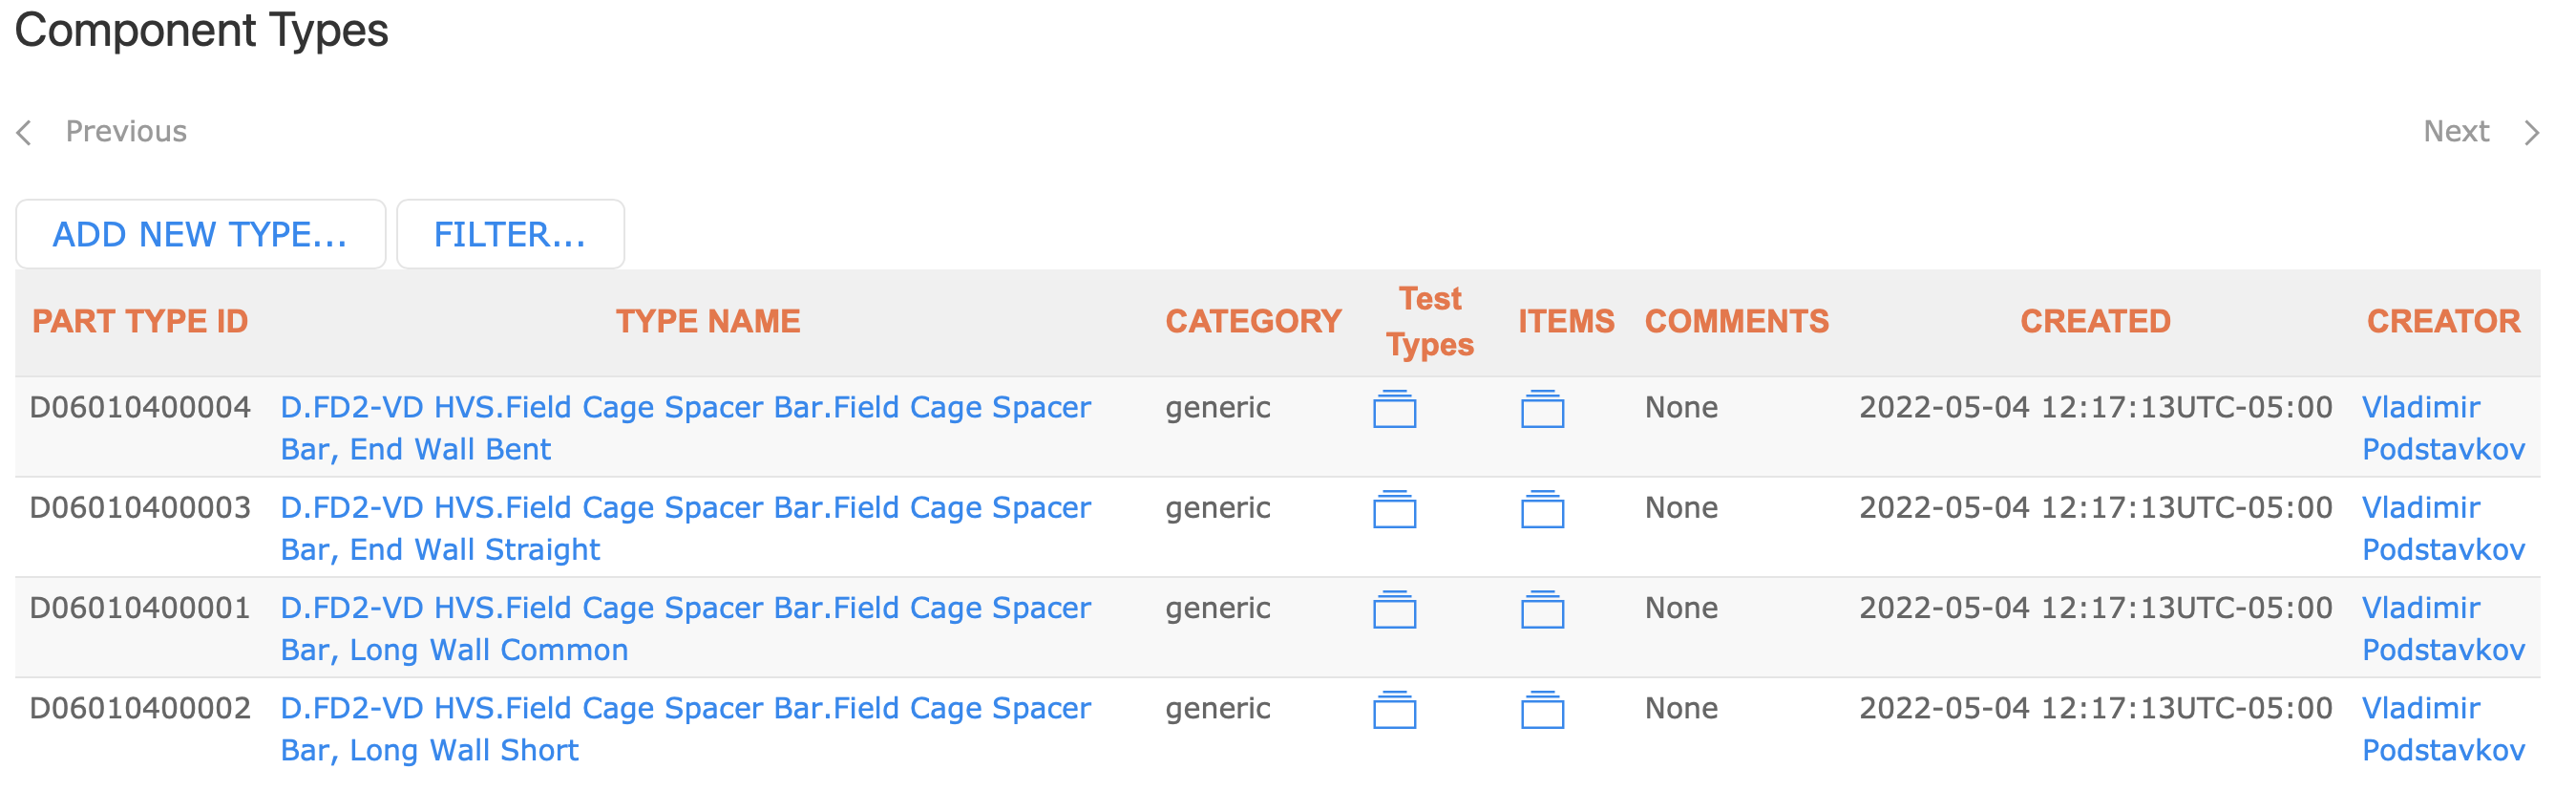
Four Component Types for Field Cage Spacer Bar are seen. In this list one can click the ITEMS or Test Types columns to see a list of the corresponding Items or Test Types, if it exists, respectively.
Defining a Component Type
Now that we can go through the hierarchy of existing IDs, let’s edit one of the existing Component Types.Pick one that you like to modify. As an example, we’ll modify the Component Type, CPA Parts FR4 bottom frame (type id = Z00100100017) here.
First, let’s find the Component Type.
From the side menu, click Component Types and then click FILTER….
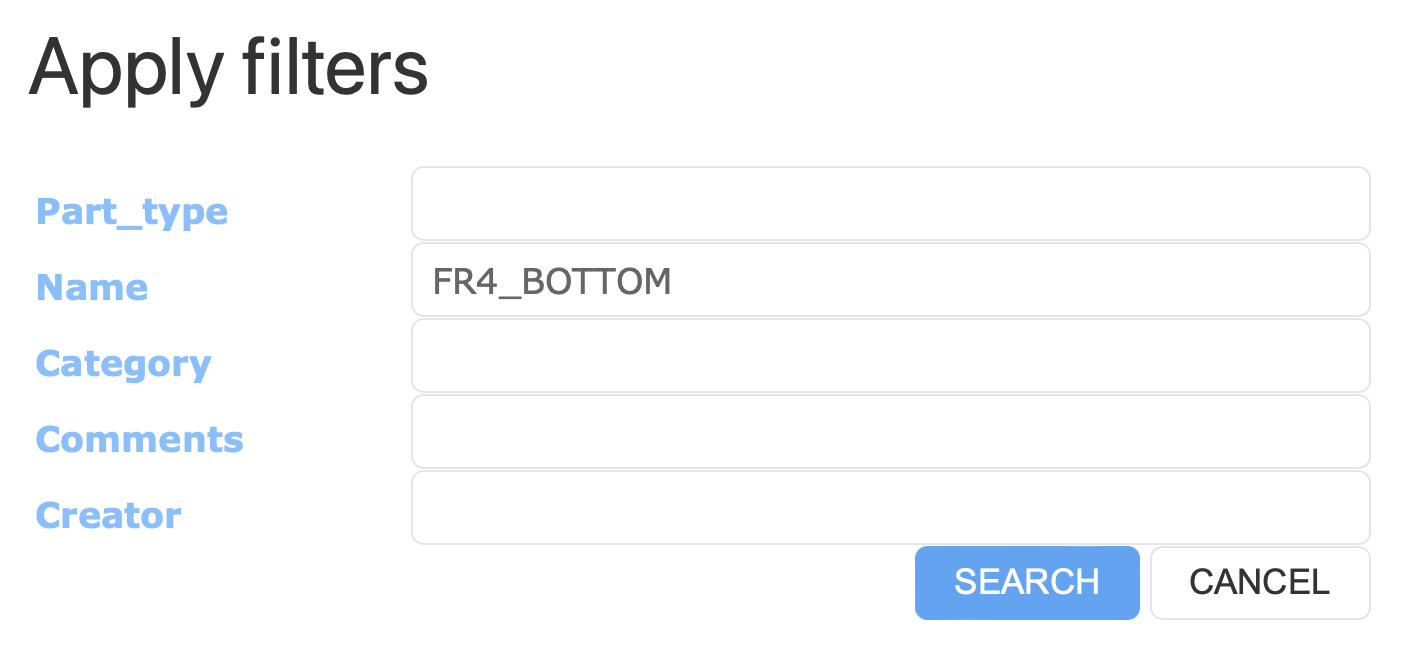
In the Apply filters window, you can provide the corresponding type id to the Part_type field, if you already know the type id you are looking for.
You could also provide a part of the Component Type name, like FR4_BOTTOM to Name field as shown below. It is case-insensitive here. Now hit the SEARCH button.
After filtering the Component Type list, you should be seeing the type you were looking for.
Clicking its TYPE NAME should display its definition as shown below:
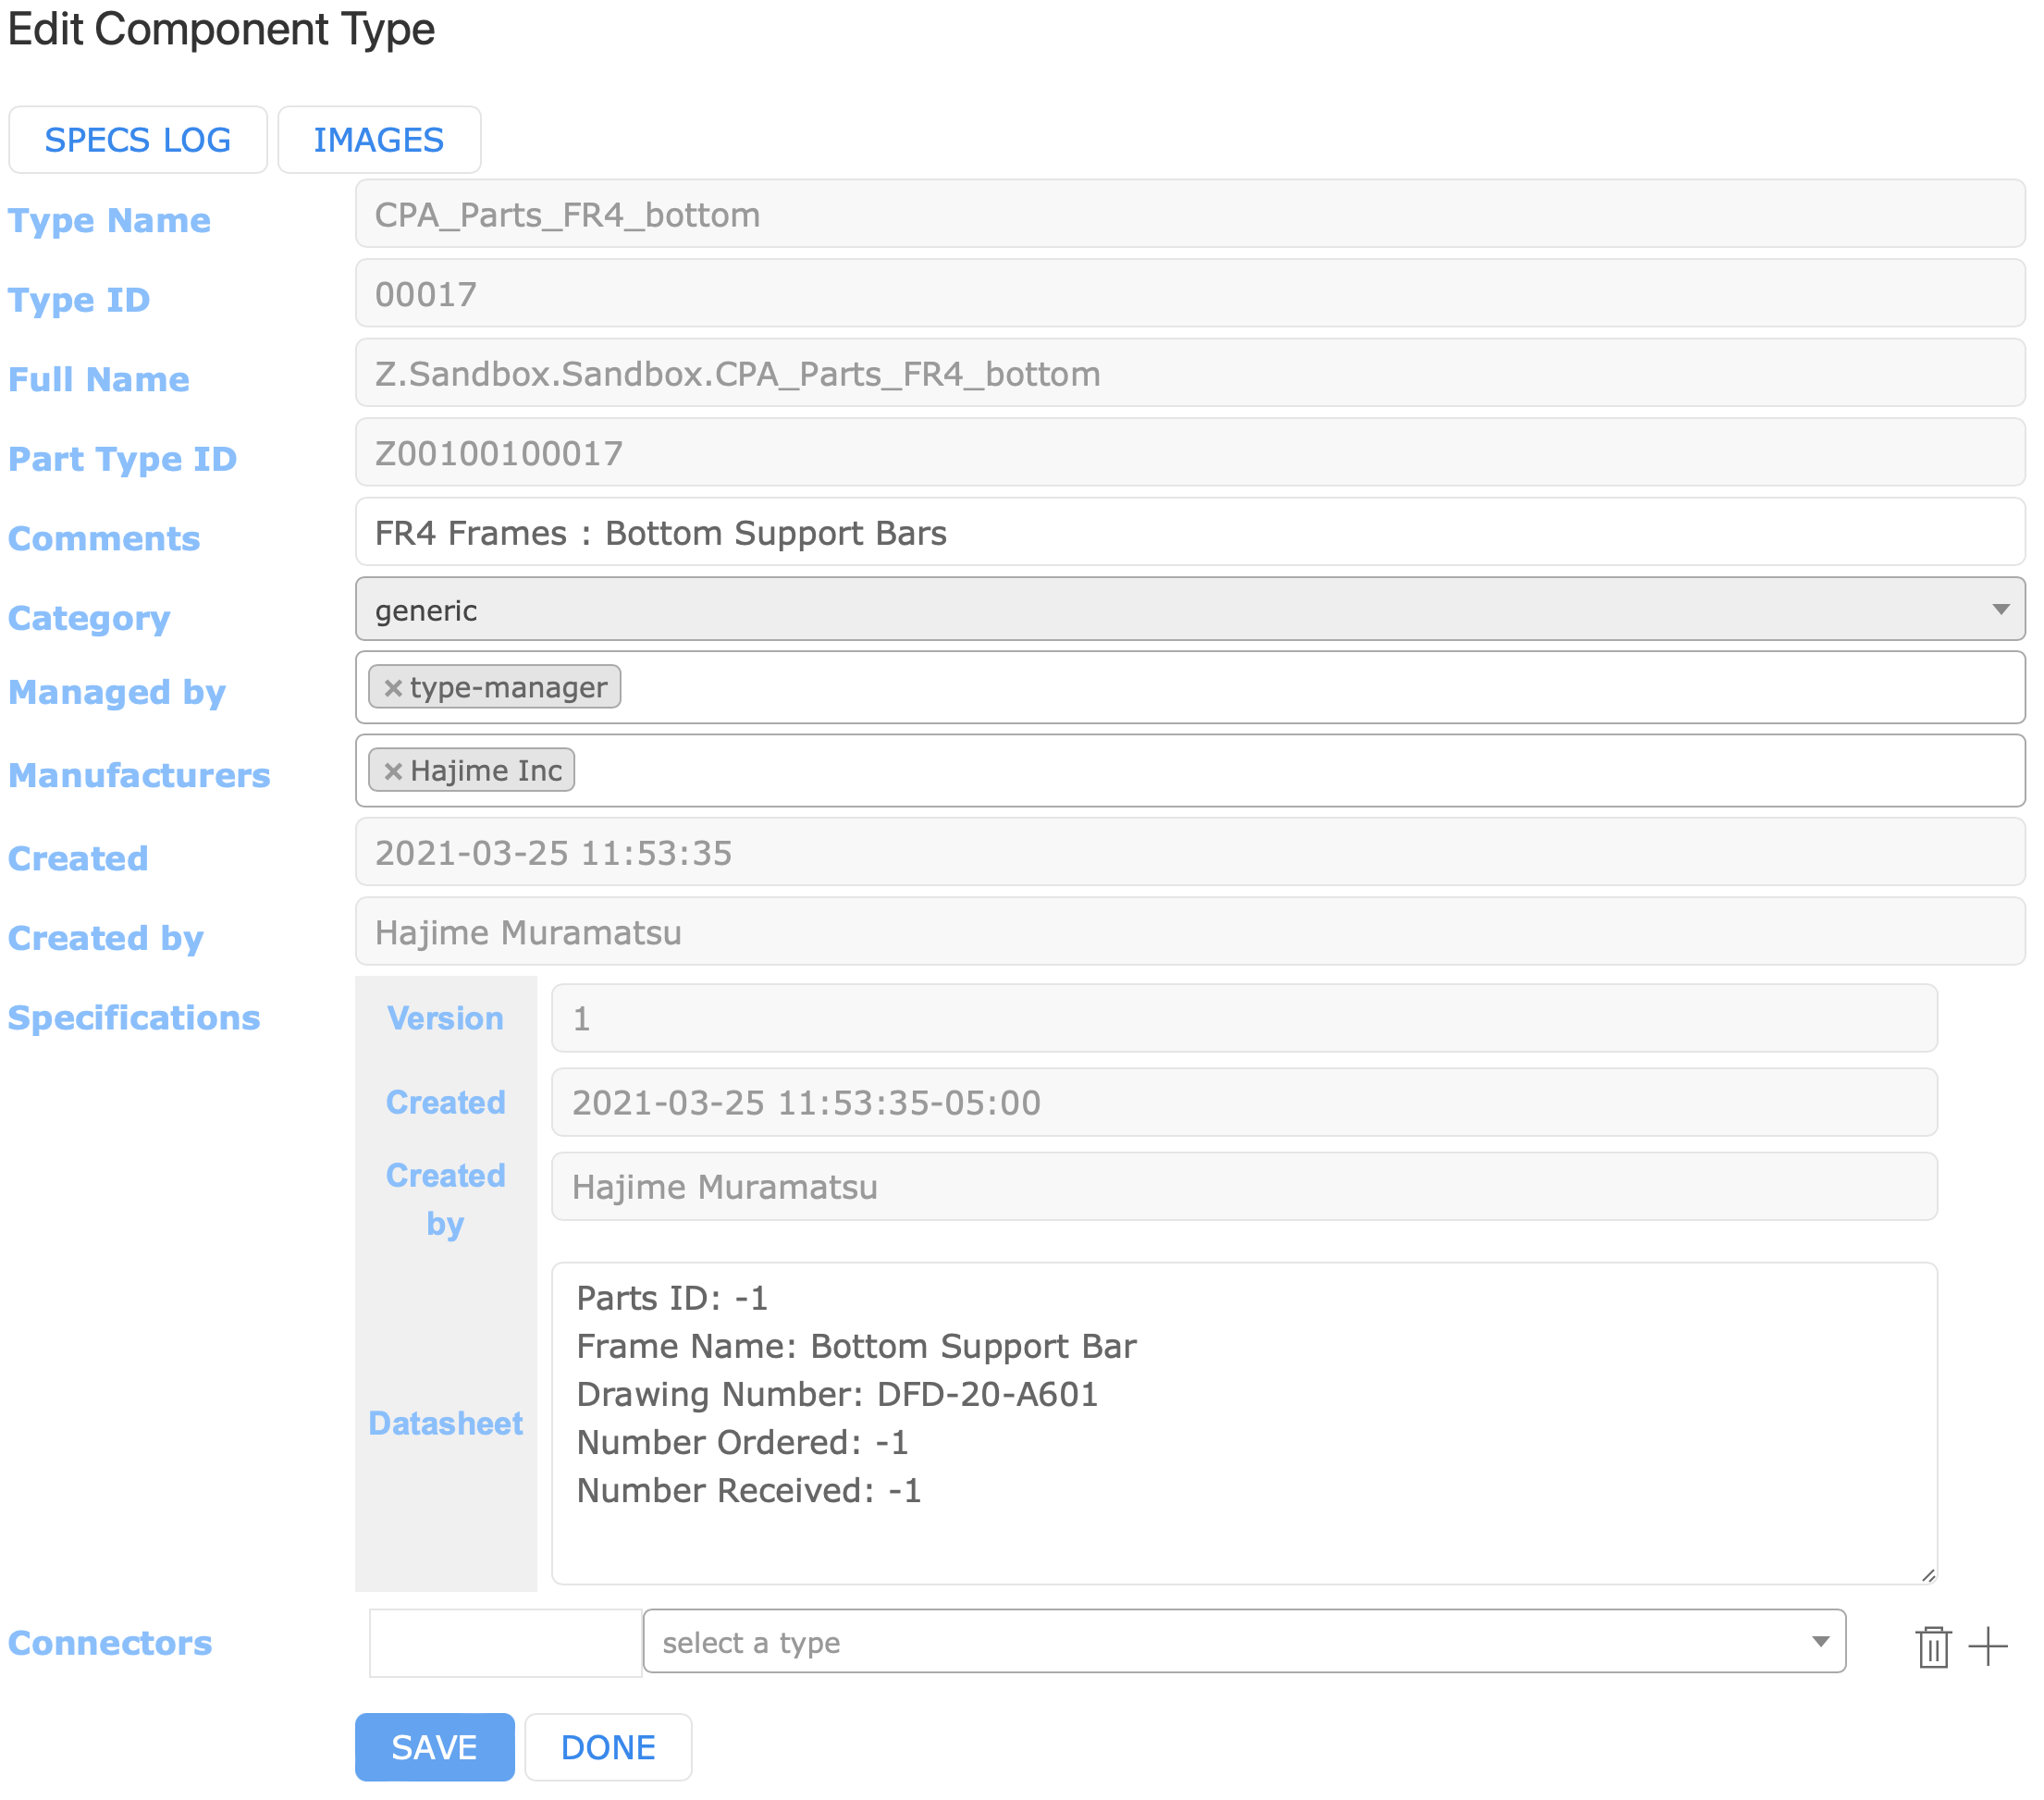
Some of the fields are in gray, indicating that you are not allowed to edit them, such asType Name, Type ID, Full Name, Part Type ID, Created, and Created by… etc. Here Full Name is a name that combines the all id names together:
- Project = Z
- System name = Sandbox
- Subsystem name = Sandbox
- Component Type name = CPA_Parts_FR4_bottom
We’ll now go through the rest of the fields/button now: Managed by, Manufacturers, Specifications, Connectors, and SPECS LOG.
Managed by (a required field)
In Managed by field, we provide a specific Role or Roles which behaves as an access restriction to this particular Component Type. That is, by providing a specific Role, only users who are assigned to that specific Role are allowed to create/edit the corresponding Items.
Where can we see a list of available Roles and how can we create a new one?
Again, from the side-menu, click Admin and then Roles. You should see a list of existing Roles like shown here:
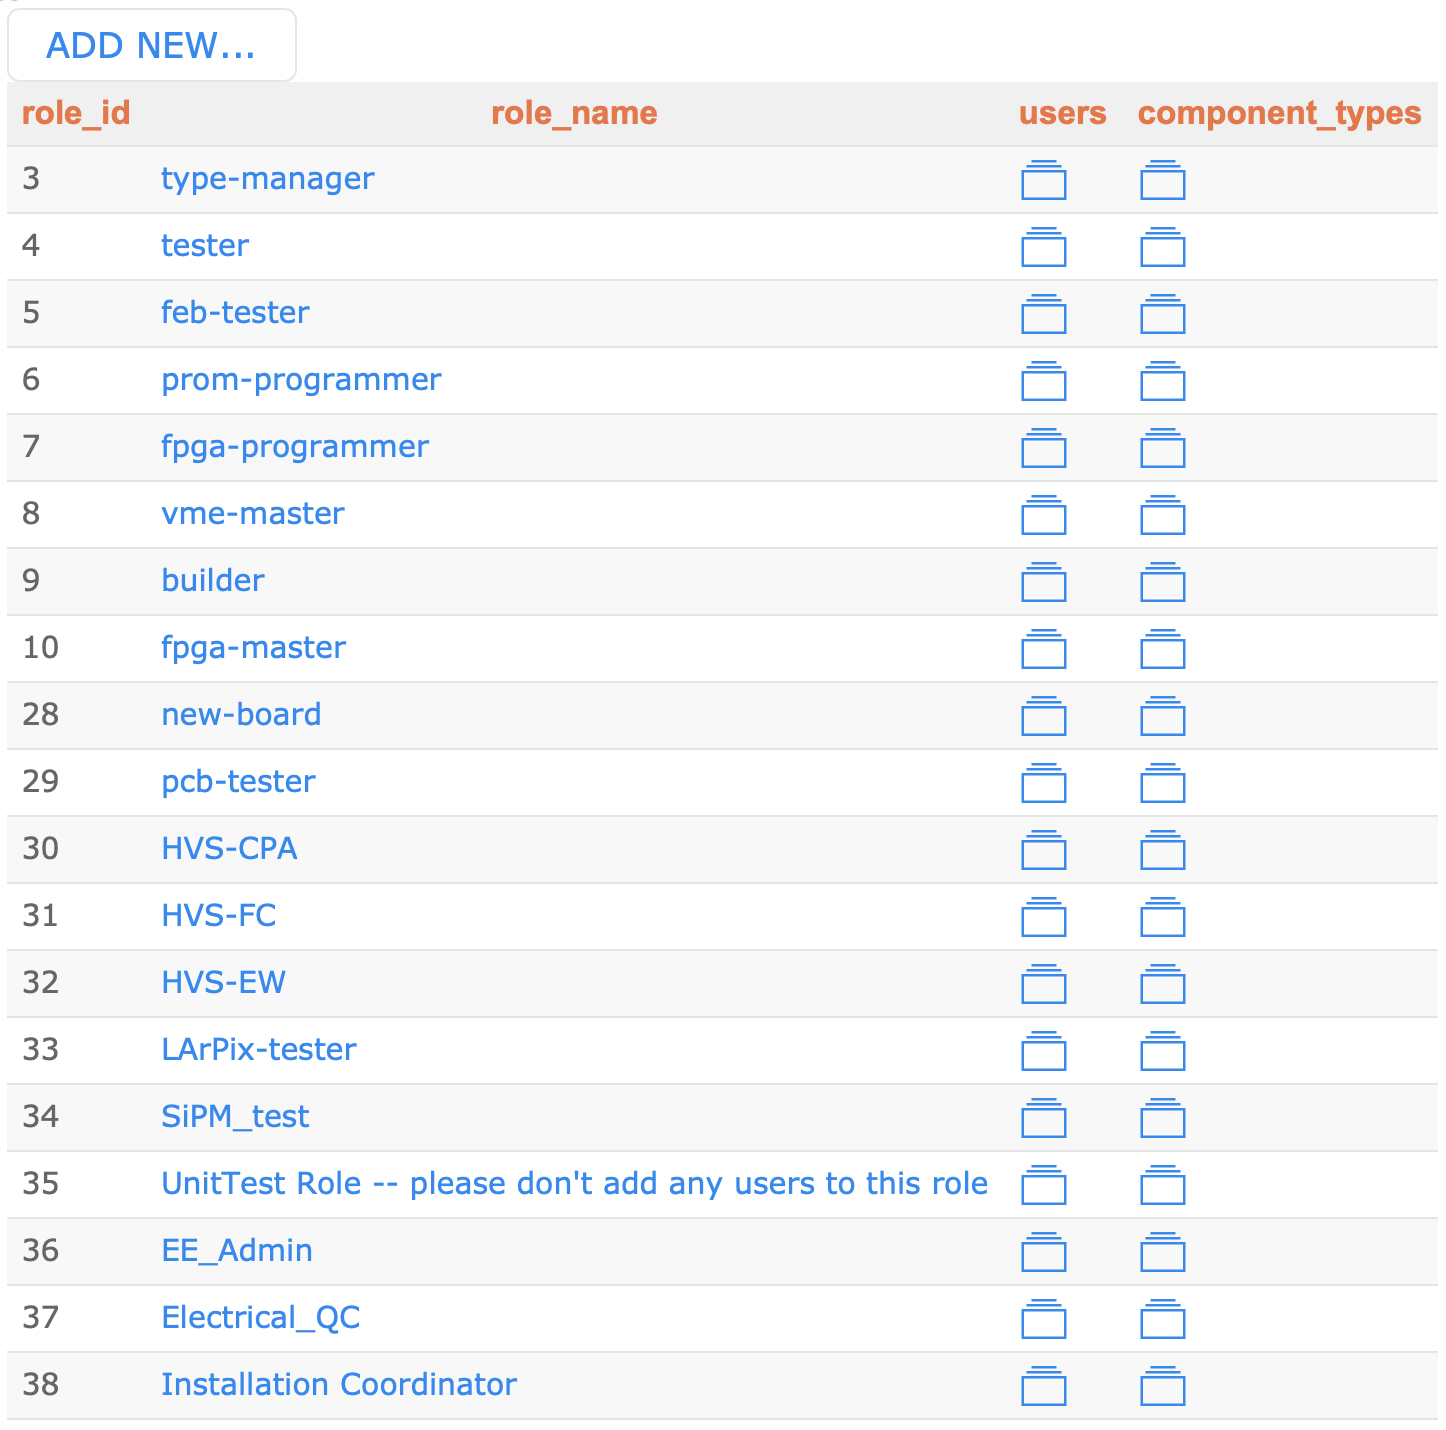
Only users with the Administrator privilege can create a new Role by clicking ADD NEW….
Similarly one can find out what Roles each user has been assigned to.
Clicking Admin from the side-menu and then go to Users. This shows a list of the all available users.
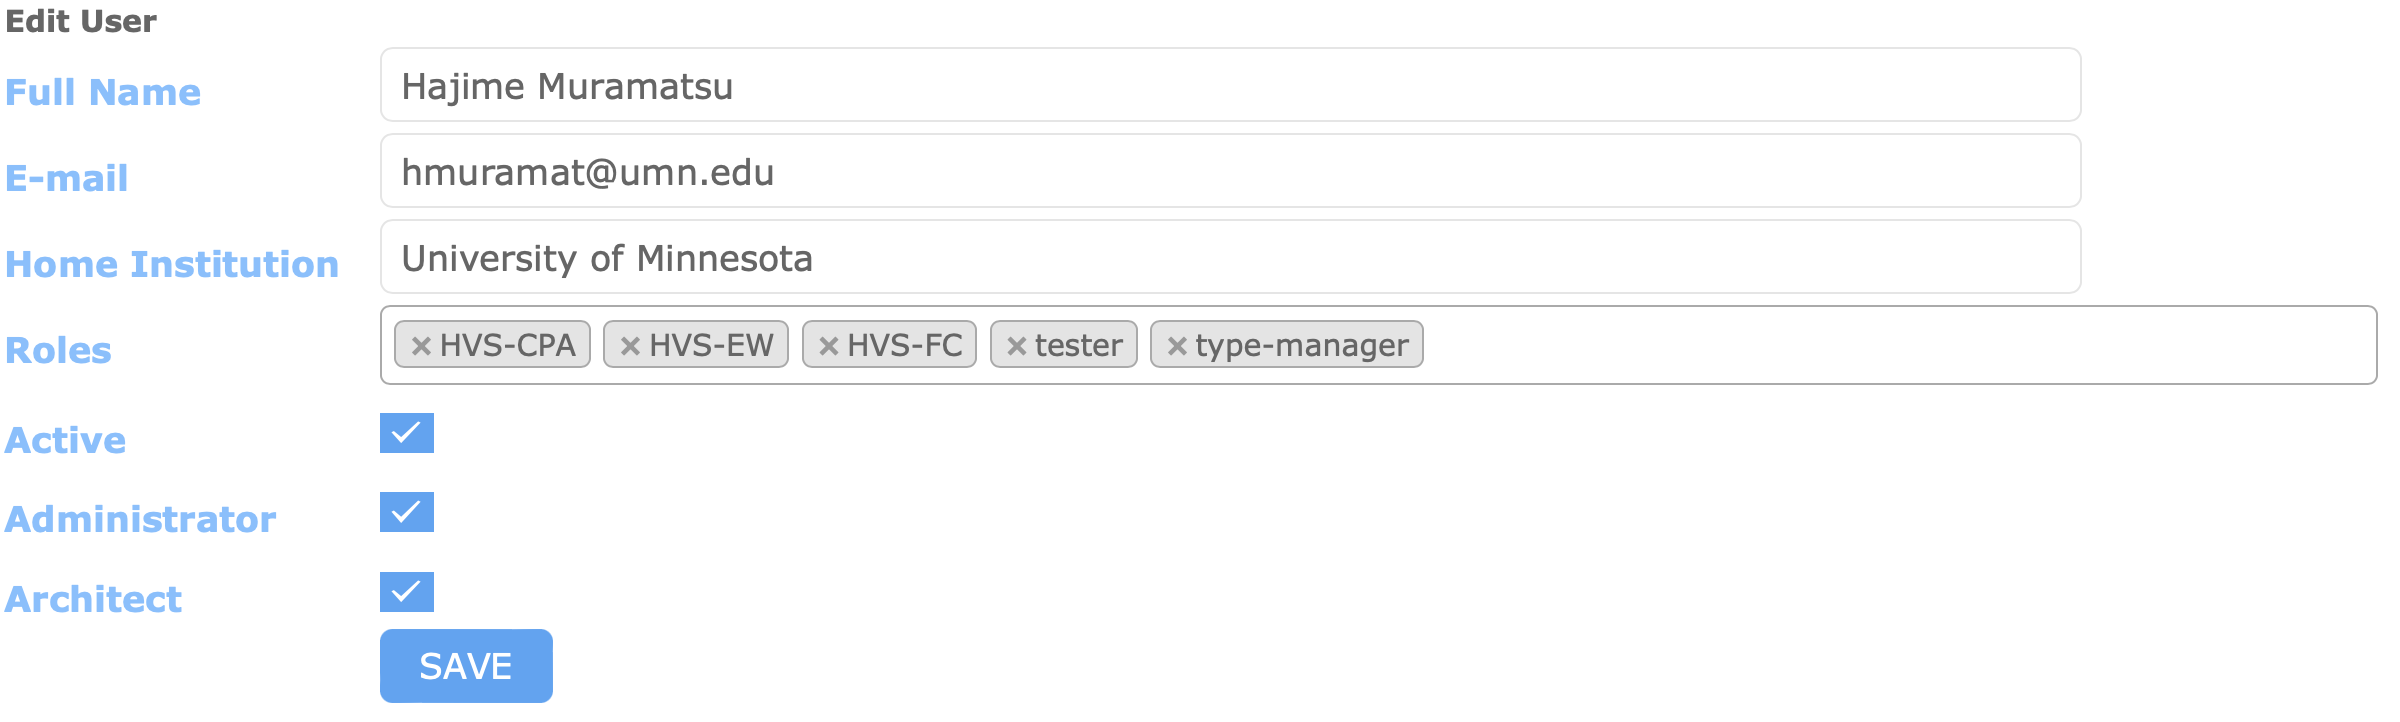
Clicking full_name shows information of the individual user like shown here in which one can see what Role(s)
the user has been assigned to:
 back to top
Manufacturers (an optional field)
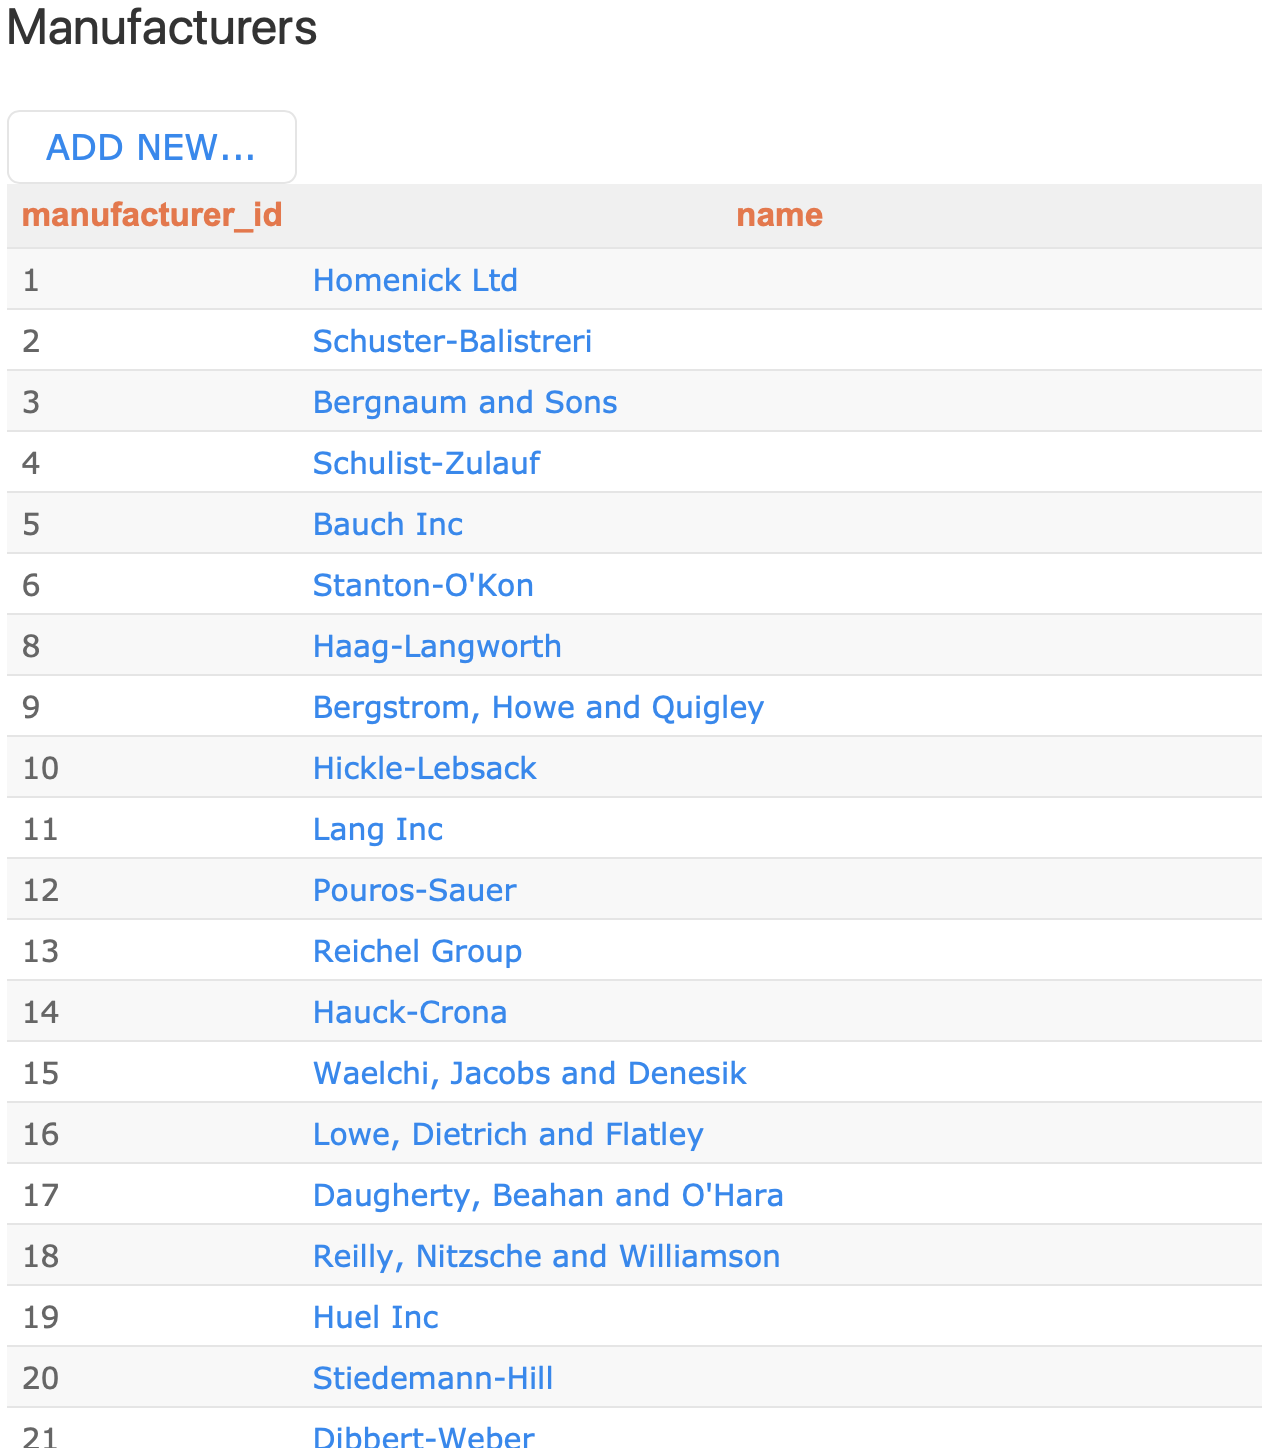
Just like Roles, we assign Manufacture(s) from its available list.
The list can be reached by going to Manufactures from the side-menu.
Again only Administrators can edit the list.
 back to top
Specifications (a required field)
Let’s now fill the field, Datasheet under Specifications. This is probably the most important field in defining a Component Type definition.
Users may provide information in Specifications of an Item, that uniquely identifies each of the corresponding Items. Database schema for Specifications can be provided by YAML, a human-friendly data serialization language for all programming languages. It has typically a form of;
Key : Value
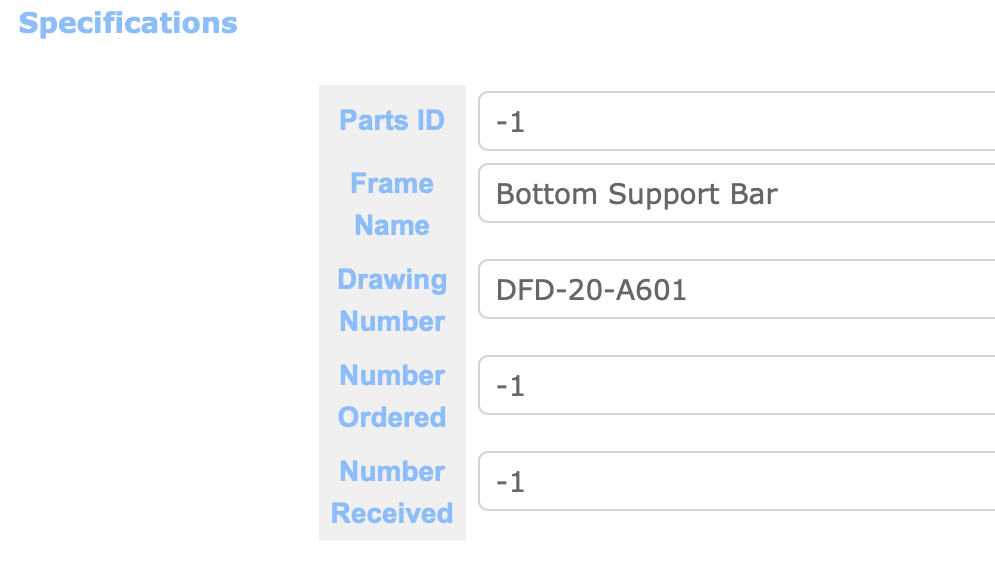
Value could be numbers, strings, null, list, array, or even an empty array. For instance, if you define a Specifications like the following;
 Parts ID: -1
 Frame Name: Bottom Support Bar
 Drawing Number: DFD-20-A601
 Number Ordered: -1
 Number Received: -1
then when you create an Item (in the next session) you will have boxes that are filled with their initial valies as shown below:
You could also provide an empty array, like [ ]. In this case, you could provide data for this array in any scheme, which might sometimes be useful.
You could also provide options like the following;
 AR: []
 Gain:
  - T1
  - T2
 Size: null
 Type: null
so that when you create a new Item, it will let you select predefined optional values as shown below:

Quiz
Can yo provide a Specifications that has nested Keys?
Connectors (an optional field)
In the Connectors section, one can provide Type IDs of sub-Components, defining relations among different Component Types. For instance,
an assembly is a Component Type that is constructed from other sub-Component Types.
E.g., A Component Type, CPA Plane, is made of a pair of sub-Component Types, CPA Panels. By the way, from the view of one of the sub0Component Types, the current Component Type you are editing would be then its parent Component Type, forming a hierarchical structure : Parent Component Type ⟷ Current Component Type ⟷ sub-Component Type(s).
Suppose, we have 3 Component Types: Front Axle, Left Wheel, and Right Wheel. And let’s just that Front Axle is made of two sub-Component Types, Left and Right Wheels.
Furthermore, Type IDs for these 3 Types are:
- Type ID = Z00100400005 for Front Axle
- Type ID = Z00100400007 for Left Wheel
- Type ID = Z00100400008 for Right Wheel
Now let’s start to define Type IDs of these two sub-Components. Again, we want Left & Right Wheels to be sub-Components of Frot Axle. Go to the Component Type definition page of Front Axle and find the Connectors section at the bottom.
To add a new sub-Component Type ID, click + icon. It will ask you to fill out two empty boxes in a single row. In the first one, provide a functional position name. This name needs to be unique within this Component Type, such as ASIC-001, SMB00008-S13360.. etc. For us, let’s call this 1st sub-Component as My L Wheel.
For the 2nd empty box, you need to provide the actual existing Component Type name. Entring 2 characters would trigger the HWDB
to look for and display them for you, as can be seen below (be careful that the entered characters here are case-sensitive):
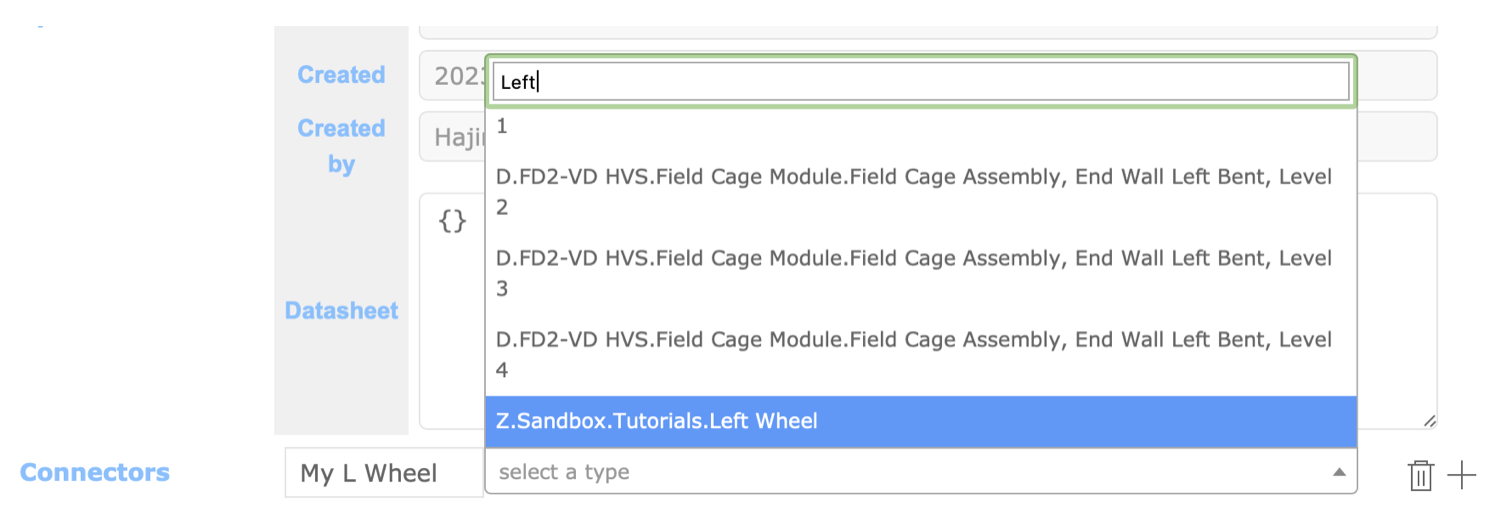 Pick the Left Wheel there.
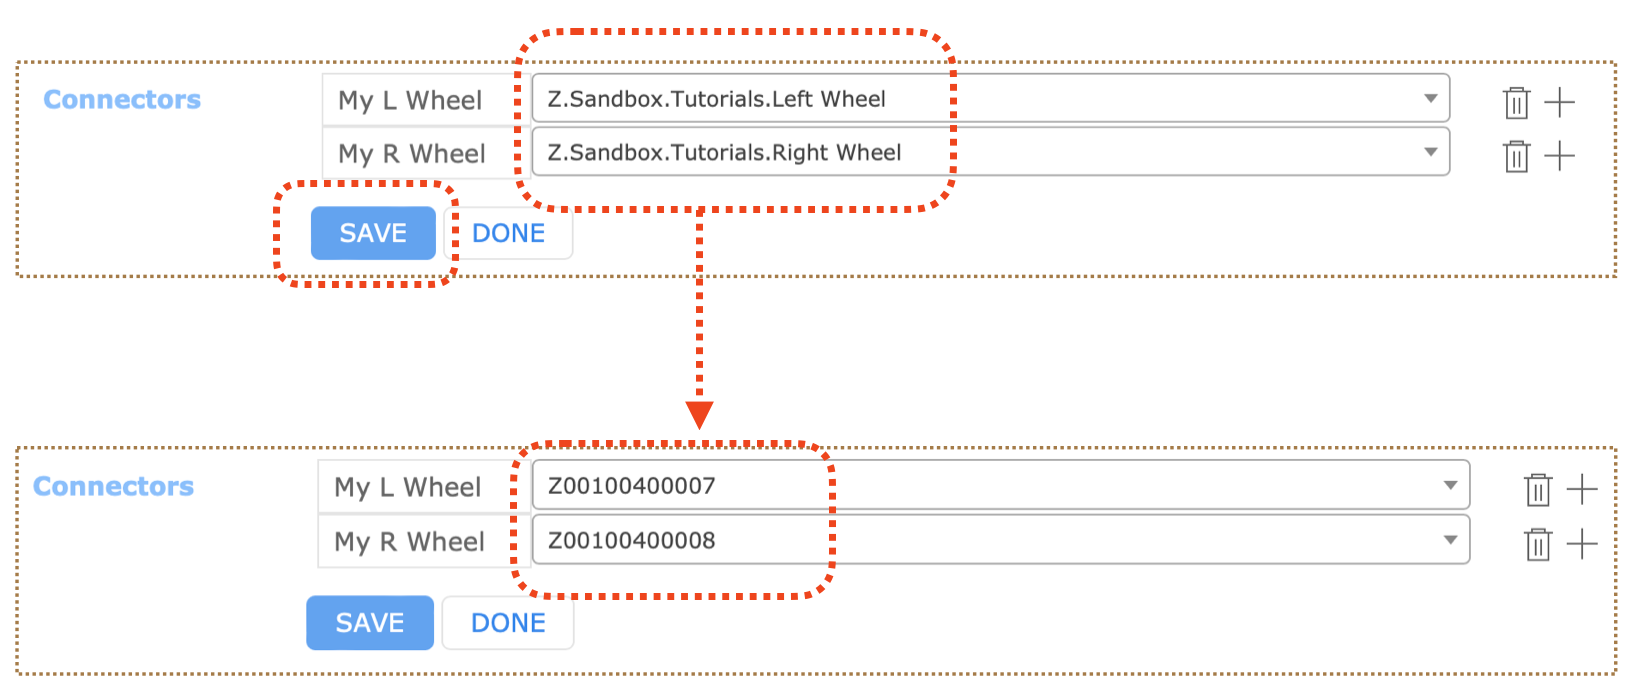
Next, click the + icon again and setup similarly for the Right Wheel. And once you are done with the two Types,
click SAVE. The HWDB then converts the two provided sub-Component Type names to the corresponding Type IDs as shown below:
CAUTIONS!!
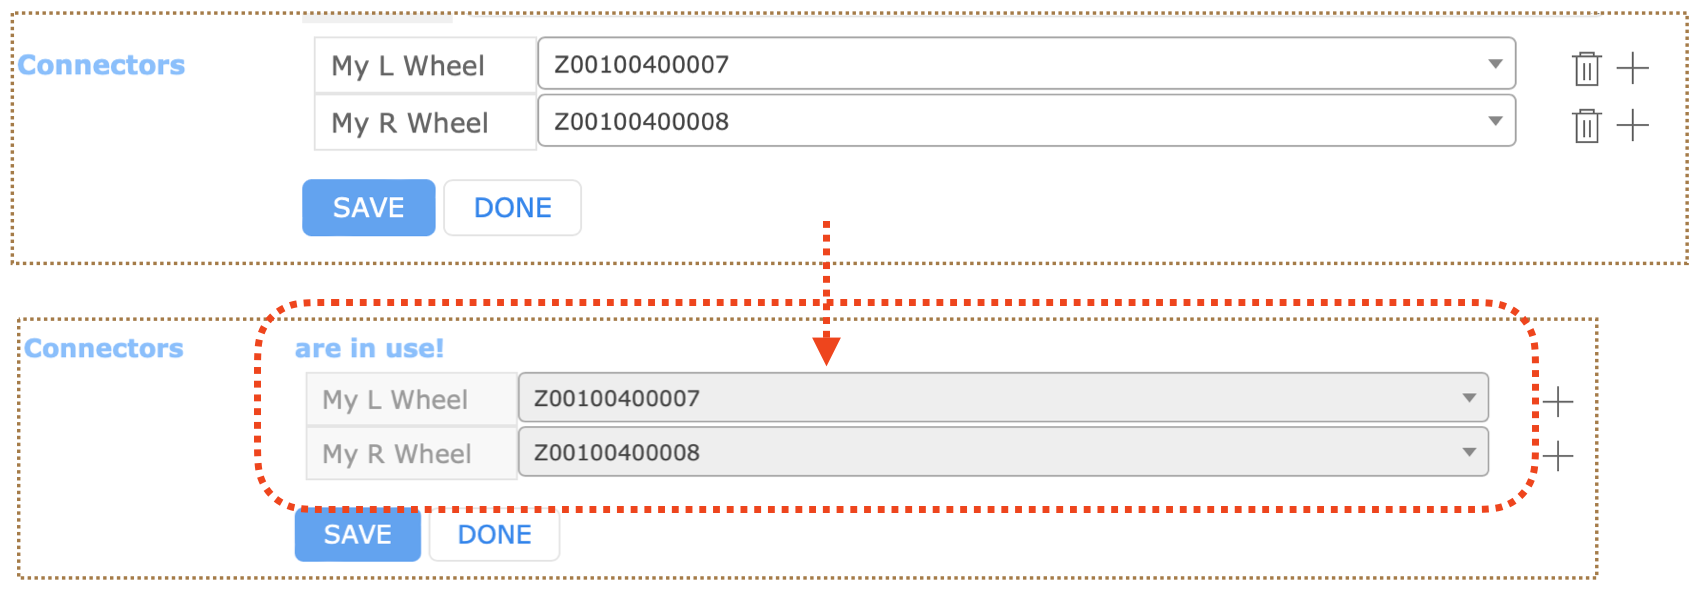
Once you define these sub-Component Types and start to actually use them (i.e., linking existing Items as sub-Components; we will do this in the next session), you will not be allowed to delete or edit those existing sub-Component Types. Else there could be inconsistencies between modified (updated) Component Type definitions and pre-existing Items that are linked.
Because of this, the sub-Component Type definition will be frozen once the corresponding Item(s) is linked as shown below:
Nevertheless, you are still allowed to add new sub-Component Types by clicking the + icon.
If you absolutely need to delete or edite the existing sub-Component Type definition(s), you can do so once you undo (delete) the all existing sub-Component links in the corresponding Items.
SPEC LOG
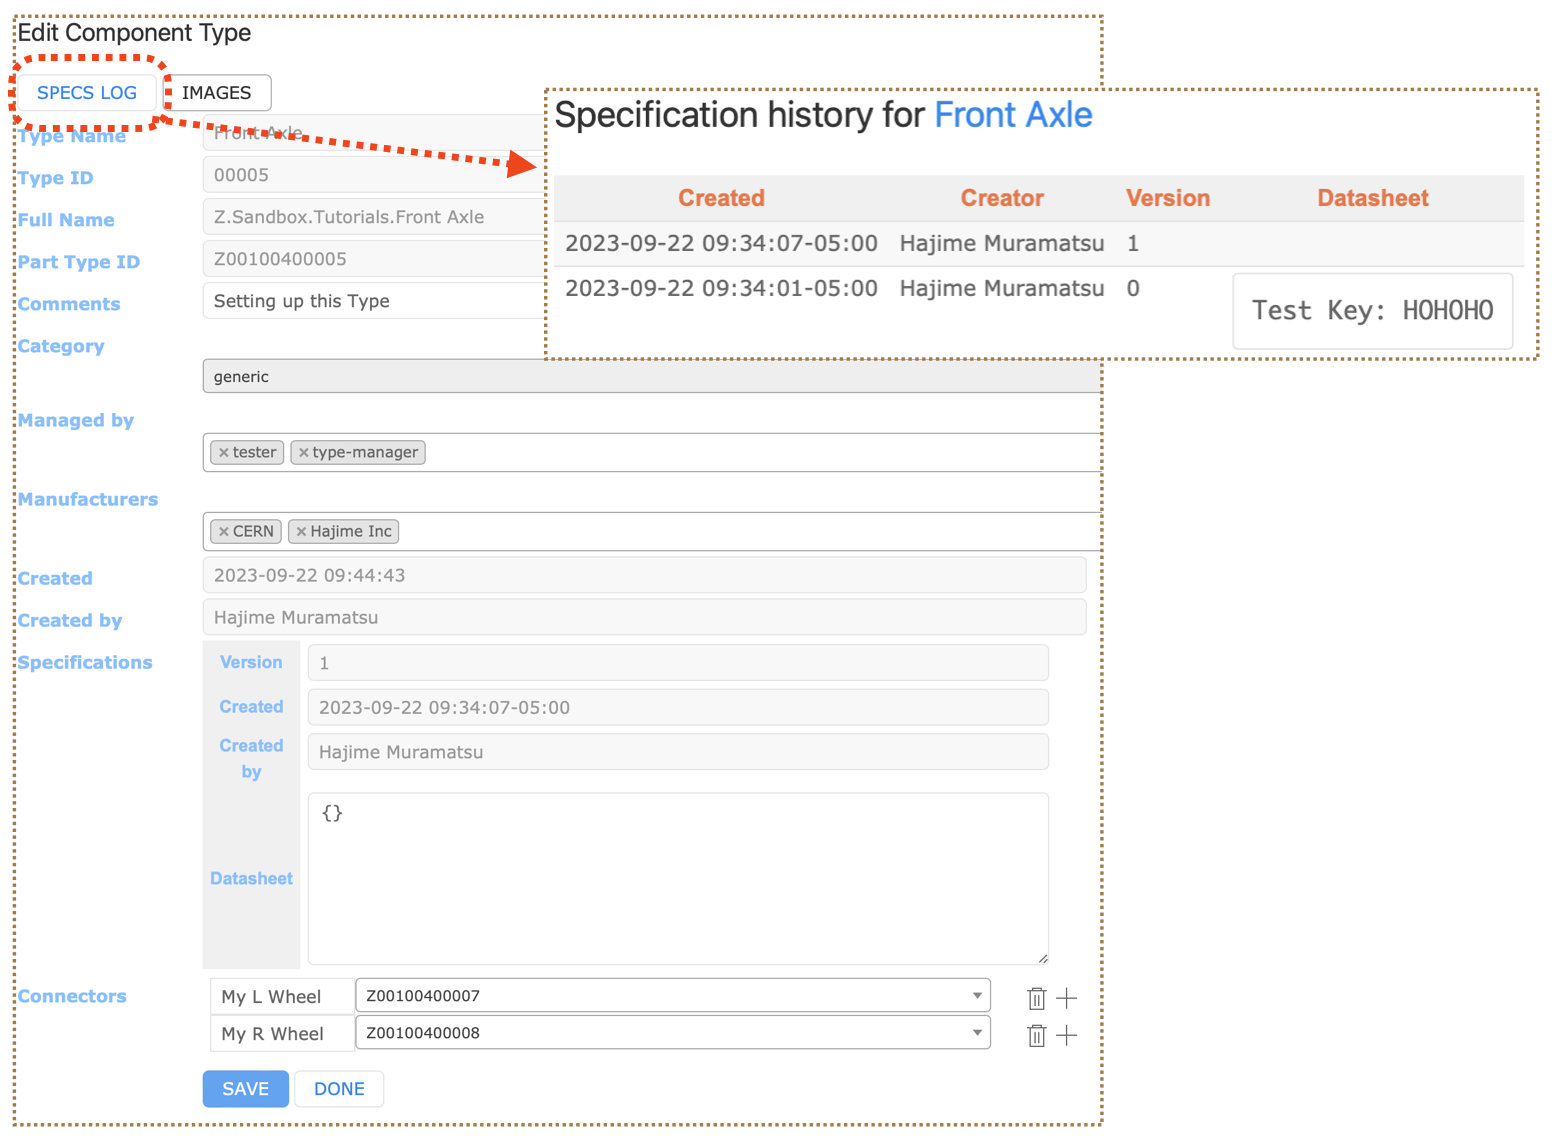
In a typical Component Type definition page, there is a tab-button, SPECS LOG at the top.
Clicking it will take you to a page, where you can see a history of modifications on that Component Type Specifications.
This could be useful not only when you need to look at the historical changes, but if you need to roll-back your Specifications definition.
Defining a Test Type
Now let’s define a Test Type, which essentially defines the DB schema for the data you store at the HWDB, such as QC test results. Also remember that we could have multiple Test Types for a given Component Type.
The procedure is very much similar to what we have done to define a Component Type.
Let us employ the Component Type, CPA_Parts_FR4_bottom, as an example again.
To find that Component Type, select Component Types from the side-menu, then click FILTER….
In the pop-up window, Apply filters, provide “CPA_Parts_FR4_bottom” in the Name field and hist SEARCH.
Click the folder in the Test Types column. You should be seeing a list of available Test Types for this Component Type as shown below:
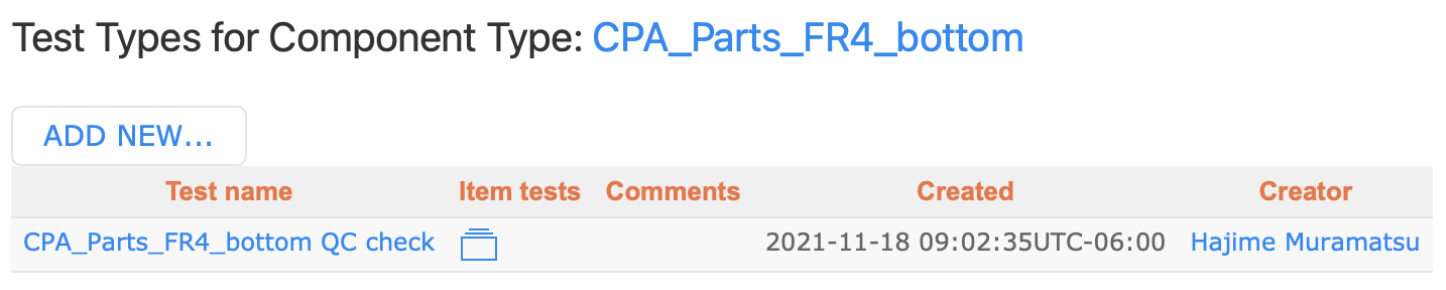
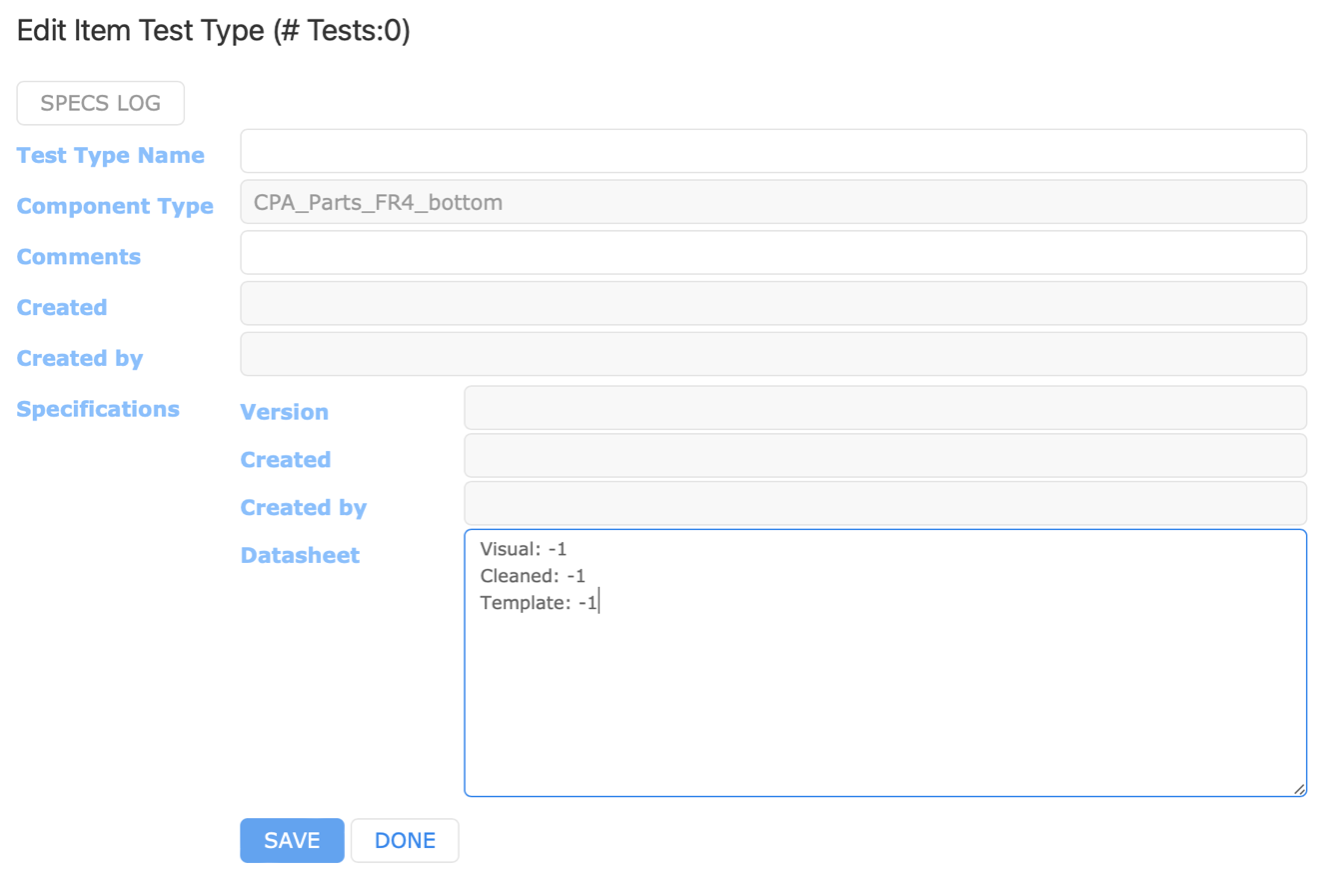
Click ADD NEW… to create a new Test Type definition. This will bring a screen like the one below.
You must provide a Test Type name, which needs to be unique within its Component Type.
Again, its Specifications should be provided in YAML. Once you are done, don’t forget to hit SAVE.
REST API
Let’s try everything we have done so far in this session through the REST API of the HWDB. We will extensively employ the alias and the variable, APIPATH, that we defined in Setup. Just to remind what they were:
 alias CURL='curl --cert-type P12 --cert usercred.p12:PassWord'
 export APIPATH='https://dbwebapi2.fnal.gov:8443/cdbdev/api/v1'
Notice that the APIPATH points to both the version v1 of the API and the development version (cdbdev). If you like to access to the production version, it should be cdb, instead of cdbdev.
Please also be aware that, while we will cover API endpoints that are essential in this session, we will not cover the all available endpoints. For a complete list of endpoints, please refer to the online documentation Redoc as well as the Swagger site in which users can try the REST API endpoints interactively.
Going through the hierarchy of IDs with the REST API
With the API, it is easy to obtain lists of available Projects, Systems, Subsystems, and Component Types.
GET a list of Projects
The endpoint to get a list of Projects is simply /projects as shown below.
CURL "${APIPATH}/projects" | jq
And here is the response in JSON. As can be seen, two projects current exist in the HWDB.
{
  "data": [
    {
      "comments": null,
      "created": "2021-10-28T10:14:44.215630-05:00",
      "creator": {
        "id": 3,
        "name": "Vladimir Podstavkov",
        "username": "podstvkv"
      },
      "id": "a",
      "name": "Dummy a"
    },
    {
      "comments": "Includes approved far detector modules and near detectors",
      "created": "2022-01-31T16:12:30.338331-06:00",
      "creator": {
        "id": 3,
        "name": "Vladimir Podstavkov",
        "username": "podstvkv"
      },
      "id": "D",
      "name": "DUNE"
    },
    {
      "comments": "Test project",
      "created": "2022-01-28T16:22:22.319197-06:00",
      "creator": {
        "id": 3,
        "name": "Vladimir Podstavkov",
        "username": "podstvkv"
      },
      "id": "Z",
      "name": "Sandbox"
    }
  ],
  "link": {
    "href": "/cdbdev/api/v1/projects",
    "rel": "self"
  },
  "status": "OK"
}
GET lists of Systems, Subsystems, and Component Types
Similarly one can easily get lists of Systems, Subsystems, and Component Types with the following endpoints:
- List of Systems: /systems/<project_id>
- List of Subsystems: /subsystems/<project_id>/<system_id>
- List of Component Types: /component-types/<project_id>/<system_id>/<subsystem_id>
Quiz
GET lists of Systems, Subsystems, and Component Types for the following cases:
- Obtain a list of Systems for project_id = D
- Obtain a list of Subsystems for project_id = D and system_id = 005
- Obtain a list of Component Types for project_id = D, system_id = 005, and subsystem_id = 20
Defining a Component Type with the REST API
Now let’s define a Component Type. Let’s take the Front Axle (Type ID = Z00100400005) as an example.
The endpoint we need in this case is /component-types/<type_id> Or the actual command-line would look like the following:
CURL -H "Content-Type: application/json" -X PATCH -d @Patch_CompType.json "${APIPATH}/component-types/Z00100400005" | jq
Here;
- we are patching instead of posting as the Component Type must pre-exist (only Architect can create a Component Type)
- Type ID = Z00100400005
- Patch_CompType.json is a file and its contents are shown below:
{
  "part_type_id": "Z00100400005",
  "comments": "Setting up this Type",
  "manufacturers": [7,27],
  "roles": [3,4],
  "properties": {
      "specifications": {
      "Last name": "Muramatsu",
      "First name": "Hajime"
  }
  },
  "connectors": {
  "My L Wheel": "Z00100400007",
  "My R Wheel": "Z00100400008"
  }
}
In this file, you need to provide the followings:
- part_type_id, which is the Type ID = Z00100400005 we are modifying.
- manufacturers can be given in terms of the corresponding Manufacturer-IDs.
- roles similarly can be provided by their IDs.
- specifications holds its schema.
- connectors holds the info of Connectors. You can specify functional position names and sub-Component Type IDs here. Or you don’t need to provide the info and leave it blank (no connectors section) and patch this Component Type later, if you like.
Now let’s GET the Component Type we just patched. The endpoint we need is still the same, /component-types/<type_id>. The actual command-line is like this:
CURL "${APIPATH}/component-types/Z00100400005" | jq
And its response is long, but we show it below for completes.
{
  "data": {
    "category": "generic",
    "comments": "Setting up this Type",
    "connectors": {
      "My L Wheel": "Z00100400007",
      "My R Wheel": "Z00100400008"
    },
    "created": "2024-03-11T04:59:48.503848-05:00",
    "creator": {
      "id": 12624,
      "name": "Hajime Muramatsu",
      "username": "hajime3"
    },
    "full_name": "Z.Sandbox.Tutorials.Front Axle",
    "id": 1058,
    "manufacturers": [
      {
        "id": 7,
        "name": "Hajime Inc"
      },
      {
        "id": 27,
        "name": "CERN"
      }
    ],
    "part_type_id": "Z00100400005",
    "properties": {
      "specifications": [
        {
          "created": "2024-03-11 05:00:22-05:00",
          "creator": "Hajime Muramatsu",
          "datasheet": {
            "First name": "Hajime",
            "Last name": "Muramatsu"
          },
          "version": 6
        }
      ]
    },
    "roles": [
      {
        "id": 3,
        "name": "type-manager"
      },
      {
        "id": 4,
        "name": "tester"
      }
    ],
    "subsystem": {
      "id": 263,
      "name": "Tutorials"
    }
  },
  "link": {
    "href": "/cdbdev/api/v1/component-types/Z00100400005?history=False",
    "rel": "self"
  },
  "methods": [
    {
      "href": "/cdbdev/api/v1/component-types/Z00100400005/components",
      "rel": "Components"
    },
    {
      "href": "/cdbdev/api/v1/component-types/Z00100400005/test-types",
      "rel": "Test Types"
    },
    {
      "href": "/cdbdev/api/v1/component-types/Z00100400005/connectors",
      "rel": "Connectors description"
    },
    {
      "href": "/cdbdev/api/v1/component-types/Z00100400005/specifications",
      "rel": "Type specs"
    },
    {
      "href": "/cdbdev/api/v1/component-types/Z00100400005/images",
      "rel": "Images"
    },
    {
      "href": "/cdbdev/api/v1/component-types/Z00100400005/bulk-add",
      "rel": "Bulk Add"
    }
  ],
  "status": "OK"
}
Inside of the data blob, we see;
- comments
- manufacturers
- roles (Managed by)
- specifications and its version
- subsystem
- connectors
It shows the latest version of its Specifications by default.
If you like to see older version, you could do the following:
CURL "${APIPATH}/component-types/Z00100400005?history=true" | jq
There are other blobs:
- link: shows the href you just accessed.
- methods: shows other API endpoints available that are associated with this Component Type.
- status: reports a status of the access you just made.
Defining a Test Type with the REST API
In a similar manner we can define a new Test Type. The endpoint we need in this case is /component-types/<type_id>/test-types. And again the actual command-line would look like the following:
CURL -H "Content-Type: application/json" -X POST -d @Post_TestType.json "${APIPATH}/component-types/Z00100100046/test-types" | jq
We are posting a new Test Type here. The contents of Post_TestType.json file are shown below:
{
    "component_type": {
        "part_type_id": "Z00100100046"
    },
    "name": "Test_Parts_3_TestType_10",
    "comments": "Testing...",
    "specifications": {
        "Cleaned": 0,
        "Template": 0,
        "Visual": 0
    }
}
You must provide:
- the Test Type name (Test_Parts_3_TestType_10 in this example)
- the Specifications.
Let’s GET a list of the available Test Types for this Component Type, Z00100100046 with the following command-line.
CURL "${APIPATH}/component-types/Z00100100046/test-types" | jq
Its response is shown below. It is long, so we are not showing the entire response here.
{
  "component_type": {
    "name": "Test_Parts_3",
    "part_type_id": "Z00100100046"
  },
  "data": [
    {
      "comments": "Testing...",
      "created": "2022-04-22T15:49:13.519104-05:00",
      "creator": {
        "id": 12624,
        "name": "Hajime Muramatsu",
        "username": "hajime3"
      },
      "id": 223,
      "link": {
        "href": "/cdbdev/api/v1/component-test-types/223",
        "rel": "self"
      },
      "name": "Test_Parts_3_TestType_3"
    },
    {
      "comments": "Testing...",
      "created": "2022-04-22T15:07:07.456921-05:00",
      "creator": {
        "id": 12624,
        "name": "Hajime Muramatsu",
        "username": "hajime3"
      },
      "id": 218,
      "link": {
        "href": "/cdbdev/api/v1/component-test-types/218",
        "rel": "self"
      },
      "name": "Test_Parts_3_TestType_2"
    },
    {
      "comments": "",
      "created": "2022-04-19T10:17:00.887976-05:00",
      "creator": {
        "id": 12624,
        "name": "Hajime Muramatsu",
        "username": "hajime3"
      },
      "id": 217,
      "link": {
        "href": "/cdbdev/api/v1/component-test-types/217",
        "rel": "self"
      },
      "name": "Test_Parts_3_TestType"
    }
  ],
  "link": {
    "href": "/cdbdev/api/v1/component-types/Z00100100046/test-types",
    "rel": "self"
  },
  "status": "OK"
}
Three Test Types are seen, Test_Parts_3_TestType, Test_Parts_3_TestType_2, and Test_Parts_3_TestType_3.
Some other useful endpoints
There are some useful ones that you could easily try out:
- /users : list of registered users
- /users/whoami : your account info
- /users/<user_id> : user info
- /countries : list of countries
- /institutions : list of institutions
- /manufacturers : list of manufacturers
- /roles : list of roles, including lists of the corresponding users and Component Types
- /roles/<role_id> : info of a particular role
Useful links to bookmark
- Production version of the HWDB (WEB UI) : https://dbweb0.fnal.gov/cdb/login/sso
- Development version of the HWDB (WEB UI) : https://dbweb0.fnal.gov/cdbdev/login/sso
- Online documentation of the REST API (Redoc) : https://dbweb9.fnal.gov:8443/cdbdev/apidoc/redoc
- Where users can try API endpoints interactively (Swagger) : https://dbweb9.fnal.gov:8443/cdbdev/apidoc/swagger
Key Points
Two ways to communicate with the DUNE HWDB, with the WEB UI and the REST API.